I went to visit him last night because, well, mainly because he's working on something for ME. If I didn't get my own spot out there I'd be some upset. Yes, I do need my own craft room in the house and space in the garage, why do you ask?
A few months ago I saw a post on another decorating blog featuring a fold-up (fold-down?) workbench and knew I had to have one. If I can find the link I'll add it. Here are some pics of my inspiration:
Isn't that a great idea? Extra (always cleared) workspace that can be folded up out of the way when we need to park the car inside. So it's been a part of the reno plan from day one. Then...... a couple of days ago I changed my mind and decided I'd really rather just have a table in the middle of the floor. I figured I probably wouldn't use it if it was off in the corner. But the materials were already purchased so I was getting a workbench, dammit!
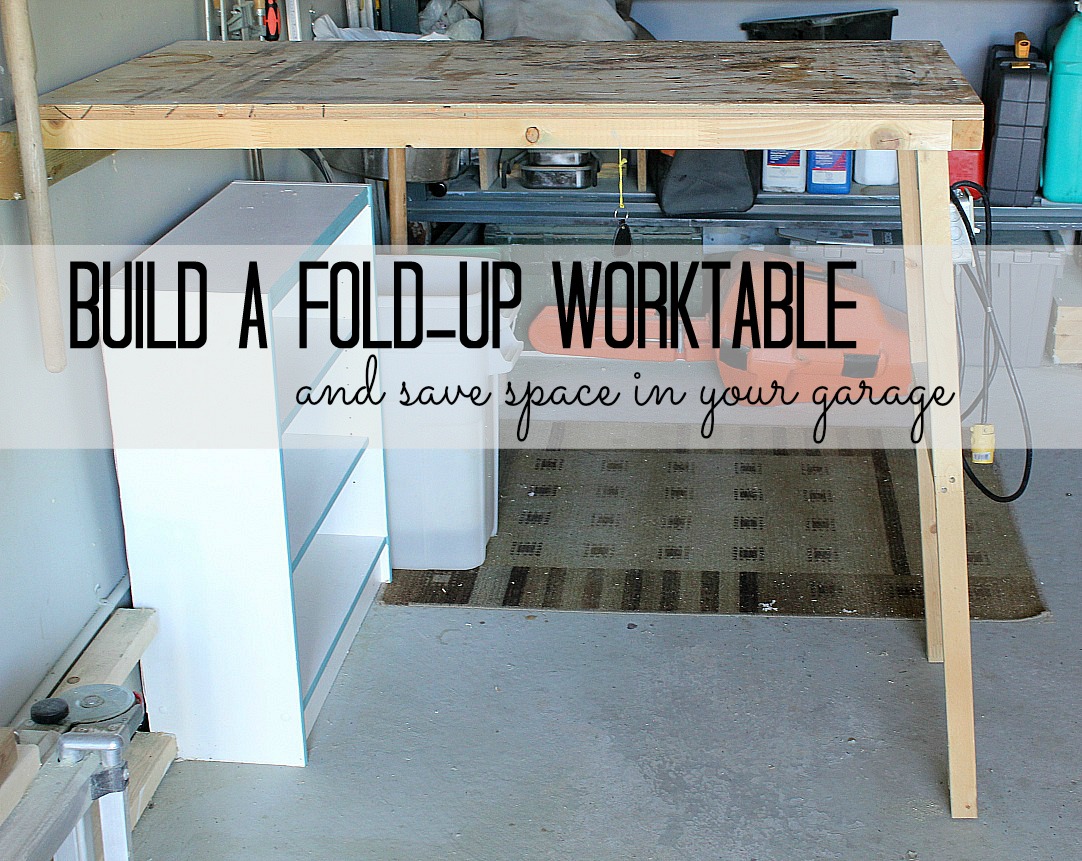
Tom reworked the original and I really like what he's done. I thought the long edge would be against the wall making just the front useful, but he built it so it folds out (like an ironing board) and now I can work all the way around it.
And it has legs for extra support.
Don't you just love how it folds up?
And the cute little hook to keep it in place?
Now could he just get the rest of the garage finished so I can start making a mess?
~~~~~
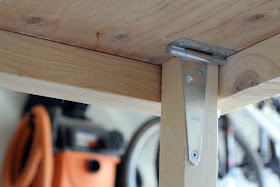
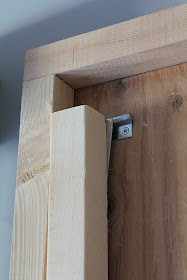
Update: People have asked for some detailed pictures of how it mounts to the wall and how the legs attach, so I've added more here.
There is a piano hinge attaching the table to the support board on the wall. Excuse the dust and dirt.
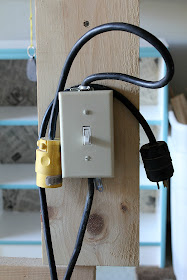
Since the original post we’ve also added an electrical switch to make it easier to use power tools. You plug your tool into the yellow end, plug the black end into the wall outlet (or an extension cord), and flip the switch. Power without having to run cords all over the place, and an easy shut off.
I hope these extra pictures help! If you end up building a fold down table of your own, please send me a link or a picture - I’d love to see it.
~~~~~
I'm linking to these great link parties!


do the legs lock when the table is down? if so how?
ReplyDeleteThe legs don't lock exactly, but the angle between the table and legs is a little more than 90 degrees so that keeps the table steady - kind of like a ladder. Does that make sense?
ReplyDeleteAwesome! Would you post a better picture of the hinges at the wall and on the legs? I think I have just about everything to make one of these.
ReplyDeleteHi Barb,
ReplyDeleteI just added some more pictures and instructions. Hope that makes it easier!
I don't quite understand how the hook works to hold up the table to the wall
ReplyDeleteHi Tricia,
ReplyDeleteThere is a hook mounted to the wall, and then a hole drilled in the table at the same level (when it's folded up). There is a key fob hanging from the underside of the table on a short string. When the table is folded up, the hook comes through the hole to the other side, and then the ring on the fob goes over the hook to hold the table in place. As long as you use something larger than the hole to go over the hook (like the old insurance fob we had), the table will stay up in place and out of the way. You might want to use a curvier hook (like a cup hook) if you're worried about the fob ring getting knocked out and the table falling.
Does that make sense? Let me know if you need a better explanation.
Hey there! Last weekend I was browsing around looking for folding workbench ideas when I came across yours. I just wanted to say thanks for posting the pictures of it and to let you know I built one. : ) Yay for awesome space saving work areas. Anyways, here a link if you want to check it out. I beefed it up some so I can put a drill press or miter saw on it but it's the same principal. Oh, and I also linked to your post! So, hope that helps. : )
ReplyDeleteCheers!
hm...a link would be helpful right?! ...here you are...http://wilkerdos.blogspot.com/2013/11/diy-fold-down-workbench.html
ReplyDelete; )
Sorry it took me so long to reply to this, April - your plans are fantastic! I looked at them right away and then forgot to comment. I love your modifications from our plan - it's really sturdy, and much better looking than ours! And great instructions - I always wonder if I'm writing too much, but you definitely kept it interesting and clear. Thanks so much for sharing!
ReplyDeleteAwesome! Great little DIY work table.
ReplyDeleteLove, love, love this idea! Thank you for sharing all of the details!
ReplyDeleteThank you - glad you liked it! We use it all the time.
ReplyDelete