Pages

Jan 31, 2012

Map Yourself

Have time for a little fun?

Katie over at Latte Love has put together an interactive blogger map
Go on over and add your location - it only takes a minute!


Keep in touch (maybe even arrange a meet-up) with online friends
on your travels around the globe!

Jan 30, 2012

Livingroom Revamp - During

So we spent the entire weekend painting. After a quick detour on Friday night to Big Daddy's for some wings.  We went over to the bar area for a drink while we waited for our order.  Probably not a good idea.  Rum & coke on an empty stomach meant that not much got done when we got home.

If you remember, this was our livingroom before.  For more detail of the "before" check it out here.  We were tired of the orange (you can say terracotta but I'm gonna call it orange), yellow, and green.  Really tired.


Friday night I finished up the sanding, edging the walls with white and generally cleaning up the dust. 


Bright and early Saturday morning we started with the taping.  Some people are very good at cutting in and rolling without taping, and I've painted quite a bit, but I still like to have the extra insurance of tape.  We used 3M's Scotchblue painter's tape with Edge-Lock and I'm not sure they're going to ask me to do a commercial anytime soon.  I really didn't see any improvement over the usual green tape.  There was still some bleed-through here and there.  I think in the future I'll just save my pennies and keep buying the cheaper stuff.

  
What we were impressed with was the Benjamin Moore paint we purchased.  Now I see why the salesclerk gave us a funny look when we said we usually use 1.5 - 2 gallons of paint per room.  It took just one can to do the entire livingroom.  Two coats. We only needed to open the second can to continue into the diningroom area. This paint went on so smoothly.  The two pictures below are after just one coat.


Coverage was amazing, and there was no backspray when rolling.  In fact I had barely any paint on my hands when I was finished.  I used a sponge roller this time and I am in love with it.  Smooth rolling and easy to clean.  They dry fast too.  We learn a little bit more each time.

So how about some pictures?  I only have a few, and it was dark by the time we finished cleaning up, so by no means is the room finished.  In fact, the furniture was put down helter skelter, just to have a place to sit. 


I want to wait at least a week before we put the outlet covers back on and hang the artwork we have.  I also need to paint all of the trim as it's still builder's white and I want it to be bright white.  I'm also going to paint the fireplace white.


Then it's on to choosing curtains and curtain rods, and all of the other decorations.  And maybe I'll even get around to adding pictures to the gallery wall frames. :-)

Jan 26, 2012

Livingroom Revamp - Before

I've been wanting to paint our livingroom for a long, long time.  You've heard (read?) me refer to it many times as the mexican restaurant.  This is not how it's usually decorated.  I just didn't add anything back after I took down the Christmas decorations.


Gallery wall with less than half the frames filled in.  Yeah, someday.

The big problem, besides picking a colour, was figuring out when we'd have enough time to do it.  We realized that it was going to have to be spread out over a couple of weekends.  The first one to pick out & purchase paint, then make sure we have all of our supplies, the second one to actually paint.  With some spackling and sanding during the week between.  It's Thursday night and we're not done with the sanding.  I'm worried for our schedule. 

I've been pinning paint colours onto Pinterest for the last few weeks.  All of them are in the neutral, grey-beige-taupe family.  Truth be told, they all look kind of the same online. I wanted something not only for the livingroom but that can flow throughout the first floor and perhaps up the stairwell.


Something relaxing and rich.  Not too dark because there isn't a lot of light other than in the livingroom, but nothing anemic-looking either.  We took my list of paint colours to the nearest Benjamin Moore and I have to say, the saleswoman was fantastic.  Her name is Kim and I think I love her.  I rattled off my list of paint colours while she zoomed up and down the paint wall grabbing chips.  I was expecting to have to find them myself but she had them all within a couple of minutes.  I then showed her a sample of our tile, our kitchen cabinet wood, and our furniture fabric, and she quickly began eliminating colours that wouldn't work, explaining why each time.  We narrowed it down to a few and finally settled on Ranchwood.


(Side note: a few months ago I had torn a page out of Style at Home magazine of a paint colour that I liked but I forgot to take it to the store with me.  Guess what colour it was?  Yep, Ranchwood.  I think it was meant to be.)


It looks more grey here. Maybe it's just my monitor. The shade is very close to the colour of the furniture, but I think with accent colours - haven't picked them yet - it won't look monochromatic.  I was concerned with finding something that would go with the green cabinets in case we stain them dark brown or paint them bright white.  Or leave them green because we run out of money.  (And yes, we are definitely replacing those white appliances.)


We're also limited by the tile colour.  In the kitchen and hallway it's not so bad, but the fireplace is also tiled with the terra-cotta orange. Tom is strongly against me painting them white.  How much worse could it be?


We hadn't planned on buying the paint there, just picking out the colour, but Kim's superior customer service won us over.  We had expected it to take most of the day but we were home with our paint in less than 2 hours.  So we got right to taking the room apart. 


The previous owners had installed surround-sound in the livingroom and removing the wire covers meant removing quite a bit of paint (and some drywall).


This is what's slowing down our progress.  We've spackled and sanded that wall for days.  Tom finally cut down into the drywall to form a shallow trench and then spackled on top of it.  There are also dozens of dents and holes in the walls.  I don't think they did any prep before they painted the orange.


I love this shot.  It looks like we have 16 foot ceilings.

Tonight I'm going to start painting around the ceiling, baseboards and windows with white the same way I did in the bathroom.  This takes care of any colour from the previous paint job being visible on the ceiling or trim.  I'm hoping to be able to start taping tomorrow night after work and then I might have something more to show off by the end of the weekend.

Wish me luck!

Jan 24, 2012

Camera Lens Sleeves

I have a really good camera bag.  It's a sling style and has plenty of pockets.  It looks something like this:


But I also like to be able to just put my camera in my purse and carry one bag around.  Unfortunately that doesn't protect my camera and lenses very well.  I came up with the idea of making little drawstring "pouches" for each spare part. 

Camera Lens Sleeve

I have a set of fleece sheets that are no longer used - they are soft and cushiony, but not bulky.  And I love the grey colour.  The pillow case alone provided more than enough material for me to fashion my pouches.


Here's what I did.

I turned the pillow case inside out and laid it out on a flat surface.  I took my longer 55-250 zoom lens and put it in the pillow case, sliding it down to the bottom corner.  Using a pillow case is nice because two of your seams are already sewn for you. 


I used a ruler and a Sharpie to mark where my other side seam should be. It should be snug but not too tight.  I measured two inches beyond the edge of the lens on the open end to allow the bag room to close (plus a hem) and marked it.
(radius is one inch - allow an extra inch for hem)

I removed the lens and drew straight lines to join the marks, making a rectangle on the material.  While you could draw the lines with the lens inside the pillowcase, I found that they didn't always end up being straight.  I cut out the "rectangle" and got to sewing.


You're going to close the top of the pouch with a drawstring, so there are going to be open edges where the string comes out.  You'll want a nice finished look there, so take your two raw edges on the open side and fold over the material - right side out - sewing a very small hem on each one, all the way top to bottom. 


Take your top open edge and fold it over 1 inch, right side out.  Sew all the way across the opening about 3/4" from the edge. 


Do you see how you have a nice finished edge at each end?  Aren't you happy you sewed those tiny hems?


Turn your pouch inside out and sew the open side together, keeping as close to the first hem as you can. Only sew up as far as the stitching that goes across the top.  You don't want to sew your drawstring opening closed.

Camera Lens Sleeve

If the bottom isn't already sewn for you, sew it closed now.

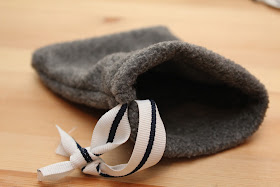
You now need to string a ribbon or cord through the top.  I used a navy & white flat ribbon that used to be the handle of a shopping bag.  Resourceful, yes?  I have found that the easiest way to string the ribbon is to attach a safety pin to one end and feed the pin through the hole. 


Slide the ribbon all the way through, tie a knot at each end to keep it from slipping back , turn your pouch right side out and admire your work.

Camera Lens Sleeve

Camera Lens Sleeve

The lens fits perfectly and I'm not so worried that it's being damaged in my purse.  I might keep it in the pouch even when it's in the camera bag in case it should fall out (not that that's ever happened - not more than once anyway).

Camera Lens Sleeve

Camera Lens Sleeve

Camera Lens Sleeve

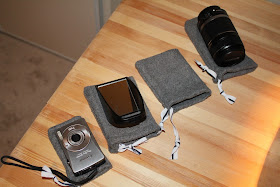
I then went ahead and made a pouch for my smaller lens, my Lightscoop flash redirecter, and my little point and shoot.  It's especially good for small cameras as they're always getting tossed in a bag or knapsack (as you can see from the scratches on it already).

Camera Lens Sleeve
(See the difference when the flash isn't bounced?)

Camera Lens Sleeve

Camera Lens Sleeve
my little army

I think I'm going to make one for the camera body, and probably one for the battery recharger because that cord is always all over the place, even when it's in the camera bag. 

Yes, I'm out of control.  Snuggies for everyone!


Jan 18, 2012

Homemade Pizza

Pizza is a favourite in our household.  We have it at least twice a month if not more.  But not that greasy delivery stuff.  Mine is homemade.  Or I guess more accurately, semi-homemade, since I don't make the crust myself.  I like food to be ready FAST.


Most of the time I buy flatbread rather than the usual pizza crust.  It's pre-baked so it doesn't get soggy in the middle.  And the texture is just...better.  Less doughy?  More chewy?  I dunno.

I like to get a bit non-traditional with the sauce.  Sometimes I mix sweet chili sauce with ranch dressing.  Sometimes it's sweet chili sauce and bbq sauce.  And then sometimes it's just sweet chili sauce.  Hmmmm, think we like sweet chili sauce? Think I just like saying "sweet chili sauce"?


Vegetables are a must.  In fact, often we just have a vegetarian pizza because that's all that's in the fridge.  Lots of mushrooms, sweet peppers, onions.  This time I added spinach, broccoli, and cauliflower.  That's a lot of vegetables.  If there's sausage, bacon or hamburger thawed I'll fry that up while I'm chopping the veggies.  It really takes no time at all.

Then on to the shredded cheese.  I usually buy whatever catches my eye. Tex-mex is pretty good. This one was straight mozzarella.  Nice and stringy.


Finally a sprinkling of spices.  Cause chili sauce isn't enough.  Oh no, there has to be black pepper at the very least.  This pizza also received a nice dose of steakhouse pepper seasoning.


The last and most important step is to fold aluminum foil around the edge of your pizza.  This keeps the edges from getting dried out and hard.  I wish I'd figured this out sooner - every pizza turns out perfectly now. Then into the oven for 20 minutes and it's done.


Check it out.  You want some, don't you?


I like that this pizza is light.  You decide how much cheese to add.  You decide if you want meat or not.  There is barely any oil and fat in this pizza and yet the flavour is still all there.

Here are some photos of pizzas past.


The only problem is that there are never any leftovers!
~~~~~~~~~~

Linking up to these parties this week!