The princess got a new bed this weekend.
You're not tired of posts about my dogs, are you? This one is only dog-adjacent so it won't be too bad.
Our dogs have too many dog beds. I'll say that up front. One in every room. Sometimes more than one. But that doesn't stop me from wanting to buy more. Have you seen the ones at Costco? They are so nice. The dogs wear them out fast because of the necessary "fluffing" that must be done, and the fact that one little dog still thinks she needs to remove the zipper and piping whenever possible.
We just replaced our curtains - you know about that - and I thought the material from the old ones would make excellent dog bed covers. It's thick - almost like a brocade.
The bed I chose to cover first is a thick, cushy, orthopedic jobbie. It did have a fluffy, sheepskin-like side. Now it has see-through netting. And it did have piping. Now it's more like fringe.
So Chloe and I got down to making the new cover.
It's nice that she likes to help.
The bed is a simple rectangle with piping all around. And I wanted to put a zipper at one end so that I could remove the cover and wash it easily.
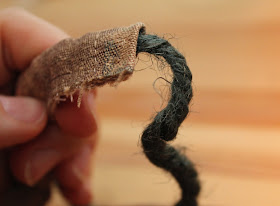
With this configuration I only needed to cut two more side pieces from a new curtain, and some more lengths for piping. After cutting it all out I realized that the hems I had already cut off would make excellent piping, I would just have to feed rope through them, no sewing required. That saved a lot of time, and headaches (and swearing). The swearing came later.
Then began hours of pinning and sewing. I sewed the piping onto one side of the material, and then sewed the second piece to it. I tried to attach all three at the same time but I just wasn't coordinated enough.
So huge delay. But my new machine is a beauty. That zipper went on with no problem. Remind me not to be so ambitious as to attach a zipper right at the piping next time.
Finished product! I must say, I'm pretty darn proud of it.
And I think Chloe likes it.
It's hard to tell because I finished it at 11pm and she just wanted to go to sleep.
She was nice enough to let Sasha have a turn on it.
Now I just have 3 more to do. I should have an update around October. :-)
~~~~
I'm linking to these parties this week!


What a nice dog bed cover! I love that you used your old curtains.
ReplyDeleteThis looks great! I really need to make something more fashionable for my pup. I may just have to dive in :-)
ReplyDeleteI too have a bigger dog and her bed definitely gets lumpy and flattened out in no time! It can get pretty expensive having to buy a new one every 3 months or so. I love this idea of making a bed like this. It seems pretty sturdy:) Thanks for the post!
ReplyDeleteWhat a nice mom you are, you made a new bed and recycled curtains that would of gone to the trash....The dogs are so cute, I like the one with the tape measure liked he's helping........cute andi
ReplyDeleteHow bad could it be, right? :-)
ReplyDeleteThank you!
ReplyDeleteThank you!
ReplyDeleteOh, that's great. We have a bunch of dog beds around here that don't look as nice as that one does. Chloe and Sasha are lucky little babes. Thanks for sharing at our party this week.
ReplyDeleteCan you believe I almost threw them out?
ReplyDeleteThanks!
ReplyDeleteThank you!
ReplyDeleteThanks!
ReplyDeleteThank you! It's all about making the dogs happy, right? :-)
ReplyDeleteThank you!
ReplyDeleteThat is an awesome idea!! Looks like the dogs really love it! Thanks for sharing this as well at Thursday's Temptation.
ReplyDeleteJill
Great job! I love that you covered and added the piping! The details make all the difference! You did a really nice job and it looks fantastic!
ReplyDeleteThanks for linking it up at Creatively Living!--Katie
Haha. Too cute. The pillows too. :D Just kidding love it all. Thanks for sharing on BeColorful
ReplyDeletepam
What an amazing job you did! A great use for old curtains. Thanks so much for sharing at Mom On Timeout!
ReplyDelete