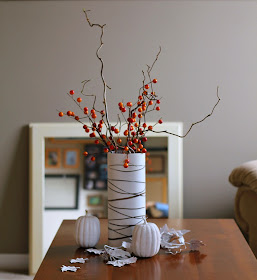
Luckily, depending on how you fill the vase, it can be used year round. In fact, it gives off a bit more of a winter vibe to me than a fall one. What say you?
I've seen this idea all over the place - check out a couple of versions here and here - and knew I had the perfect vase for it. I bought this 12" vase at one of my company yard sales, for $1 or $2 I think. Don't you love the height and the thick, heavy glass it's made of?
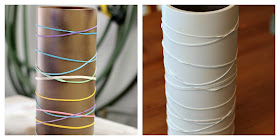
I liked Emily's (Merrypad) way of spray painting with shades of brown first to give a more natural bark look rather than having it be clear in the unpainted spots. I used two colours, Rustoleum's espresso and nutmeg, both in a satin finish. You know, I kind of like how the browns blend and wouldn't mind having a vase just like this.
Once it was dry I added rubber bands in a random non-pattern and then started spraying on very light coats of white. True confession time - I was so excited to get to the painting that I accidentally started spraying on the white before I put the elastics on. Thank goodness it was just a little mist in one spot when I realized what I was doing and stopped. Tom says he wished he had the camera ready because the look of horror on my face was priceless.
Several coats later I let it dry completely and then snipped off the rubber bands. The edges where the elastics met the glass were a little rough in places so I sanded them with a high-grit sandpaper. There are imperfections where the elastics were, but I think that makes it more natural. Have you ever seen a perfect tree?
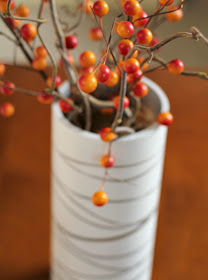
There isn't a lot of foliage around to decorate with this time of year, so I snipped off some branches from our tree out front. The tree has these crazy wiggly branches and the leaves always look like they're dying for a drink. If you know what kind of tree it is, please let me know. I also added in some orange and red berries from the dollar store.
And even though there are brown undertones, the light does still pass through the glass and give it a glow in the afternoon.
~~~~~
I'm linking up here this week!


I'm in love with this Barb! We don't have birch trees here but I fell in love with them when we were in Michigan recently! Pinning this to try for myself :-)
ReplyDeleteLove this! Thank you for sharing! One to try for sure.
ReplyDeleteThat looks great! Birch trees are my favorite also. I have two that I planted about 10 years ago and their bark is so nice and peely.
ReplyDeleteThat looks really great! I can't wait to try this myself. New follower.
ReplyDeleteDanielle www.thesweetpeapod.blogspot.com
OO so pretty! I think ill try this for Christmas...we shall see!
ReplyDeleteWow, the vase came out fantastic! Nicely done.
ReplyDeleteGreat idea! I found a birch tree in the woods a while back, but I couldn't get to it so I'm glad to see this project.
ReplyDeleteLOVE your vase.... I can't believe you used rubber bands...!! What a brilliant idea!
ReplyDeletehugs x
Crystelle
This turned out really cute - I love when I find a deal on something someone else no longer wants!
ReplyDeleteSo creative and pretty. Thanks so much for sharing on "I GottaTry That"
ReplyDeleteHave a great Thanksgiving.
Marcie
Thanks for linking up to The Weekly Creative last week - I'm featuring you today! I'm also hosting my first official giveaway and would love for you to check it out.
ReplyDeletehttp://sewingbarefoot.blogspot.com/2012/11/the-weekly-creative-9-and-giveaway.html
Have a great day!
Shannon @ Sewing Barefoot
I love birch trees! This is such a beautiful idea.
ReplyDeleteThank you! I can't help staring at it myself - it makes me so happy.
ReplyDeleteThanks Shannon!
ReplyDeleteThank you! You too!
ReplyDeleteThanks!
ReplyDeleteThank you!
ReplyDeleteI hope you do! Let me know how it turns out!
ReplyDeleteThank you!
ReplyDeleteAhhh, I'm jealous! I really want to plant a birch tree this year.
ReplyDeleteThank you!
ReplyDeleteI love this! It's absolutely beautiful and would match my house perfectly! I'm pinning it!
ReplyDeleteVery pretty!! Thank you so much for sharing at Sharing Saturday!!
ReplyDeleteLove this! I am featuring you tomorrow! Thanks for linking up!
ReplyDeleteKim
This is gorgeous!! I tried doing that before and totally failed! Yours looks great. I think I did too many coats on my so it didn't look right when I pulled the rubber bands off. Thanks so much for sharing at Thursday's Temptation 2 weeks ago! I will be featuring this at this weeks link party tonight on my blog!
ReplyDeleteJill
I LOVE this!! I'm trying to finish up my Christmas decor and am looking for ideas for my table center piece. I may have to try this. Rubber bands...who knew??!!
ReplyDeleteMy sister and I host a joint link party...Think Tank Thursday and would love for you link this up there. http://www.saving4six.com/2012/11/welcome-to-think-tank-thursday-7.html
Very cool. i like how you painted it brown first instead of leaving the glass clear.
ReplyDeleteThanks! I have to give credit to Emily at Merrypad.com for that idea though!
ReplyDeleteThank you!
ReplyDeleteThanks! I was worried I had too much paint (hard edges where the rubber bands came off) but I sanded them a bit and it worked out fine.
ReplyDeleteThanks, Kim!
ReplyDeleteThank you!
ReplyDelete