Pages

Dec 31, 2012

Hot Chocolate (on a Stick!)

Hey everyone!  Are you still on a Christmas sugar high? I had to send a huge bag of chocolates/goodies to work with Tom just to get it out of the house. But there is still too much of it around. And this doesn't include the two pies and 15 or so cupcakes in the fridge.


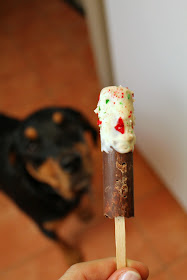
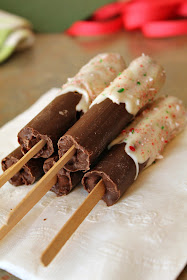
But I'm not completely innocent - I made chocolate treats to give out to our friends and family too. This is hot chocolate - on a stick! You just need to stir one into a cup of hot water or milk until it melts and you're done. You can even eat them as they are if you're in need of a chocolate fix!

Hot Chocolate on a Stick - Turtles and Tails blog


It's a pretty simple recipe that just requires some patience.

You'll need:
Chocolate for melting - discs or bars
Unsweetened cocoa
Icing (confectioner's) sugar
Molds - icecube trays, popsicle trays, - get inventive!
Coffee stirsticks or popsicle sticks

You'll also need a place to put the sticks while the dip is hardening. We cut slits into some cardboard and set them up on top of plastic containers.

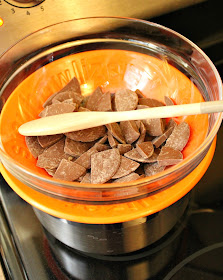
You'll start by setting up a double boiler on the stove. We used a pot filled with an inch or two of water, a glass bowl to hold the chocolate, and a Staybowlizer between to keep the bowl in place. The Staybowlizer is the best invention ever. No need for extra pots that are rarely used.

Hot Chocolate on a Stick - Turtles and Tails blog

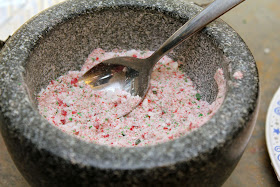
You can use whatever chocolate you like - we bought some chocolate melts from the local bulk store in Belgian milk chocolate. We also bought candy melts in different colours, and some crushed candy canes for decorating.

Hot Chocolate on a Stick - Turtles and Tails blog

Break the chocolate up and melt it slowly in the bowl. With the double boiler you don't really have to worry about it burning or melting too quickly. I was so nervous the first time because I read all about getting it too hot, or not letting any liquid touch it, but as I went along (4 batches? 5 batches? There were some errors) I got more relaxed.

Once the chocolate is melted start adding your powdered cocoa and icing sugar, a bit at a time, until it is blended well. My measurements weren't exact, maybe 3 tablespoons of each for every 4 (pre-melted) cups of chocolate. You don't want to add too much as this will make the mixture too stiff and it won't pour into the mold.

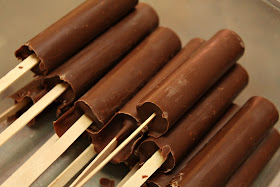
Spoon the mixture into your mold, filling them about 3/4 of the way. Once full, tap the mold against the counter a couple of times to remove any air bubbles. Slowly insert your sticks into each section making sure they don't go all the way to the bottom. We found these cool ice cube trays that were long and skinny - perfect for a mug. (These ones are also fun if you want to do cubes instead.)


Hot Chocolate on a Stick - Turtles and Tails blog

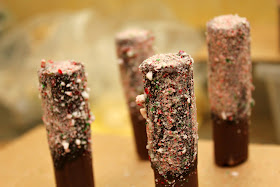
Put your mold in the fridge and let it cool for 2 or 3 hours. The chocolate blocks should pop out fairly easily when you pull on the sticks. We were lucky in that the bottom of our ice cube tray popped off and we could push the chocolate out from the bottom.

Hot Chocolate on a Stick - Turtles and Tails blog

You can leave the sticks the way they are and they're ready to use, or you can decorate them to make them a little more fun. 

To decorate:
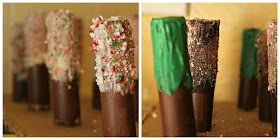
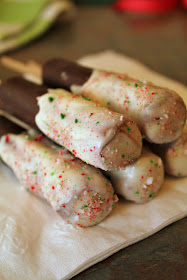
Heat some candy melts in the double boiler the same way you did the chocolate. We used white, green, and dark brown melts - each in a separate dish. I think the white ones turned out the nicest. Use a pastry brush to quickly brush the melted candy onto each stick and then sprinkle the crushed candy cane all over it. You probably think it would be easier to dip them, but the chocolate melts too quickly and you'll end up with a funky looking finished product. 

Hot Chocolate on a Stick - Turtles and Tails blog

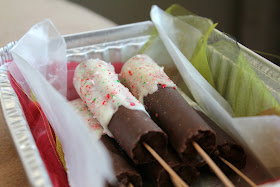
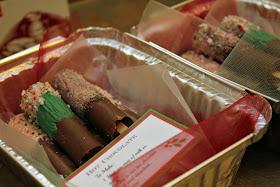
I used foil takeout containers from the dollar store to package them up. Inside I layered green and red tulle, and then wax paper to protect the chocolate.

Hot Chocolate on a Stick - Turtles and Tails blog

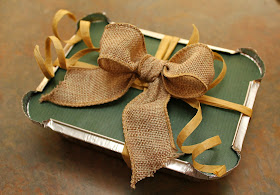
I glued solid green wrapping paper to the lid of the container to fancy it up, and then wrapped it with raffia and a burlap ribbon bow.

Hot Chocolate on a Stick - Turtles and Tails blog

I also included instructions inside so that people would know what to do with the sticks.

Hot Chocolate on a Stick - Turtles and Tails blog

How about that? Once I got the hang of it there wasn't much to it and the result was so, so pretty. I hope everyone who received a box loved them as much as I loved making them.

Hot Chocolate on a Stick - Turtles and Tails blog

Hot Chocolate on a Stick - Turtles and Tails blog

Hot Chocolate on a Stick - Turtles and Tails blog

Hot Chocolate on a Stick - Turtles and Tails blog


~~~~~

I'm linking up here this week!


Dec 26, 2012

Easy Breakfast Bake

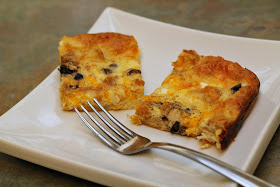
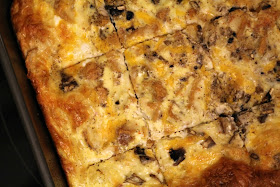
I made a quick and easy breakfast on Christmas morning that you just might want to try yourself - maybe for New Year's Day brunch?

Breakfast Bake - Turtles and Tails Blog
Breakfast Bake

Ingredients:
1 lb of ground sausage, beef, or bacon - cooked and crumbled
1 pkg of refrigerated crescent roll dough
2 cups of shredded cheese
4 eggs
1 cup of milk
salt & pepper to taste

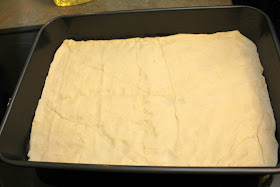
You'll start by greasing a 9x13 baking dish and preheating the oven to 425 degrees. Open a tube of crescent rolls and spread them on the bottom of the baking dish, pressing the dough to close the perforations.

Breakfast Bake - Turtles and Tails Blog

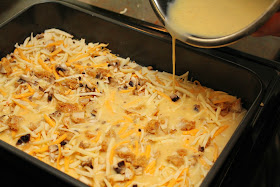
Sprinkle the meat and cheese evenly over the pan. The recipe calls for ground sausage but we didn't have anything defrosted, and I was hungry, so I substituted some leftover Popeye's chicken tenders, cut up into tiny pieces. I also sprinkled on some fresh, chopped mushrooms.

In a mixing bowl, add the eggs, milk, salt, and pepper. Whisk them together until blended. We left out one egg and added a tiny bit of ranch dressing - maybe a half a tablespoon. I've discovered that the ranch dressing makes the eggs really fluffy. I also added a squirt of sriracha sauce for some kick.

Breakfast Bake - Turtles and Tails Blog

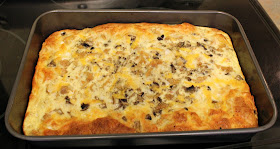
Pour the egg mixture over the meat and cheese, and bake in the oven for 15 minutes or until set. Let the pan cool for 5 minutes before cutting.

How good does that look?

Breakfast Bake - Turtles and Tails Blog

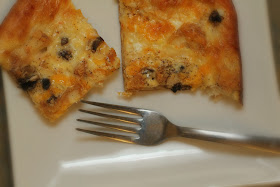
This recipe made enough for 2 people with leftovers for a snack later.

Breakfast Bake - Turtles and Tails Blog

Breakfast Bake - Turtles and Tails Blog

Breakfast Bake - Turtles and Tails Blog


This may become a new Christmas morning tradition!


~~~~~


I'm linking up here this week!


Dec 24, 2012

Merry Christmas!


Merry Christmas 
from the Turtles and Tails household!


We hope you all have a wonderful holiday 
and we'll see you again later in the week!


Dec 19, 2012

This Little Tree of Mine, I'm Gonna Let It Shine


I put up another tree today. A little guy that just oozes personality. I'm pretty sure that I bought him at Goodwill last year. I was shocked he was there at all - this was a pre-lit tree with a burlap base. And there is no way he was over $10 ('cause I know how cheap I am). Score, me.

pipe cleaner tree - Turtles and Tails blog

I put him on the end of the bar in the basement TV room. We rarely use the bar and it was looking sad and neglected. Except for the jar of jellybeans that is mysteriously emptying by leaps and bounds. Or by handfuls and mouthfuls. Jelly Belly, you are an evil temptress.

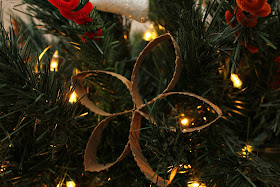
Because the tree is so small I couldn't go overboard on the decorations, so I used a few glittery bells and balls, and some twisted pipe cleaners. Do you remember seeing these on my main tree last year? I first saw it done on Bower Power (her mom does it every year) and I fell in love with the idea. I call ours the Dr. Suess tree because the pipe cleaners look so crazy.

pipe cleaner tree - Turtles and Tails blog

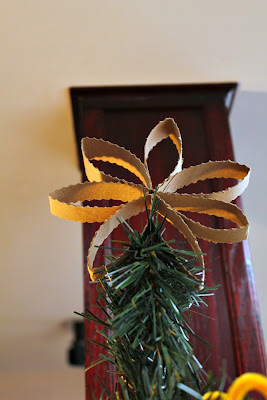
I also added some homemade stars made from toilet paper rolls. Everything can be repurposed, can't it? The edges were cut with some wavy-edged scissors and then the rings were glued together.

pipe cleaner tree - Turtles and Tails blog

We're now up to 4 trees in the house - wall tree, book tree, regular tree, and this beauty. And I found a tree made of pinecones in the storage room the other day that I'd completely forgotten about. I bought it last year at a post-Christmas sale. Now where am I going to put that one?

pipe cleaner tree - Turtles and Tails blog

pipe cleaner tree - Turtles and Tails blog

pipe cleaner tree - Turtles and Tails blog


Dec 17, 2012

Lacy Pinecone Ornament

Can I drop one more Christmas craft on ya? Am I really giving you a choice?

This Christmas tree ornament idea has been sitting on my Pinterest board for a while, and with only 8 days left until Christmas it was time to get on it!

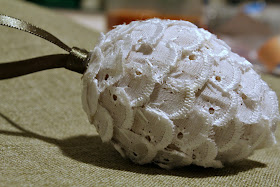
It's a pinecone ornament - seriously, I have a pinecone sickness - with "leaves" made of lace edging.

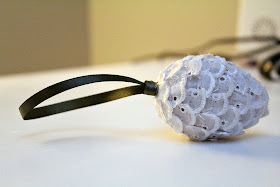
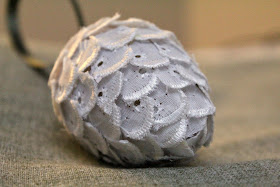
Lace Pinecone Ornament - Turtles and Tails blog

Go to Bliss Bloom Blog to see the inspiration. I wish I could photograph mine so beautifully.

I made this ornament the same way as my pinecone map ornament. You'll start with a round or egg-shaped form. Mine is a papier-maché egg that I think I bought at a Restore or at Goodwill. I couldn't find styrofoam eggs anywhere and then I stumbled across these ones already in my stash. Doesn't it kind of look like an avocado pit?


The lace edging was just a small package from Walmart. I did buy two, and stained one of them with tea, but I didn't really like the look compared with the clean whiteness of the undyed lace.


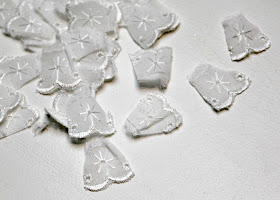
I took the lace edging and cut it up into little wedge-shaped pieces. I found that I  had to make them pretty small - my first attempt yielded a huge pinecone and the leaves all turned outwards.


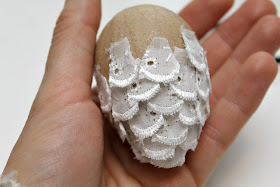
I used hot glue to attach the leaves to the egg, but you could use straight pins like Melanie did, or you could use white school glue if you have more patience than I do. Start by gluing a small round piece to the very bottom so that the form isn't visible through the leaves. Then one by one, attach the leaves in an overlapping pattern all the way to the top.

Lace Pinecone Ornament - Turtles and Tails blog

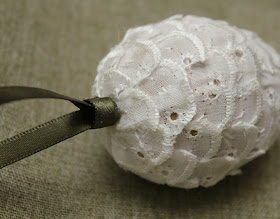
It's your choice whether you attach the ribbon before or after you glue on the leaves. I chose afterwards. I glued some green ribbon to the very top, and then glued a little collar of ribbon around the base of the loop to help it stand upright.

Lace Pinecone Ornament - Turtles and Tails blog


I also added a drop of glue underneath any leaf that was turned upwards.

I love these easy crafts. Start to finish it didn't take more than an hour to complete. And the lace adds the perfect amount of vintage that I was going for on the tree this year.

Lace Pinecone Ornament - Turtles and Tails blog

Lace Pinecone Ornament - Turtles and Tails blog

Lace Pinecone Ornament - Turtles and Tails blog

Lace Pinecone Ornament - Turtles and Tails blog


~~~~~

I'm linking up here this week!


Dec 13, 2012

All About Keeping the Dog Happy


This doesn't really have anything to do with anything, except

this was Chloe last night (and practically every night),


and this is a youtube video I saw today.


I think we've found Chloe's new favourite Christmas movie.


Dec 12, 2012

Feeling Ornamental

How are your holiday decorations coming along? I decorate in fits and starts - I'll get ambitious and knock out 3 projects simultaneously, and then I'll have a couple of days of just not feeling it. Unfortunately, I usually get in a creative mood when I'm at work and can't do anything about it (thanks, Pinterest!)

Here are some of the ornaments I made last year. I was feeling very gung ho and crafty. 

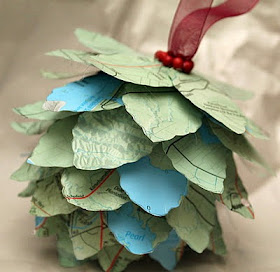
The pinecone map ornament was my first one, and to this day is still my favourite. There is something about the shape and texture of a pinecone (real or crafted) that appeals to me.

Pinecone Map Ornament - Turtles and Tails blog

And that's what made me make one from birch bark as well. It doesn't hurt that birch is my favourite tree. 

Birch Bark Pinecone Ornament - Turtles and Tails blog

Like so many other people, I collect sand from the beach whenever we go on vacation. I liked the idea of displaying some of that sand on our Christmas tree with these glass vacation memory ornaments.

Vacation Memory Ornament - Turtles and Tails blog

I tried my hand at mod podge for the first time last year as well. I bought a book of sheet music from a local used book store and cut the sheets into strips to be applied to a styrofoam ball. The song I picked was "Jingle Bells" - fitting I think.

"Jingle Bell" Mod Podge Ornament - Turtles and Tails blog

The last ornament style was the simplest - just scraps of ribbon inserted into a clear glass ornament. I love this ribbon though - so glittery. And the colour of the outside ribbon changes depending on how the light is hitting it.

Ribbon Filled Glass Ornament - Turtles and Tails blog


Do you make handmade ornaments? 
Are they ones you keep year after year, or do you like to switch them out periodically? 
Mine are still around, but I'd like to try my hand at some Victorian-styled ones this year.


Dec 10, 2012

Christmas Mantel with Nature...and Glitter

We are slowly, s-l-o-w-l-y getting the house decorated for Christmas.  I have so many ideas and not enough time to finish them all. And truthfully, I take a lot of breaks. I'm afraid that some of the things I started - like my poor papier mâché reindeer - aren't going to be ready for this Christmas. But I have a huge head start on next year, right?

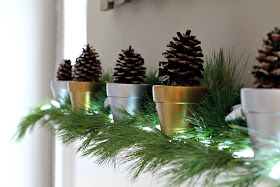
One area I did finish was the fireplace mantel. I really love it. The colour scheme for the whole room this year was kept simple with only silver, gold, white, & blue. I'll admit I stole this idea from Jessica at Decor Adventures. I did tell her I was going to steal it though, so I don't feel as guilty. It's too beautiful an idea not to emulate.

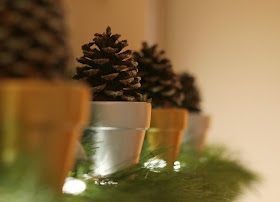
glitter pinecones with painted flower pots - Turtles and Tails blog

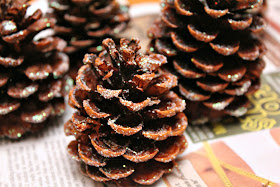
I started by glitterizing some large pinecones. The first thing you'll want to do is apply glue to the tips of the pinecone with an artist's brush. I think you could also use spray adhesive but I'm not sure if it would dry too quickly.

glitter pinecones with painted flower pots - Turtles and Tails blog

I then used my bottle of white glitter and shook it all over the pinecone. You'll want to have a plate or paper under the pinecone to catch all of the excess.

glitter pinecones with painted flower pots - Turtles and Tails blog

Once it's dry, shake off all the excess glitter onto the plate. Isn't that pretty? It looks like sugar.

glitter pinecones with painted flower pots - Turtles and Tails blog

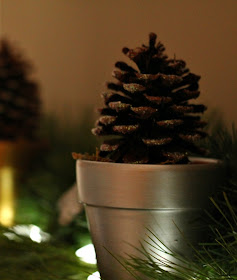
I bought some small flowerpots from the dollar store and painted them gold and silver. The pots came with moss and a flower already in it - the moss made a great base for the pinecone to sit on, but I just tossed the flower. I used regular acrylic paint on the pots and it took several coats, but I think I ended up with a smoother finish than I would have if I'd used spray paint. Plus I didn't have gold or silver spray paint in the house, so that probably would have slowed me down a bit. :-)

glitter pinecones with painted flower pots - Turtles and Tails blog

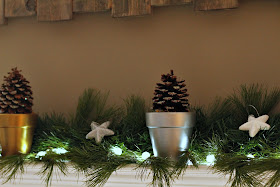
Once everything was dry, I arranged the pots on the mantel and wove some battery operated lights between them. I'm really digging the battery-operated lights this year. So much nicer than having extension cords running all over the place. I then tucked some greenery between the pots and all around the lights - harvested from the forest the day we collected branches for the wall tree.

glitter pinecones with painted flower pots - Turtles and Tails blog

I also added some silver and white star-shaped, glitter-covered ornaments between the pots. I think they look a bit like starfish, and you know how I like to add a little beach to everything.

glitter pinecones with painted flower pots - Turtles and Tails blog

And that's the mantel. 

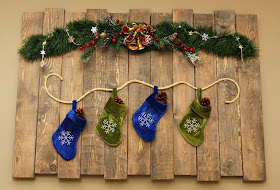
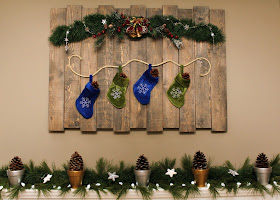
But what about above the mantel? Tom and I built this wall hanging - for lack of a better word - for about $10 - decorations included.

Scrap wood wall hanging - stockings - Christmas - Turtles and Tails blog

We cut pieces of 1x4 to 26" lengths, and then attached them to each other in a staggered pattern with a piece of plywood across the back. I then used my favourite stain + watered-down paint method of aging wood to look like barn boards. Lastly, I attached some artificial greenery, decorations, and some miniature stockings.


I strung the stockings on some heavy twine and then stapled the twine to the board. I added some smaller pinecones to the stockings so they looked a little full and to bring in more nature. Everything is stapled on so it can be removed easily and changed up for another season if we want.

I love this so much. I can't help but smile at it every time I walk in the room.

Here they are all together. So sweet and so simple. 

Christmas mantel - glitter pinecones & wooden wall hanging - Turtles and Tails blog


I'm glad to have this part done. Tonight we were working on decorating the front porch, but it was way too dark for pictures. And the tree is done (I think). I keep finding more ornaments to add. 

How much decorating do you do?

glitter pinecones with painted flower pots - Turtles and Tails blog

glitter pinecones with painted flower pots - Turtles and Tails blog


~~~~~

I'm linking up here this week!