It's time once again for another Pinterest Challenge - winter edition this time. The Pinterest Challenge is a get-off-your-butt-and-make-that-thing-you-pinned declaration started by Sherry from Young House Love and Katie from Bower Power. This edition is also co-hosted by Megan from The Remodeled Life and Michelle from Decor & the Dog.
I've participated a few times before - check out my photo bottles, yarn eggs, fold-up patio bar, and my favourite - the poop factory costume for the ever-patient Chloe.
This time I wanted to try something a little bigger, though since I can only do this DIY stuff on the weekends it couldn't be too big. How about a little nightstand makeover?
My go-to method of refinishing wood is to sand it down, wipe on dark stain, wipe on watered-down paint, and then wax and buff it to a shine. I love the results - every time it turns out a little different depending on the stain and paint colour I choose. If you'd like to see some of my past results go here, here, and here.
But colour me surprised when I found out there is a name for this method - it's called "cerusing". Except there is one additional step - you use a wire brush on the wood before staining and painting so that the paint gets right in the grooves. When you wipe off the excess paint, you get little spots of paint left behind. It's a great way to camouflage imperfections in the wood when you can't sand the heck out of it (like with wood veneer).
I first saw this on The Ridiculous Redhead and had to pin it. I love the results I've had so far, but paint in the grooves would add some extra depth that's been missing.
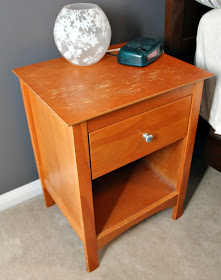
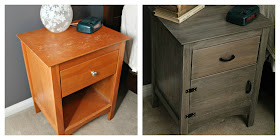
This is the nightstand that volunteered for the makeover. Plain, serviceable, nothing to write home about.
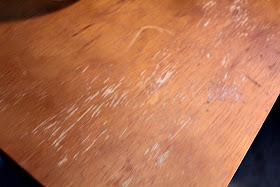
Someday we'll build ones that we love, but the to-do list is so long right now that it won't be any time soon. I'm not a fan of the orange stain and the top has some pretty bad water damage. But the body/frame is real wood, although with particle board/veneer on the top and thin plywood on the sides. Materials that make sanding an adventure.
Do you know that I sanded them in the bathroom? Well now you do. I didn't want to go out to the freezing cold garage - we have a kerosene heater there but it burns my eyes after only a few minutes - and I didn't want fine stain/lacquer dust all over the house, so I chose the bathroom. The tiny, tiny bathroom. Pretty brilliant, I think. It only took about 90 minutes to completely strip each nightstand, though every surface in the room ended up covered in dust. And I sanded them on two different nights so I ended up cleaning the bathroom from top to bottom twice in one week. It's the hard-knock life.
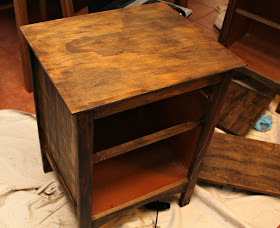
They look pretty good naked, don't they? Tom thought I should leave them like that. Does he not know me at all? There's experimenting to do, y'all!
I used a wire brush to scuff up the wood - in the direction of the grain - on every surface of the stand. The veneer looked pretty cool because the brush would take out little divots rather than make big scratches. Don't forget to lightly sand again to smooth down the edges of the grooves when you're done.
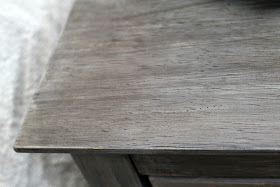
I used a cloth to apply a thin coat of stain - Jacobean by Minwax - and then once it was dry applied a coat of "whitewash paint" with a new cloth. The colour I used was a mistint from the Habitat for Humanity ReStore - sort of a taupe-y shade with almost a pink undertone.
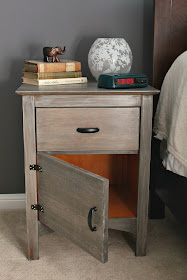
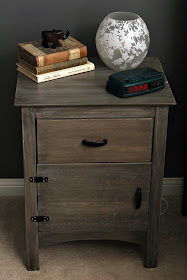
But wait! There's more. I didn't want to sand the inside of the nightstand - thin plywood, remember - but I also didn't want the old orange to show. So we built a door for the front of each that swings to the side and is attached with exposed trunk-style hinges. We swapped out the silver knobs for black handles as well. Lee Valley Tools has the most amazing selection of hinges and handles - everything from basic knobs to fancy shapes and hammered metal.
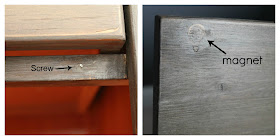
To make sure the door stays closed, Tom inserted a crosspiece below the drawer and screwed in a flathead screw flush to the wood at one end. He then countersunk a magnet in the back of the door that lined up with the screw and keeps the door closed when you want it to be. I applied a thin coat of wood putty over the magnet and the screw to make them less visible.
How about a little before-and-after?
I'm going to call this a win and keep practicing my cerusing skills.
Now head on over to the host sites and see what everyone else was up to this week!
~~~~~
I'm also linking up here this week!








Wow this looks amazing!!!! So impressed!
ReplyDeleteLove the finish. It looks great with the wall color!
ReplyDeleteWell I just learned something new! I had never heard that term before, and the results are great! Hope you can stop by the enchanted oven.
ReplyDeletexo,
Lisa
I love the way it turned out! I think the color looks amazing! PS - we have those same lamps from ikea :).
ReplyDeleteIt looks great! And the inside orange coordinates so nicely with the finish too :)
ReplyDeleteI've never heard of carusing :). So this was a very informative post. And your nightstand looks cute!
ReplyDeleteI'm so happy I have inspired you with cerusing!! The nightstand looks great.
ReplyDeleteHOLY COW! I love it! it looks sooo much better!
ReplyDeletePS found you from Decor & the Dog Link up :)
letsjustbuildahouse.blogspot.com
Love it! What did you use for "whitewash paint"?
ReplyDeleteWow, this looks great! I'm your newest follower ;)
ReplyDeleteJamie ~ Better With Age
gorgeous re-do! I love the transformation. Thanks for sharing this at The Weekly Creative :)
ReplyDeleteShannon @ Sewing Barefoot
Wow! You did an amazing job. Would you do it again? I'm curious if the whole process was worth it to you to duplicate? :) I'm lovin the barn wood effect as well that you achieved.
ReplyDeleteIt would be awesome if you would share this project sometime over on my weekly Friday Link-up party!
http://www.parloandlogi.com/category/f-it-friday/
These look so beautiful!
ReplyDeleteHappy weekend!
Jenny
www.simcoestreet.blogspot.com
You sanded in your bathroom!?! Brave woman! These two turned out great. I have not heard this process called cerusing, though I have used it. Thanks for the tutorial.
ReplyDeleteOkay, this is amazing. Does not even look at all like the same piece! Bravo!!
ReplyDeleteKaren
Wow! Your nightstand turned out fabulous. You have inspired me to try this with an almost identical nightstand I have in my son's room!
ReplyDeleteI hope you do! Except don't make the mistakes I did and have to stain it more than once!
ReplyDeleteThank you!
ReplyDeleteBrave or dumb? Or maybe lazy? :-)
ReplyDeleteThanks!
ReplyDeleteI would definitely do it again but I would scrub the paint off more I think - so that the dark stain shows through. Even though I love the barnboard look - I've done it a few times - it wasn't my intention this time.
ReplyDeleteThanks, Shannon!
ReplyDeleteThanks, Jamie. Nice to meet you!
ReplyDeleteHi Anna, I used a mistinted paint that I bought at the Restore. It was a kind of taupey colour with a pink undertone - I can't really describe it exactly. I'm drawn to taupes, and greys, and light greens, so whenever I see one in a mistint section of the paint store I grab it. I just pour some water (about 1/2 a cup) in an old plastic tupperware container and then add the paint a bit at a time until I get the consistency I want. You can always add more paint or water until you get what you like. I've even mixed several paint colours together until I'm happy with it. Long answer, right? :-)
ReplyDeleteThanks, Kelly!
ReplyDeleteThanks! Do you like those lamps? I go back and forth on whether or not they're big enough/tall enough.
ReplyDeleteThank you!
ReplyDeleteThanks!
ReplyDeleteThank you!
ReplyDeleteThis turned out beautifully! Thanks for sharing at Terrific Tuesdays.
ReplyDeleteLove the color of this! Thanks so much for linking up with Made in a Day last week!
ReplyDeleteKim
Looks great! The door was a perfect idea. Thank you for sharing at Rustic Restorations Weekend!
ReplyDeleteWow, you did an amazing job! I think I want to try to do this to some of my own furniture now. You are today's Dare to Share Feature of the Day. http://www.pamspartyandpracticaltips.com/2013/03/refinish-nightstand-feature-of-day.html
ReplyDeleteGreat make-over! Thanks so much for linking it up!
ReplyDeleteAshley
www.simplydesigning.net
Thank you!
ReplyDeleteThanks, Pam!
ReplyDeleteThank you!
ReplyDeleteThanks, Rachel!
ReplyDeleteI love it!! Might try this technique on a dresser I have! You should come share at our new link party: Give Me The Goods{1Party,5 Blogs}
ReplyDeleteVery cool - I love the countersunk magnet idea! Found you through Rain on a Tin Roof Monday Linky party...
ReplyDeleteCher @ Designs by Studio C
http://designsbystudioc.com
So cool!! WOW, just love this!!! Thanks for sharing over at our Give Me The Goods Mondays link party!!! So glad to have found you! Features will be announced on Sunday!!! XXXOOO!
ReplyDeleteamy from www.commona-myhouse.blogspot.com
Guess what! I picked your project as a feature at the Give Me The Goods Link Party! I just loved it so much! Please stop by and grab your feature button!! http://dimplesandpigtales.blogspot.com/2013/04/give-me-goods-features.html
ReplyDeleteThanks!
ReplyDeleteThanks! Tom gets all the credit for that one!
ReplyDeleteWhat did you use as the final seal?
ReplyDeleteWhat did you use as the final seal?
ReplyDeleteI used Minwax furniture wax - the lighter one. If you apply two coats, buffing between coats, It'll be smooth and sealed. If you buff it again with fine steel wool it'll get even smoother. You'd think the steel wool would take the wax right off, but for some reason it doesn't.
ReplyDeleteWow, amazing job. I've been restoring furniture part time hobby for 20+ yrs and have never heard of cerusing. Got to do me some research. They really are gorgeous.
ReplyDeleteI'm really hooked on it now - even if I can't get the paint to stay in the grooves. I use it all the time.
ReplyDeleteشركة شراء الاثاث مستعمل بجدة
ReplyDelete