Just a tiny, little carpentry project this week. But it was kind of a big deal because I cut the wood myself. With the sliding mitre saw. I'll admit that it took me longer to figure out how to unlock the saw arm than it did to cut two pieces of wood, but I did it!
Our bedside tables are a little crowded with books, globe lamps, water bottles, alarm clocks - the usual paraphernalia. No bedside styling or tweaking in my house, we just don't have room for it. We could have installed wall-mounted sconces, but since these lamps are less than a year old that wouldn't be very fiscally responsible, would it?
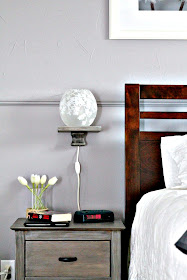
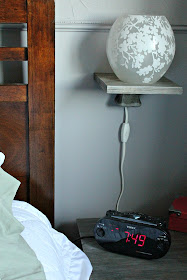
I had the idea to get the lamps off the tabletops and put them on floating shelves. Now ideally I would have liked streamlined, 100% floating shelves, but that isn't really possible with the depth of shelf we need. So I gave in to having a (small) support underneath. But all of the shelf supports at the big box store were either huge (like over 8" in each direction) or made of something other than wood. I wanted the support to blend with the shelf, so it had to be stainable/paintable.
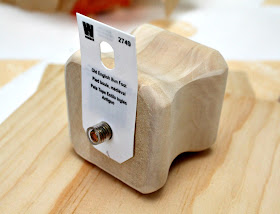
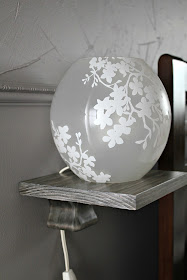
We eventually wandered into the moulding aisle and found some short, squatty table legs - or bun feet as they're called. Do you know how much fun I had saying "bun foot" over and over again? I bet you do. We tried out all the different styles and settled on the square one. The plan was to cut off the back of each foot to make it flush with the wall and attach it to the shelf above. And remove the top screw of course.
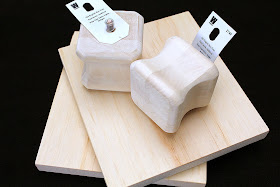
So here were my supplies. Two 7" x 7" pieces of scrap one inch board, (some screws), and two bun feet.
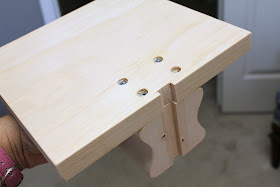
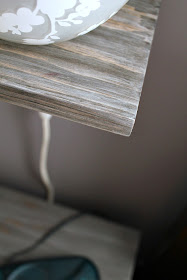
Tom did the scary support cutting and then attached the board and the foot to each other with wood screws, plus he drilled two offset holes in each support so that it could be mounted directly to the wall. He also cut a channel down the back of each piece so that the lamp cord could fit through and be centred, rather than hanging off the side of the shelf.
I puttied and sanded the top screw holes (the other ones would have to wait until after the shelf was mounted), and then stained and painted the shelves. I used the same cerusing technique that I did on the nightstands, trying to match the grey barnboard colour as closely as possible. Here are some other examples (one, two, and three) of that paint-on-stain technique if you'd like to see some instructions.
I held the lamp and cord in place while Tom mounted the shelf to the wall. Luckily he hit studs both times so we didn't have to use the anchors, and we don't have to worry about the shelves falling down. The lamps aren't that heavy anyway so I don't think there's any danger.
The lamp has an on/off switch on the cord that hangs at the perfect height when you're laying in bed. No more digging behind the nightstand in the dark, trying to find it and knocking everything all over the place!
~~~~~
I'm linking up here this week!


Super cool idea. I have lamps similar to these in my bedroom. I would love it if you would share this over at my link party that is going on right now.
ReplyDeletehttp://www.ifitsnotbaroquedesignblog.blogspot.com
This looks beautiful! What a great solution to get more usable space!
ReplyDeleteGreat makeover! I really like how you repurposed the bun foot to make the sconce. Very clever!
ReplyDeletethis is awesome!! I have no skills in this area at all!
ReplyDeleteAwesome solution to your space problem!! The gang over at My Personal Accent, would like to invite you to link-up this terrific makeover at our new Blog Strut Peacock Style Link Party. Share as many of your creative ideas, recipes, and any other family friendly content as you like. We will be pinning every submission we receive. If you have a giveaway or contest you’d like to promote, feel free to post it on our giveaway page. Come on over and show us what you’ve got! http://www.mypersonalaccent.com/the-blog-strut-peacock-style-6/
ReplyDeleteThis is a common problem so I would guess that a lot of readers will be pinning this. :D Thanks for sharing on BeColorful
ReplyDeletep
Thank you! It would be great if it helped other people.
ReplyDeleteWell, I don't know about skill - we did spend a lot of time figuring out that bracket. A LOT.
ReplyDeleteThanks! We're really loving it. I think we actually use the lamp more now.
ReplyDeleteGenius idea, Barb! I've pinned it and I'm including a link back to you in today's DIY party highlights. Thanks for sharing your creativity! Love them!
ReplyDeleteWhere did you get those lamps? Do they give off a soft light or bright light?
ReplyDeleteThank you for featuring me, Roeshel!
ReplyDeleteHi Stacey,
ReplyDeleteThey came from Ikea and have a beautiful, soft light. I'm so glad we got them!