Pages

Feb 29, 2012

Wednesday Musings

It's a quiet, snowy day here.  Tomorrow is the start of the circus known as month-end reporting (cue theme from Psycho) where it'll be non-stop go-go-go for 8 or so days.  Not to mention that my company has been bought out and the new company assumes ownership tomorrow.  I thought I'd take this mellow time to share what has caught my eye lately.

I've  been wanting to add an armchair to the livingroom for some time.  Something that complements but doesn't perfectly match the current furniture.  Here's a reminder of what we have already.  I want solid and substantial, comfy but not slouchy.

These looked interesting:


Carmen Chair - Brownie


product image

 Umbria   Leather Chair and Ottoman

Though that last one is wa-a-a-ay out of my price range.

~~~~~

This latest snowstorm (we have been fortunate to only have had a few this year) is making me long for summer.  Specifically for my backyard hammock.  (This is not my backyard btw.)

Tiki Hammock

We rebuilt the deck last year - gotta tell you about that sometime - and made a place to hang it.  Everyone loves it.  Even the dogs.  It hangs on a lower level so the dogs step right off the top level into the hammock.

~~~~~


I think I want to build this and get it installed this year,

Pinned Image

 Would you like to stop by for a pina colada? Perhaps a frozen margarita?

~~~~~

Oh, these.  THESE say "summer" to me. 


And I own them.  Yep, I obsessed over them, read the reviews, even emailed the company to ask questions. Then I found a mall in my town that sold them.  And since my fabulous sister gave me a gift card for that same mall for Christmas, I made them mine.  Now when am I going to get a chance to wear them?

~~~~~

I'm so in love with barnboard, Restoration Hardware-style furniture.  When we lived in the country I think I probably would have filled the house with it, but now that we are in a tiny little semi-detached in town, I have to fit it in sparingly.  These bedside tables speak to me.

Kentwood Nightstands or End Tables

 Definitely on my to-do list.

~~~~~


And finally, this just makes me laugh.  I spend 95% of my time at home in my pyjamas.  If this were true I would get nothing done.


~~~~~

 
Have a fantastic Wednesday.

Feb 28, 2012

Foyer Light

We made some baby steps towards completing the main floor "makeover" this weekend.  If you've missed anything get caught up here, and here.

There was very little free time as Tom's mom had surgery this past week and we decided to put together a week's worth of meals for her and my father-in-law. We made 2 kinds of soup, pot roast with mashed potatoes and gravy, tea biscuits, & a loaf of bread.  Everything from scratch. And then Tom delivered them (an hour+ away). We also went out for an early dinner with other relatives on Sunday.  So these tiny projects feel like huge accomplishments.

The change I'm loving the most is the new light in the entranceway.  Tom is so resistent to dangling lights (pendants, chandeliers, etc.) but I am going to convert him, slowly but surely.

This is the light before. 
A pretty non-descript flush-mount ceiling fixture. 
Blah.
 

And this is what is hanging there now. 


What a superstar.  Look how she shines!
(Ignore the ugly CFL bulb.  That will be swapped out now that it's visible.)

The light is from Lowe's, and is technically an outdoor light.  The body is metal with glass inserts on all sides and around the top with an open bottom.  The metal has a brown-rust, aged look.


The light came with about 2 feet of extra chain that needed to be removed before hanging since we only have 8 foot ceilings.  Sasha supervised the removal of excess chain and inspected all of the connections.


She also got her Jersey on and wore the chain for a while.


I was very happy to see that the previous light had padding inside it that protected the ceiling from getting a crease from the edge of the fixture.  I didn't want to even think about having to patch a popcorn ceiling. And there was no discolouration on the ceiling - yay!


The old light came down easily and the new one installed just as easily.  This coming from me - the person who stood and watched. And took pictures.


The light hangs about 12-18 inches from the ceiling so only one very tall friend (Hi Jay!) will come anywhere near hitting their head on it.


One last inspection by the boss (yes, Tom is holding her up - call us crazy).
Not sure that is a look of approval.


And the glass inserts in the top make a lovely wagon wheel pattern
on the ceiling when the light is on.


I realize now that I didn't take any pictures from far away.  I'll have to remedy that soon.

Update:

Do you like our collection of dog collars & leashes?
(Forgive the gaping closet - we're buying new doors for it soon.)

Some more gratuitous shots:


Let there be light!

Feb 27, 2012

Be Twine: New Love for an Old Chair

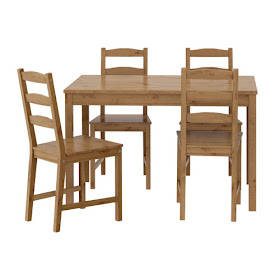
Ever get bored with your furniture...but not bored enough to replace it?  That's how I feel about our kitchen chairs.  We have a very tiny kitchen/dining room area so we also have a tiny table & chair set.  It's from Ikea, though I got it for $20 at a "yard sale" at work. 


The company I work for does photography for catalogues and magazines, and sometimes the props can't be returned and aren't going to be reused.  So the company holds a yard sale for the employees and the money is donated to a charity.  This set was going in a silent auction and I was the only one that bid on it.  Could have had it for $1.  Can't complain about $20 for a $150 set though.

But it's kind of plain, isn't it?  Not a lot of excitement going on.  I'm really not fond of painted wood, and it already had a finish on it, so what's left to do?  Play with the chairs of course.  I decided to wrap the chair rails with jute twine for a more rustic look.  The twine is from the dollar store - seriously, I live there, right? - and one roll does a whole chair.

Here is a step-by-step if you feel the urge to entwine your chairs yourself:

Start with a small dot of hot glue at one end of the chair rail, in an inconspicuous place.  The dot of glue in this picture is too big, but it ends up hidden so no worries.  Press the end of your twine into the glue using a narrow instrument to get it tight into the corner.  I used a ruler or pen, whichever was closer at the time.


Wind the twine tightly around the chair rail, pushing the strands firmly against each other each time. 


I put another dot of glue when I get to the halfway point, to lock the twine in and to give me a break from holding it so tightly.


Keep winding all the way to the end of the rail, leaving a tiny, tiny space at the back for the final strand. 


Place a dot of glue in that space, press the twine into it, and snip off the excess twine.  (Wow I'm sick of the word "twine".) I used nail clippers to get in really close to the wood.  One rail done!  Now begin all over again with the next rail.  Or walk away for a little while because your hands hurt.

Here is my first chair all bound and dressed up for pictures. 


What do you think?  Pretty?  I like it.  I might even continue and wrap twine around one or all of the stretchers.


I'm also thinking of doing something with the seat.  Either a pad with some sort of design painted on, or I'll paint (gasp!) directly onto the wood.

Have you ever done something like this?  Dressed up your table and chairs to make them feel a bit fancier? Everyone needs to feel fancy sometimes.

~~~~~~~~

I'm linking up to these parties this week!

Feb 22, 2012

Pillow Talk

I became a pillow-making machine on the weekend.


I was at the dollar store on Friday looking for plastic storage containers, wandered down the linens aisle and stopped at the placemats. I couldn't believe how many different patterns and fabrics there were.  I chose a green mat with a slight wavy pattern and two grey on grey mats with a Paris, France print.  I love the different fonts, and the fabric is quite thick.


The green one was two-ply so I tore out the stitches along one side with a stitch-ripper, stuffed the cavity with polyester fiberfill, and sewed the seam closed.  Easy-peasy as they say.


The printed placemats were thicker, a single-ply, but with a kind of vinyl backing.  I was concerned that the sewing machine needle wouldn't go through a double thickness, but it was no problem at all.  I matched them up, right sides out, and sewed around 3 edges. 


I was going to stuff it with fiberfill but I decided to use an old pillow form instead.  It was a dense pillow form - feather-filled maybe - and it made the pillow weighty and substantial.  I shoved the pillow form in further than it should go so that I could squeeze the open sides together and sew them up on the machine.  I hate hand sewing and use the machine whenever I can.


The pillow can't be changed out easily but I don't think I'm going to want to anyway.  I went back to the dollar store on Monday and bought two more placemats to make a matching pillow.  (I may even have bought 4 more in a slightly different shade - same pattern - for the livingroom.) 

I also bought two pillow covers on that first trip.  They were already finished with a zipper at the back. 


I bought them because the grey silk is a near-perfect match to the curtains in the guest room. At first I stuffed them with fiberfill, but they were too soft so I switched it out for some throw pillows I already had.


 So what was the total?

Green placemat - $1.50
Paris placemats - $6 (4x$1.50)
Silk pillow covers - $4 (2x$2)
Stuffing - already had it, but about $2
Pillow forms - already had, prices unknown

Total - $13.50 for 5 pillows, or $2.70 per pillow. How's that for some thrifty work?


Here is the guest room with all the pillowy goodness. 


I still need to switch out the picture above the bed - the room used to be green & brown and it matched then. I want to put a black and white picture up there - maybe even one I've taken myself. 

Something like this:


I think I have to stay away from the dollar store for a little while.  These were so easy that I could go crazy buying placemats and sewing them up. 


~~~~~~~~~

I'm linking up here this week!