SEARCH THE BLOG

Jul 31, 2013

Vintage Bedroom Chair

There's someone new keeping us company in the bedroom at night. And during the day. He's short, chubby, and older, but I think I love him.

Meet our new man:
Vintage Chair

Tom's been making me go trail riding (mountain bikes) with him lately - though really I do like it, so it's not like he's dragging me through the forest. I think he wants me to go with him just so he doesn't feel guilty buying pizza afterwards. This last week, as we drove from the trail to the pizza place, we passed an old antique shop near Sharon, Ontario. (That's for you locals.) It's a tiny little place that used to be a motorcycle repair shop. Sounds bad, right? They had all kinds of solid wood furniture outside though, so I made Tom stop to take a look.

There was nothing that we really wanted - well, there was a dining room set but we don't have room for it. Just as we were about to leave I saw this chair with cardboard boxes piled on top of it. The fabric looked brand new and it didn't sag, plus the grey would match our bedroom, so off I went to find out the price. The guy told me $45 or best offer. Seriously? I was expecting over a hundred dollars. Especially since the manufacturer's tag was still on the bottom. And did I mention that the fabric was brand new? Tom had $35 in his wallet (I conveniently didn't bring mine), so just like that it was ours.

The tag on the bottom says it was made in 1967 and the upholstery was originally tangerine. Can you imagine? Though our bedroom is done in grey and orange, so maybe it would have matched regardless.

Vintage Furniture Tag

The finish on the wood is peeling, but I'd like to stain it a darker shade anyway. I'm thinking espresso or ebony.

Vintage Chair

The seat is really wide and the arms are low - perfect for slouching in while we talk about our day.

Vintage Chair

The fabric is a little bluer than the walls, but it seems to match the grey in the pillows exactly. (Not that that pillow would stay there - it's a bit big - but I wanted to add some colour to the shot.)

Vintage Chair


The room really needed a dose of old-fashioned. Even Tom, who originally didn't want a chair in the bedroom, said, "Hey, this is pretty comfortable to sit in." Better believe it! This guy is staying.

Vintage Chair


Jul 29, 2013

Rainy Day Sewing Projects

I knocked out a couple of sewing projects this weekend. It rained on and off most of the weekend so it was a good time for some indoor activities.

First up was re-recovering this little footstool.

recovered footstool

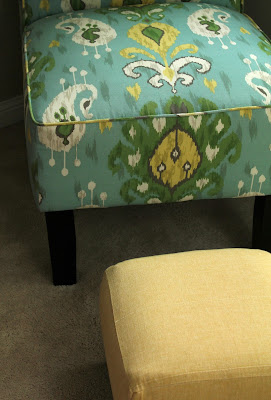
If you remember, I'd originally recovered it with dropcloth material and a freezer paper ink transfer.  But once I'd bought the turquoise/yellow chair from Target, the beige & brown just didn't match. When I was cleaning out the linen closet I found an old set of curtains that were nearly the same yellow as in the chair. They are a rough, almost-dropcloth-like material too.

I was planning on just folding over the material at each corner and stapling it under, but after several dozen tries I couldn't get it to lay to my liking. So I sewed the corners down the same as I did the first time I recovered it. This time I also added a little seam on each top edge by folding the material over and sewing a thin line (hem?) No real reason for it, I just thought it'd be fun.

recovered footstool
recovered footstool

To attach the fabric to the stool, you simply unscrew the stool legs, pull the newly sewn slipcover on, fold the edges over, and staple them to the bottom. Start by stapling once in the center of each side (pull the fabric taut), then do the corners, then fill the spaces between the center points and the corners. You then reattach the legs and you're done.

recovered footstool

The stool is still a little plain looking. I think I'm going to make a stencil of one of the ikat patterns on the chair and paint it on to the top of the stool.

recovered footstool


The second project was a new dog bed. I love making dog beds. They are so easy, and they make the dogs happy. There's nothing I like more than making my dogs happy.

This entire project required no new materials. I used two old blankets, a waterproof fitted sheet from Goodwill, and a curtain panel from the As-Is section of Ikea that I had in my fabric stash.

Little Dog (Sasha) has been having some minor incontinence problems lately (we're trying a change of diet and homeopathic drops to see if it helps), so we've had to throw out a few dogs beds. You can wash a cover, but there's only so much you can do for the bed itself. And we have an abundance of old blankets that we aren't using anymore.

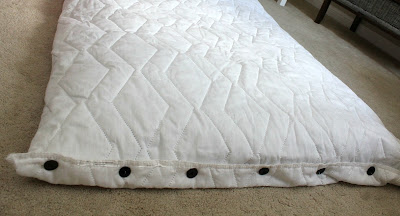
I folded the two blankets into the size I wanted and sewed the corners together to keep them from sliding around. I removed the elastic edging from the fitted sheet, folded the sheet over, and sewed up two of the sides to make a sleeping bag shape. This crib sheet is wonderful because it's a nice quilted fabric on the outside, but plastic on the inside, so even if she does have an accident, we can remove the cover and the sheet, wash them, and the blankets still stay dry.

waterproof dog bed

The open edge of the "sleeping bag" closes with buttons, much like a duvet cover. I couldn't get the button hole setting to work on my sewing machine - I think because the plastic layer of the sheet kept sliding - so I "freehanded" some button holes just by sewing-turning-sewing-turning to make rectangles. Not bad, if I do say so myself.

simple button hole

I then sewed buttons on the opposite edge. Here we have it with the blankets inside and the buttons done up. I like it already.

waterproof dog bed

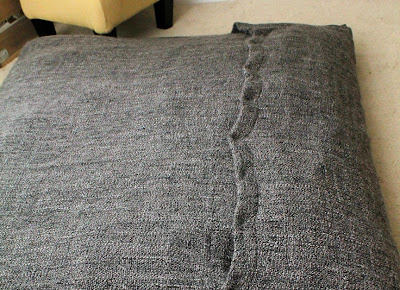
The outer cover is a loose weave charcoal curtain that is so very soft. The plan was to sew it in an envelope style so that the interior section could be removed easily. Unfortunately the material is so stretchy that the center kept gaping open. So it was more buttons. I sewed them on the inside of the top flap and then just pushed them through the fabric on the bottom flap. The weave is so loose that I didn't have to make button holes.

waterproof dog bed

The finished product is kind of whomp, whomp. It's okay for now, but I think I might remove the buttons and add velcro later. Or take out the stitches and just make it a standard cover with a zipper.

waterproof dog bed


Chloe is very much in love with it, even with all its flaws. She wouldn't stop laying on it, at every level of construction. In fact, after sewing the outer cover, I left it on the floor to go get a snack, and came back to find this:

Chloe dog

After I kicked her off she sat beside me to watch. This bed wasn't getting out of her sight.

Chloe dog


I'm pretty sure Sasha isn't going to even get a chance to pee on the new bed. I might have to make a second one.


Jul 22, 2013

Floating Photo Shelves

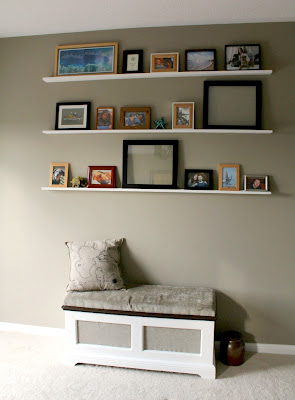
Our gallery wall in the living room hasn't been coming along the way that I'd like. I don't know if it's that the frames are too different from each other, or there aren't enough, or the fact that half of them don't have pictures in them (!), but it just wasn't appealing to my eye.

I decided that I'd rather have photo shelves instead. There would still be the randomness of the different sized frames, but they'd be more orderly and cohesive. Not to mention that you can take them down or rearrange them without having to patch the wall and make new holes.

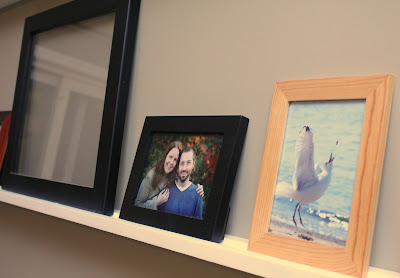
I was going to wait until I had all of the frames filled before I posted about them, but who am I kidding? It's been two weeks already and I'm no closer to being done. So you'll just have to look at some empty frames. (And my gorgeous cousins. And a seagull eating snack mix.)

floating photo shelves

We started by taking down all of the frames, pulling out the picture hangers, and patching and repainting the wall. We always keep our leftover paint for touch-ups so it was a pretty quick fix.

Before:
photo frame gallery wall

After:
floating photo shelves

We decided to center the shelves between the soffit by the sliding doors and the step up to the dining room/kitchen. The living room/dining room is sort of open-concept with a shared wall, but we decided to treat them as two different rooms. The expanse of wall stretches from the sliding doors to the window in the dining room, but centering the shelves between the soffit and the window would have looked a little goofy.

floating photo shelves

I wanted the lowest-profile shelving we could get, while not having to worry about the weight of the frames pulling them out of the wall. I liked the style of the postcard ledges that Young House Love installed in their last house, though ours needed to be deeper because of the thickness of the frames.

While Tom found a practice board, I laid the picture frames I wanted to use out on floor and arranged them to get a rough idea of how long each shelf should be and how many we would need (6 feet long and three shelves).

It was going to be a plain floating shelf, but we also wanted a groove routered in to keep the frames from sliding forward and off the shelf. We used a scrap piece of board to figure out how deep the shelf needed to be, and where the groove should go to have the frames rest on it correctly. We just rested the thickest frame on the scrap board and tilted the frame until we got the angle we wanted. Tom would then router the scrap piece and we'd try it again.

floating photo shelves

Each shelf had to be at least 4 inches deep, so once we had decided exactly what we wanted, Tom bought 2x4s and planed them down to just over an inch thick, and then routered an angled groove down the length of each shelf. Why plane them? Well, 2x4s are too chunky, and 1x4s are actually less than 1 inch thick. Sometimes it has to be DIY start to finish.

We were having trouble finding the wall studs - the stud finder was going crazy, beeping all over the place - so we came up with another plan. There is an electrical outlet in the center of the wall and we knew it had to be attached to a stud, so we just followed it up the wall (using a laser level) and marked that spot. We then held a shelf in place on the wall and marked on the shelf where the stud would hit. Tom then drilled counter-sunk pilot holes at 16" intervals to match the studs. Yes, we were working on blind faith that they were 16" apart (spoiler alert: they were).

Once the shelves were cut and holes were drilled, I sanded them, primed them, and gave them two coats of semi-gloss white - the same paint we used for the trim.

The distance between the top of the upper picture frame and the bottom of the lowest shelf was about 50", so we added an extra 4 inches of clearance and mounted the bottom shelf 54" from the ceiling. Before drilling any holes, we tested out this height with Tom sitting in various chairs beside the wall. There probably won't be a chair or sofa under the shelves, but we wanted to make sure no one would bang their head, just in case.

floating photo shelves

Then it was just a matter of attaching the shelves to the wall starting with the first stud we found and working outwards. I held the level against the shelf and Tom drilled 4 inch screws through the boards and into the wall. Since we were on studs each time, there was no need to use anchors. The screws were sunk at least an inch into the board so there was enough sticking out the back to go into the wall, and the screw heads weren't visible at the front.

Once all three shelves were mounted, I puttied the holes, sanded, and painted over the putty so that the fronts looked seamless.

floating photo shelves


The frames aren't in their final place, I just put them up there and tried to vary the heights. The top row is still a little too even for my liking. The two large frames are going to hold photos of the dogs or vacation shots, once we narrow it down to two favourites. (As if there aren't enough pictures of the dogs up there already, right?)

floating photo shelves

The shelves fill the space so much better than the frames did by themselves, and as I mentioned before, I love that I can change the photos or just change the arrangement whenever I want to. The area is a bit empty right now - I'd like to find a sideboard or old desk to put under the shelves to fill it in. And maybe one of those 5 foot wooden giraffes we saw at the farmers' market this weekend.

What do you think, Tom?

floating photo shelves

floating photo shelves

floating photo shelves


~~~~~

I'm linking up here this week!

Jul 3, 2013

Installing a Porch Railing

Why is it that it takes longer to recover from a long weekend than a regular one? I should be well rested, right? I guess if we stopped "doing" there might be a chance.

We spent the Canada Day long weekend working on projects at Tom's parents' house. I didn't take nearly enough pictures though so I'll wait to show you what we did after we finish up this coming weekend. I did get this one hilarious shot of two of the dogs spying on us from the front yard though:

Sasha & Bosco

So nosey.

On Canada Day we did stay home. To put up a railing on our own front porch.

Our front porch is pretty plain and just crazy-small. We didn't need to make it larger - it's not like we hang out there often - but we thought it would be nice to add some curb appeal. Especially since the flower beds are all spruced up now.

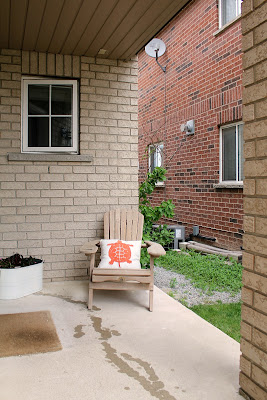
Front porch without railing

This is the porch "before". Just a 6 by10 foot rectangle with some dying flowers and a Muskoka chair. The turtle pillow is the prettiest part. You can see how close the neighbour's house is too.

Front porch without railing

The railing would add a little bit of privacy, especially if we planted some taller shrubs along side of it. Something like this. Also, when our dogs see the neighbours, they tear straight across the porch, and up onto the neighbour's porch (or into their house if the door is open). We're hoping that this railing will slow them down a little bit.

The railing is a build-it-yourself system from RailBlazers. I'm linking to them because we were really happy with how easy it was to install and the final look, and think they deserve some recognition. Plus the price wasn't horrible - less than $250 for an eight foot railing with decorative diamonds between the (wide) pickets. They even make the brackets for attaching the rails to the wall.

Railblazers porch railing

To install it, we first decided how close to the edge we wanted the railing to be. We just eyeballed it and decided to go with 4" from the edge. Tom then measured the space between the wall and the pillar exactly, and ended up having to cut about an inch off the length of each rail so that it would fit perfectly. You have the option of mounting the rail directly to the wall or to support posts (that you buy separately). Our neighbour on the other side installed the same railing using the support posts, but we thought it looked cleaner without big square posts at each end.

The bottom rail has a small support "foot" in the center, so that helps determine how high off the ground to mount the rail. We (okay, this was all Tom) drilled holes into the brick for the bottom rail brackets and then used concrete screws to secure the rail to the wall and pillar.

Railblazers porch railing

We put the rest of the railing together across two saw horses, just to make sure we had the correct number of diamonds and pickets. There are little metal spacers that go between the pickets so that you have even spacing. They just slide right into the grooves in the top and bottom rails. The diamonds attach to the rail in the same way.

Railblazers porch railing

We thought we'd be able to just lift the whole thing up and insert the pickets into the bottom rail, but the pickets had other ideas. They don't always fit tight in the groove so some kept falling out every time we lifted it. Going on limited sleep from the work we'd done all weekend, both of us were ready to just throw it a couple of times. But we found that if we inserted the pickets into the bottom rail first (with the spacers in place) and then attached the top (with the spacers and diamonds in place) that it was much easier. Once we switched methods we had it all together in about 10 minutes.

Front porch with railing

All that was left was to drill holes for the top rail brackets and insert the screws. Then we moved the chair back into place and updated the flowers.

Front porch with railing

It's so much more appealing now. A shady place where you might want to hang out on a hot day.

Front porch with railing


With all the work done we decided to take a rest. It was Canada Day after all. Here are Miss Grouchy-Pants and Miss Smiley-Pants showing off their patriotic neckwear.

Chloe & Sasha Canada Day

I think Chloe was grumpy because she wanted to get back to her hammock and book already. The story was just getting good.

Chloe & Tom


Related Posts Plugin for WordPress, Blogger...