


Dec 25, 2018
Dec 22, 2018
Chocolate Crinkle Cookies (with a twist!)
One more recipe before Christmas. These Chocolate Crinkle Cookies are like a brownie, with just the right amount of sweetness (and a little surprise kick!)

Ingredients
1 cup flour
1/2 cup unsweetened cocoa powder
1 teaspoon baking powder
1/4 teaspoon salt
3/4 cup sugar
1/4 cup vegetable oil
2 large eggs
1 teaspoon vanilla extract
1/4 teaspoon cinnamon (optional)
pinch of cayenne powder (optional)
1 cup icing sugar, for coating the cookies
In a small bowl, whisk together the flour, cocoa powder, baking powder, and salt. For a Mexican twist, add the cinnamon and cayenne powder. Set mixture aside.
In a large bowl beat the sugar and oil until light and fluffy. Add in the eggs and vanilla. Gradually add in the flour mixture and mix until just combined.
Form the dough into a large ball and wrap it in plastic wrap so that it is sealed tightly. Refrigerate for at least 2 hours.
Preheat the oven to 350°F. Fill a small bowl with the powdered sugar.
Form 1-inch round dough balls by hand or with a cookie scoop. Dip each dough ball in the powdered sugar until it is completely covered on all sides, and then place them on a parchment-lined cookie sheet.

Bake the cookies for 10-12 minutes until nicely puffed up and crinkled. Remove from the oven, and let cool completely on the cookie sheet or a wire rack.


Ingredients
1 cup flour
1/2 cup unsweetened cocoa powder
1 teaspoon baking powder
1/4 teaspoon salt
3/4 cup sugar
1/4 cup vegetable oil
2 large eggs
1 teaspoon vanilla extract
1/4 teaspoon cinnamon (optional)
pinch of cayenne powder (optional)
1 cup icing sugar, for coating the cookies
In a small bowl, whisk together the flour, cocoa powder, baking powder, and salt. For a Mexican twist, add the cinnamon and cayenne powder. Set mixture aside.
In a large bowl beat the sugar and oil until light and fluffy. Add in the eggs and vanilla. Gradually add in the flour mixture and mix until just combined.
Form the dough into a large ball and wrap it in plastic wrap so that it is sealed tightly. Refrigerate for at least 2 hours.
Preheat the oven to 350°F. Fill a small bowl with the powdered sugar.
Form 1-inch round dough balls by hand or with a cookie scoop. Dip each dough ball in the powdered sugar until it is completely covered on all sides, and then place them on a parchment-lined cookie sheet.
Bake the cookies for 10-12 minutes until nicely puffed up and crinkled. Remove from the oven, and let cool completely on the cookie sheet or a wire rack.
Dec 17, 2018
Christmas Decor - Inside and Out
As in previous years, I took a walk out to the woods at the back of our property last weekend to gather branches to make a decorative planter for the front door.

The planter I use is already 3/4 full of soil as there are live plants in it during the rest of the year. I put scrap 1x6 pieces over the dirt to get a level surface and then added 3 florist foam bricks on top to anchor the branches.
My method is to start with birch along the back, then pine branches fanned out in front of them. I position cedar along the front edge as it drapes down nicely. I then randomly fill in the open space using all four of the different types. Finally I add in the decorations. This year I chose baubles and faux iced berries that I purchased during a Christmas open house at Bradford Greenhouses. I also added in dogwood branches for colour (love how it turns bright red in the winter!) and white poinsettia flowers.

On the door, instead of a wreath, I hung a rustic window frame that I also purchased at the open house. It has a metal wreath and stylized reindeer in the center. I added a big red bow to make it pop.

Inside, we have several areas of the house with vignettes. Our stocking wall is getting very full - with two new dogs this year we now have 6 stockings! Above the stockings is the Merry Christmas sign I made with my Silhouette cutter and scrap wood.
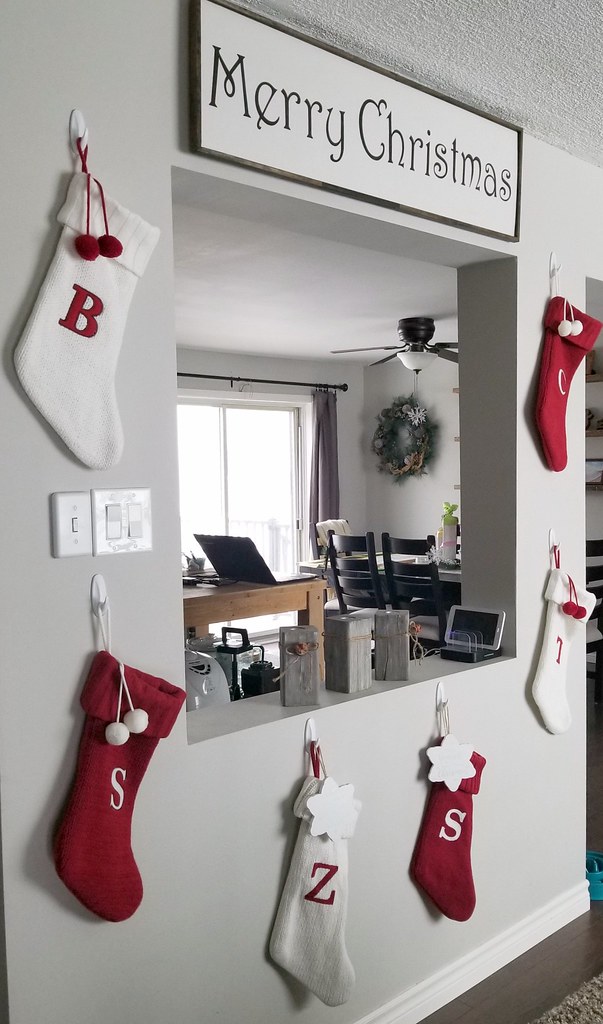
I would love to show off our tree, but it's been through an ordeal this year. The little dogs won't leave it alone so it's been stripped of ornaments along the bottom, and has been relegated to the dining room where it's safer. Maybe next year...


Dec 14, 2018
Caramel Heavenlies
I discovered a new recipe this week - Caramel Heavenlies. I can't take credit for inventing them, but I think they might become my go-to for parties and potlucks from now on. They have lots of good stuff in them - marshmallows, almonds, coconut, and brown sugar.

Ingredients
1 pkg graham crackers
2 cups mini marshmallows
3/4 cup butter
3/4 cup brown sugar
1 teaspoon ground cinnamon
1 teaspoon vanilla extract
1 cup sliced almonds
1 cup shredded coconut
Preheat oven to 350°.
Line a rectangular baking pan with foil, letting foil extend over sides by an inch. Lightly coat foil with cooking spray. Arrange graham crackers in rows, completely covering the bottom of the pan. Sprinkle graham crackers with marshmallows.
In a small saucepan, combine butter, brown sugar, and cinnamon. Stir over medium heat until butter is melted and sugar is dissolved. Remove from heat; add in vanilla.

Spoon the sugar/butter mixture over the marshmallows. Sprinkle with the almonds and coconut. Bake for 14-16 minutes or until the topping has browned.

Cool completely in the pan. Using the foil, lift cookies out of pan. Cut into triangles and discard foil.


Ingredients
1 pkg graham crackers
2 cups mini marshmallows
3/4 cup butter
3/4 cup brown sugar
1 teaspoon ground cinnamon
1 teaspoon vanilla extract
1 cup sliced almonds
1 cup shredded coconut
Preheat oven to 350°.
Line a rectangular baking pan with foil, letting foil extend over sides by an inch. Lightly coat foil with cooking spray. Arrange graham crackers in rows, completely covering the bottom of the pan. Sprinkle graham crackers with marshmallows.
In a small saucepan, combine butter, brown sugar, and cinnamon. Stir over medium heat until butter is melted and sugar is dissolved. Remove from heat; add in vanilla.
Spoon the sugar/butter mixture over the marshmallows. Sprinkle with the almonds and coconut. Bake for 14-16 minutes or until the topping has browned.
Cool completely in the pan. Using the foil, lift cookies out of pan. Cut into triangles and discard foil.
Dec 10, 2018
Christmas Snowball Cookies (Egg Free)
I'm determined to make a wide variety of cookies this year, even if it means cutting back on sleep. Raise your hand if you've made shortbread dough at 5 in the morning! Sometimes you do what you have to do.
First up: Christmas Snowball Cookies. These have a texture like shortbread and melt in your mouth. And they don't need eggs or baking soda/baking powder, so if you find yourself running short, they're the perfect solution.

Ingredients
1 cup of butter, softened slightly
1/3 cup of sugar
2 teaspoons vanilla extract
¼ teaspoon salt
2 cups of flour
2 cups of finely chopped walnuts or pecans
1½ cups of icing sugar (i.e. powdered sugar or confectioner's sugar) for dusting cookies
Cream together butter and sugar. Add in the vanilla and salt. Gradually add flour, mixing well. Stir in the nuts until evenly distributed. Wrap the dough in plastic food wrap and refrigerate for at least 45 minutes.
Preheat oven to 350ºF. Scoop out dough balls using a small cookie scoop or teaspoon. Roll the dough between your palms to make a round ball.

Place the cookies on parchment lined baking sheets. Bake until they are just beginning to brown, approximately 12 to 14 minutes. The underside of the cookies should be only lightly browned.
Cool cookies on baking sheets for about 2 minutes - they should still be warm to the touch. Gently roll the cookies in a bowl of icing sugar.

Place the sugar-coated cookies on wire racks or back on the pans to cool completely. Once cool, roll the cookies in icing sugar one more time.
Makes about 6 dozen cookies.


First up: Christmas Snowball Cookies. These have a texture like shortbread and melt in your mouth. And they don't need eggs or baking soda/baking powder, so if you find yourself running short, they're the perfect solution.
Ingredients
1 cup of butter, softened slightly
1/3 cup of sugar
2 teaspoons vanilla extract
¼ teaspoon salt
2 cups of flour
2 cups of finely chopped walnuts or pecans
1½ cups of icing sugar (i.e. powdered sugar or confectioner's sugar) for dusting cookies
Cream together butter and sugar. Add in the vanilla and salt. Gradually add flour, mixing well. Stir in the nuts until evenly distributed. Wrap the dough in plastic food wrap and refrigerate for at least 45 minutes.
Preheat oven to 350ºF. Scoop out dough balls using a small cookie scoop or teaspoon. Roll the dough between your palms to make a round ball.
Place the cookies on parchment lined baking sheets. Bake until they are just beginning to brown, approximately 12 to 14 minutes. The underside of the cookies should be only lightly browned.
Cool cookies on baking sheets for about 2 minutes - they should still be warm to the touch. Gently roll the cookies in a bowl of icing sugar.
Place the sugar-coated cookies on wire racks or back on the pans to cool completely. Once cool, roll the cookies in icing sugar one more time.
Makes about 6 dozen cookies.
Dec 7, 2018
4x4 Wooden Candle Holders
I still had some 4x4 posts left over after making the wooden snowmen, so I kept on going. You can never have too many candles, am I right? These wooden candle holders let you switch out between tea lights and LED flameless lights any time you want.

Start with pieces of 4x4 post - any length you like. You can go small, medium, and large, or all the same height - the sky's the limit. I just eyeballed the post and cut it into three approximately equal lengths. One piece is slightly longer than the other two, which I think looks better than all exactly the same.
I stained all four sides and the top of each with Minwax stain in Jacobean, and then wiped flat white paint right over the stain using a clean cloth. The paint was applied unevenly - intentionally - so that it looks aged and a bit like old barn wood. In some places the stain even shows through.

To drill the insert for the light, I had Tom use his hole saw set. The hole saw only cuts around the outside of the circle, so this method involves using a series of progressively smaller hole saw bits and then finishing with a spade bit. The other option is using a Forstner bit, which I don’t have (but I’d like to!) This bit has several angled blades and drills out the entire hole at once. The hole saw is slower, but it is easier to control.


Once the hole was drilled, I rubbed the interior with stain and paint like the sides. I then wrapped jute twine around the candle holder three times and tied it in a bow. Over the bow I glued a slice of tree branch and a bit of potpourri.
Start with pieces of 4x4 post - any length you like. You can go small, medium, and large, or all the same height - the sky's the limit. I just eyeballed the post and cut it into three approximately equal lengths. One piece is slightly longer than the other two, which I think looks better than all exactly the same.
I stained all four sides and the top of each with Minwax stain in Jacobean, and then wiped flat white paint right over the stain using a clean cloth. The paint was applied unevenly - intentionally - so that it looks aged and a bit like old barn wood. In some places the stain even shows through.
To drill the insert for the light, I had Tom use his hole saw set. The hole saw only cuts around the outside of the circle, so this method involves using a series of progressively smaller hole saw bits and then finishing with a spade bit. The other option is using a Forstner bit, which I don’t have (but I’d like to!) This bit has several angled blades and drills out the entire hole at once. The hole saw is slower, but it is easier to control.
Once the hole was drilled, I rubbed the interior with stain and paint like the sides. I then wrapped jute twine around the candle holder three times and tied it in a bow. Over the bow I glued a slice of tree branch and a bit of potpourri.
Pretty little things, aren’t they?


Dec 3, 2018
4x4 Wooden Snowmen
The town resurfaced our road this summer and that extra layer of asphalt they put on was enough such that our mailbox was now too low by postal standards. We had to replace the 4x4 post, so the old one went into the scrap wood bin until I could make these adorable 4x4 fence post snowmen.

To make one you will need:
3' of 4x4 fence post
white, black, & orange paint
scrap fabric
yarn
buttons
miter saw
hot glue gun
Cut your post into three pieces. It's up to you if you want your snowmen to be all the same or different heights. I randomly cut the post lengths without measuring, and ended up with pieces that were 9-1/2", 11-1/2", and 13-1/2" long.

I wanted a flat paint finish for the snowmen bodies, so I chose white ceiling paint, and rubbed it on with a cloth to give it just a light washed look.
Once the white paint was dry, I used poster paint to add the eyes, nose, mouth, and buttons. I used a fairly wide artist's brush which gave the features a more rustic, cartoonish look instead of being sharply defined.

You can use any type of fabric you want for the hat and scarf. I used scraps of flannel left over from the receiving blankets and stuffed animal I made for my cousin's baby.
Cut a fabric rectangle measuring 10"x15". Fold the fabric over twice - about an inch - on the long side to create the brim of the hat, and wrap it around the top of the post, just above the eyes. Glue one end of the rolled edge of the hat to the post at the back, then fold over the other end and glue it to the first edge.

Gather the top of the hat together and tie it off with yarn. Floof the top of the hat like a pompom.

Take another scrap of fabric, 17" long and about 1" wide, and wrap it around the post at the neck. I picked fabric for the scarves that didn't quite match the hats because, when we go out to play in the snow we don't worry about matching, we just make sure we're warm. Crisscross the scarf fabric and secure in place with a dot of hot glue. Glue a button where the two ends cross.
And you're done!


Nov 30, 2018
Handmade Ornaments
I'm guessing that you'll be putting up your Christmas tree soon, if you haven't already. I'm about 90% there - I'm hoping to finish it this weekend. My favourite ornaments are the ones that I've made over the years. They give me a glimpse of what was going on at that time in my life. Here are a few that I hang year after year. Click on a picture to go to the original post.
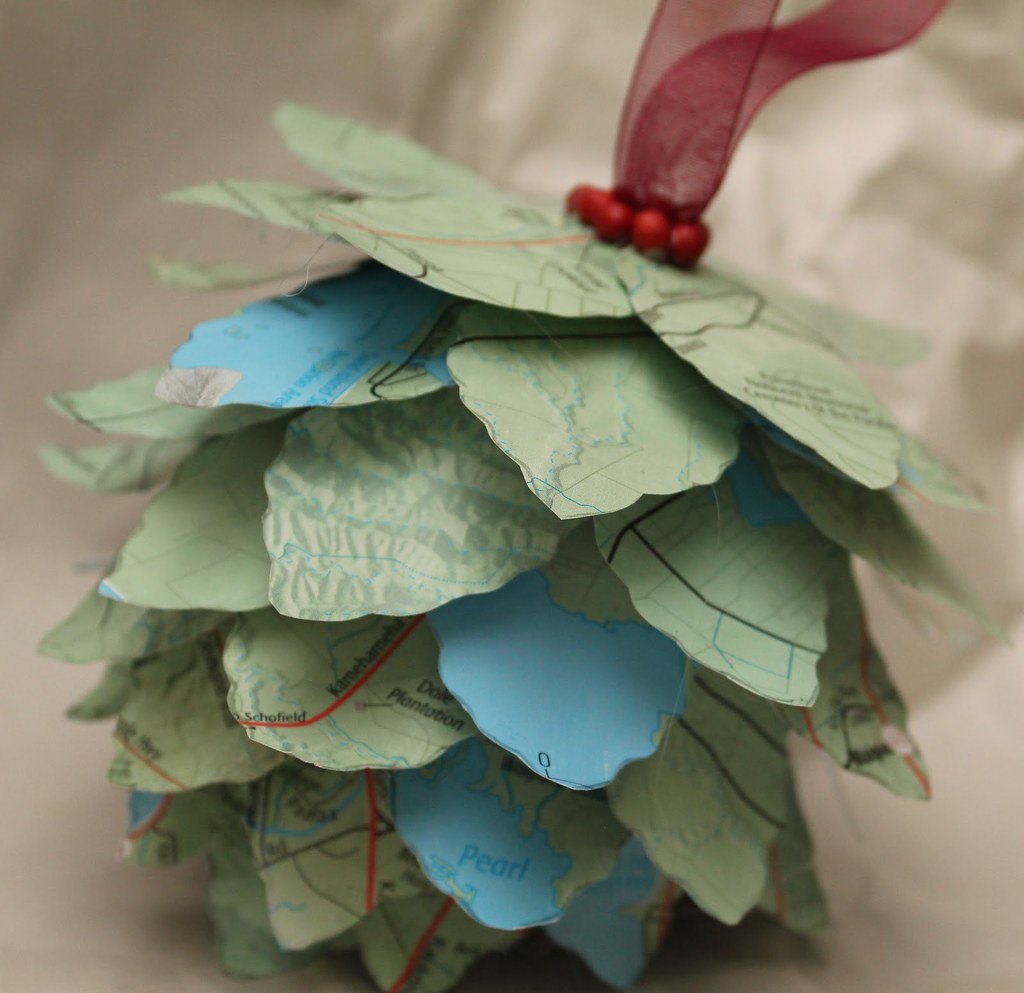
Pinecone Map Ornament
This ornament is made from paper leaves cut from a map of Honolulu. We went to Hawaii for our honeymoon and fell in love with the islands. I wanted an ornament to remember it by, just in case we didn't get a chance to see it again. (Spoiler: we've been back twice!)
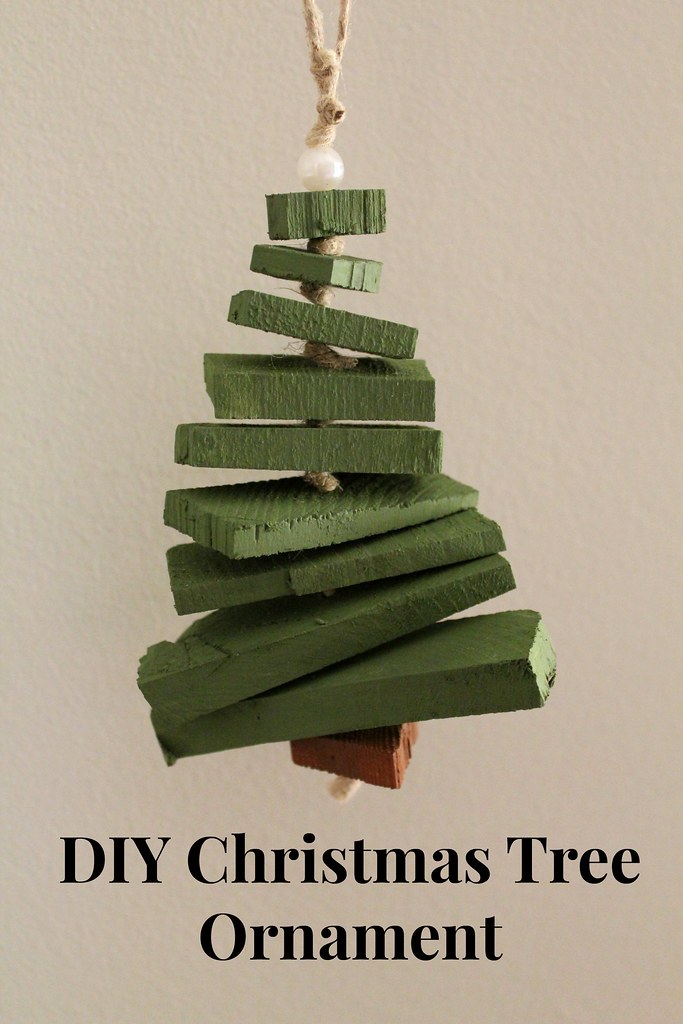
Scrap Wood Tree Ornament
This one was made from scraps left over from the porch that Tom built for his parents. He always laughs at me when I scurry around collecting the end cuts before he can throw them out.
Musical Ornament
I call this the "Jingle Bell" Ornament. It's made of strips of sheet music mod podged onto a Styrofoam ball. I bought a book of sheet music from a used book store so that I would have plenty to work with (and the paper is thicker than printer paper).

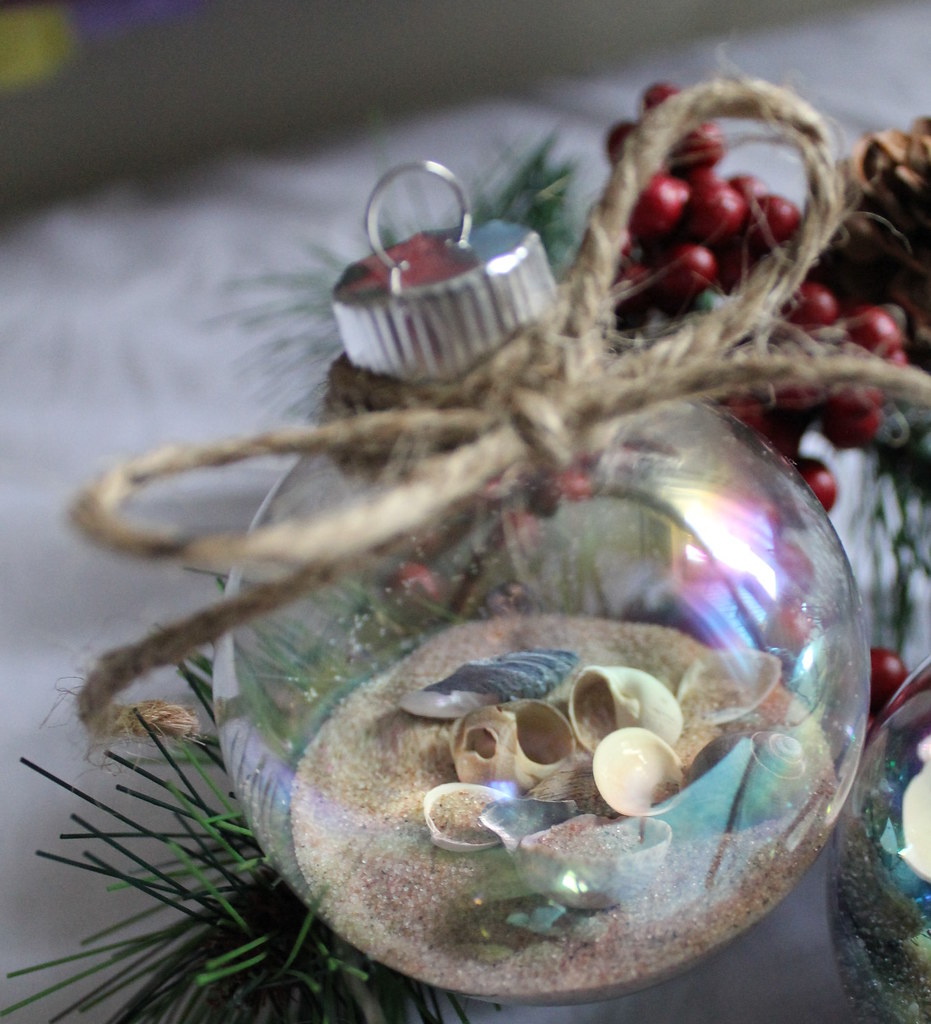
Vacation Memory Ornament
Because there were more trips to Hawaii, I needed another way to commemorate them. I bought clear bulb ornaments, filled them with sand from a favourite beach (each ornament is different), plus a few shells, and a scrap of paper with the trip details. These ones are fun, but a bit heavy!
Pinecone Map Ornament
This ornament is made from paper leaves cut from a map of Honolulu. We went to Hawaii for our honeymoon and fell in love with the islands. I wanted an ornament to remember it by, just in case we didn't get a chance to see it again. (Spoiler: we've been back twice!)
Scrap Wood Tree Ornament
This one was made from scraps left over from the porch that Tom built for his parents. He always laughs at me when I scurry around collecting the end cuts before he can throw them out.
Musical Ornament
I call this the "Jingle Bell" Ornament. It's made of strips of sheet music mod podged onto a Styrofoam ball. I bought a book of sheet music from a used book store so that I would have plenty to work with (and the paper is thicker than printer paper).
Vacation Memory Ornament
Because there were more trips to Hawaii, I needed another way to commemorate them. I bought clear bulb ornaments, filled them with sand from a favourite beach (each ornament is different), plus a few shells, and a scrap of paper with the trip details. These ones are fun, but a bit heavy!
Nov 26, 2018
Under-bed Shoe Storage Drawers
I have a lot of running shoes. Maybe too many. I should probably throw some of them out, but it's so hard, you know?
I was tired of looking at them piled up on a shelf in our closet, so I had Tom whip up some under-bed sliding drawers for me, to get them out of sight.

I wanted to use as much of the space as possible, but I didn't want the drawer to be too big to move, so we went with two drawers, one 3 feet wide and the other 3-1/2 feet wide. They're both 15 inches deep and made of 1/2" veneered plywood.

The edges are 3-1/2 inches high - high enough to hide the shoes from sight, but still low enough to give your fingers clearance to pull the drawers out.

The inside corners are reinforced with 2x2s cut on a diagonal. Since the front edge is what gets pulled on all the time, you don't want the board pulling right off.

I stained the visible sides (front of drawers and side edge at the foot of the bed) a dark Jacobean brown to blend with the bed frame and then added 2" furniture sliders to the bottom corners so that the drawers don't get caught on the carpet.

Tom liked them so much that he built some for his side of the bed too. I think he's hoping I forget about them and he won't ever have to wear dress shoes. I'm just glad I don't have to look at his big ol' sweaty sandals anymore. :-)


I was tired of looking at them piled up on a shelf in our closet, so I had Tom whip up some under-bed sliding drawers for me, to get them out of sight.
I wanted to use as much of the space as possible, but I didn't want the drawer to be too big to move, so we went with two drawers, one 3 feet wide and the other 3-1/2 feet wide. They're both 15 inches deep and made of 1/2" veneered plywood.
The edges are 3-1/2 inches high - high enough to hide the shoes from sight, but still low enough to give your fingers clearance to pull the drawers out.
The inside corners are reinforced with 2x2s cut on a diagonal. Since the front edge is what gets pulled on all the time, you don't want the board pulling right off.
I stained the visible sides (front of drawers and side edge at the foot of the bed) a dark Jacobean brown to blend with the bed frame and then added 2" furniture sliders to the bottom corners so that the drawers don't get caught on the carpet.
Tom liked them so much that he built some for his side of the bed too. I think he's hoping I forget about them and he won't ever have to wear dress shoes. I'm just glad I don't have to look at his big ol' sweaty sandals anymore. :-)
Subscribe to:
Posts (Atom)
