(Disclaimer: I am by no means an expert in photo editing or an expert in computer programming/software. If I use the incorrect terminology I hope that you'll understand what I mean.)
1. The first thing is to find the image you want to transfer. I can't really help you with that except to say that I usually just do a Google image search. If you go to Google.com, enter a description of what you're looking for and then click on "Images" in the black bar near the top, you get pages of pictures to choose from.
For the transfers I've done so far I'll play around with word combinations like "french grain bags", "vintage french signs", "old postage marks", etc., until I come across something I like. The only rule I follow is that I try to avoid taking an image from someone else's personal blog. Though The Graphics Fairy is a good source and you can use any image there for free.
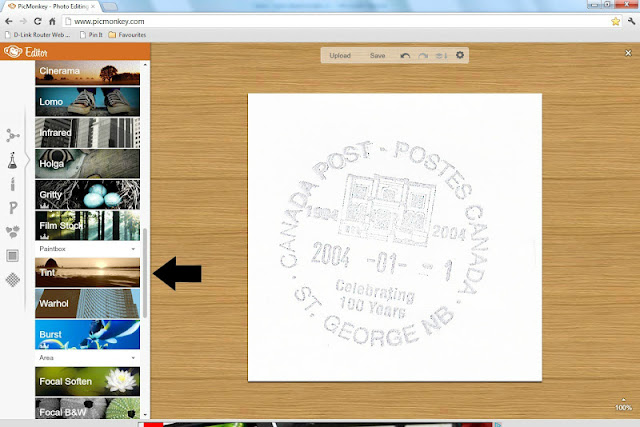
Let's pretend this is the image I chose (I think it was!)
Click on the image to get it to full screen, right click, and then click on "save image as", and save it to a location that you can find later. I find it easiest to save images as jpegs as they can be read by almost any program.
2. You'll then open the website PicMonkey.com. It's a free graphic editing program that is very user-friendly. While you're using it, any changes you make can easily be undone by clicking the undo (back) arrow above your image.
Once at the PicMonkey site, click on "Edit a photo" on the left-hand side. Your file directory will open and you can choose your file.
I hope you remembered where you saved your image! Find your image and double-click on it, or click once and then click the "open" button. This will open your image in PicMonkey and it's ready for editing.
I'm just going to do a simple colour change and image flip, but feel free to play around with any of the options on the left hand side. Each of the symbols on the far left will open up more editing choices.
Click on the Effects menu (the bubbling beaker symbol) on the left, and scroll down through the effect choices until you get to "Tint". Click on Tint and the box will expand downwards.
Position your mouse pointer over the circle in the rainbow-coloured box, hold down your left mouse button, and move the mouse around the box. You'll see the colour of your image change as you move.
Once you have your image the colour that you want it, let go of the mouse button. If you want to change it, just start moving the circle around the box again. If you're happy with the colour, click the "Apply" button. I decided I liked the bright red. And if you forget to click the Apply button, the program will prompt you. (Isn't that nice of it?)
Go back to the main edit menu by clicking on the molecule symbol on the left (above the beaker), and click on "Rotate".
Click on the third box from the left - the one that has two arrows going left and right - and your image will flip vertically. Is your image now backwards? Then click Apply.
And you're done! Well, first you have to save it! Click on "Save" up above your image. You can rename your image here if you'd like to. It's a good idea so that you still have your original for future editing. Click on "Save photo" and you can then choose where you want to save it.
And now you're really done. You can close PicMonkey and print your image on freezer paper. For instructions on how I prepped my freezer paper for printing go here.
I'll warn you that transferring images like this can get addictive! You'll be slapping graphics all over the place!
Let me know if these instructions work for you.
And I'd love to see the projects you come up with!
Here are a few of mine so far:
Hmmmm, is it obvious I have a drop cloth addiction to go along with my freezer paper (and twine) addiction?


2 comments:
Hey Barb, I've been waiting to try this since you told me where to find freezer paper here in Canada but now my printer is on the fritz. What type of printer are you using? (Ummm, I'm going to your post on how you prepped the freezer paper now ... just in case you mention your printer here)
It's an inkjet printer. Apparently a laser printer gets too hot and melts the wax so you aren't supposed to use it.
Post a Comment