We spent the Canada Day long weekend working on projects at Tom's parents' house. I didn't take nearly enough pictures though so I'll wait to show you what we did after we finish up this coming weekend. I did get this one hilarious shot of two of the dogs spying on us from the front yard though:
On Canada Day we did stay home. To put up a railing on our own front porch.
Our front porch is pretty plain and just crazy-small. We didn't need to make it larger - it's not like we hang out there often - but we thought it would be nice to add some curb appeal. Especially since the flower beds are all spruced up now.
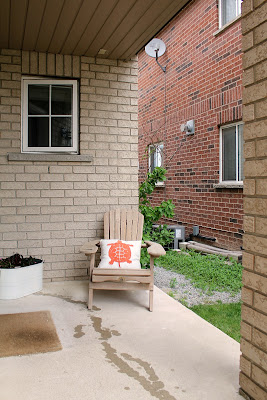
This is the porch "before". Just a 6 by10 foot rectangle with some dying flowers and a Muskoka chair. The turtle pillow is the prettiest part. You can see how close the neighbour's house is too.
The railing would add a little bit of privacy, especially if we planted some taller shrubs along side of it. Something like this. Also, when our dogs see the neighbours, they tear straight across the porch, and up onto the neighbour's porch (or into their house if the door is open). We're hoping that this railing will slow them down a little bit.
The railing is a build-it-yourself system from RailBlazers. I'm linking to them because we were really happy with how easy it was to install and the final look, and think they deserve some recognition. Plus the price wasn't horrible - less than $250 for an eight foot railing with decorative diamonds between the (wide) pickets. They even make the brackets for attaching the rails to the wall.
To install it, we first decided how close to the edge we wanted the railing to be. We just eyeballed it and decided to go with 4" from the edge. Tom then measured the space between the wall and the pillar exactly, and ended up having to cut about an inch off the length of each rail so that it would fit perfectly. You have the option of mounting the rail directly to the wall or to support posts (that you buy separately). Our neighbour on the other side installed the same railing using the support posts, but we thought it looked cleaner without big square posts at each end.
The bottom rail has a small support "foot" in the center, so that helps determine how high off the ground to mount the rail. We (okay, this was all Tom) drilled holes into the brick for the bottom rail brackets and then used concrete screws to secure the rail to the wall and pillar.
We put the rest of the railing together across two saw horses, just to make sure we had the correct number of diamonds and pickets. There are little metal spacers that go between the pickets so that you have even spacing. They just slide right into the grooves in the top and bottom rails. The diamonds attach to the rail in the same way.
We thought we'd be able to just lift the whole thing up and insert the pickets into the bottom rail, but the pickets had other ideas. They don't always fit tight in the groove so some kept falling out every time we lifted it. Going on limited sleep from the work we'd done all weekend, both of us were ready to just throw it a couple of times. But we found that if we inserted the pickets into the bottom rail first (with the spacers in place) and then attached the top (with the spacers and diamonds in place) that it was much easier. Once we switched methods we had it all together in about 10 minutes.
All that was left was to drill holes for the top rail brackets and insert the screws. Then we moved the chair back into place and updated the flowers.
It's so much more appealing now. A shady place where you might want to hang out on a hot day.
With all the work done we decided to take a rest. It was Canada Day after all. Here are Miss Grouchy-Pants and Miss Smiley-Pants showing off their patriotic neckwear.
I think Chloe was grumpy because she wanted to get back to her hammock and book already. The story was just getting good.


14 comments:
This looks really nice! And love the last pic they both look so comfortable!
Adding the railing was a good call. It looks more like a porch now and less like a slab of concrete outside your front door. The chair, pillow, and flowers look great.
We've just been talking about adding a little rail to our tiny square of a front porch. Thanks for the info!
Wow! What a difference! Love it! Your dogs are adorable too!
Great project. It definitely adds some curb appeal.
That came out awesome! Thanks for linking up!
Kim
Stopping by to let you know I am featuring you tomorrow on Made in a Day! Thanks for linking up!
Kim
A-MAZ-ING how much more finished that looks. You have to LOVE it. I know I do. Thanks for sharing.
p
Thank you! We really do love it. It's slowing the dogs down already!
Thanks, Kim!
Aww, thanks!
We talked about it forever, then just decided to get it done. It was really easy!
Yes, a slab - exactly. Thanks for stopping by!
Thank you! And I never get a turn in the hammock thanks to those two. :-)
Post a Comment