So what to tackle that can be done in a weekend and make an impact? How about a console table for the sectional in the basement TV room?
I talked about this sofa when we bought it - it's a monster, but a comfy, cozy monster. We love that there is room for everyone, and then some.
We estimated that we could go with an 8 inch wide table without encroaching too much on the necessary floor space. No one wants to have to squeeze past the couch to get into the room, right? An eight inch wide table isn't very much, but it's not like we're going to be putting big lamps or books on it - it's more for convenience than show.
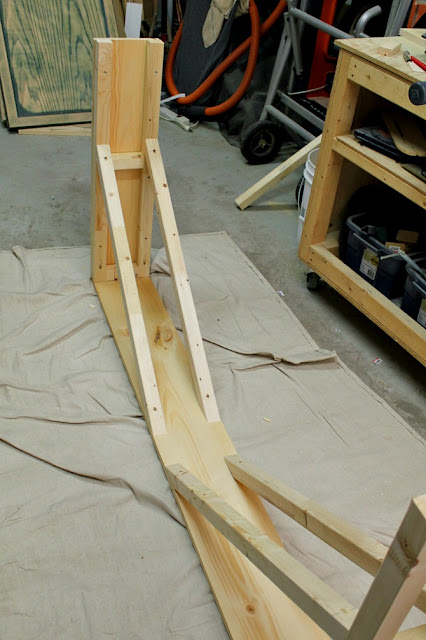
We measured the length of the couch on each side - 10 feet on one side, 8 on the other - wow! - and discussed how we wanted to support the table. We decided on two 2x2 legs at either end of a board plus one pair in the middle, for a total of 12 legs. Plus we added a length of 1x8 at each end for a nice finished look. The table is almost completely behind the couch so there was no need for shelves or fancy woodwork on the ends - no one is going to see it! Tom also wanted to put 2x2 cross braces diagonally between each set of legs to keep them from bending in towards each other.
The build was pretty straight forward - each "arm" only took an hour or two.
Here is a tip to make lining up the cross pieces easier - use a piece of wood cut to the length you want, clamp it to the support leg, and use it as a jig so that your cross piece is at the exact same height on each leg.
To attach the cross pieces to the legs we made pocket holes using our Kreg Jig R3 - a pocket hole jig that is AMAZING. This baby is only $40 and will change your life. You clamp the jig to your piece of wood, drill through the guide holes, and it puts an angled hole exactly where you need it. When the screw is attached, the screw head is hidden and you can putty over it if you want.
While Tom built the second half, I started staining the first half. I tried out my cerusing skills again but I don't know, I'm still not getting the paint into the grooves made by the wire brush. I used Minwax stain in Jacobean, and a sample can of grey paint. I wonder if I'm watering it down too much. This time I scrubbed it really well with the steel wool after waxing it, and I can't believe how smooth it is! I love that I learn something new every time I refinish a piece.
Oh, and you see that piece of white plastic beside the paint cans? Yeah, I got in trouble for using it as a stir stick. Apparently the piece of what I thought was scrap plastic was actually a $5 piece of heat-shrink tubing. That you can only buy in $100 lots. And it was his last one. Sorry. (Said with a Canadian accent.)
Let's go back to admiring the table surface, shall we? Smoooovvvve.
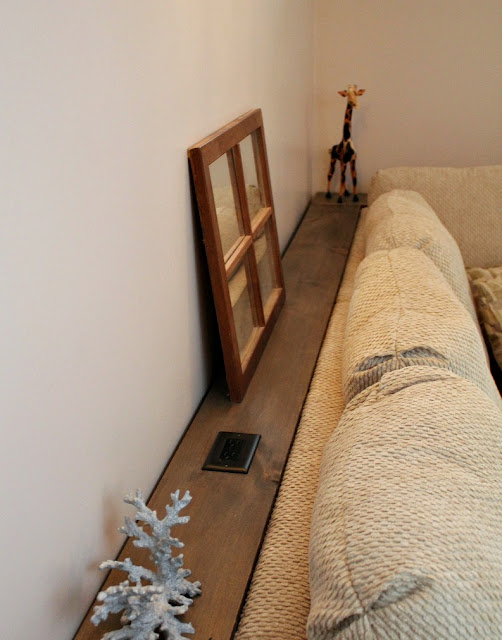
Another thing that's always a pain in the butt with large couches is that electrical outlets end up behind the couch where you can't get to them easily. Tom came up with the idea to add an outlet to the table top, one on each side. They are just standard outlets like you'd have on your wall, built flush into the top of the table, with a cord to plug it into the wall outlet below. Clever, hunh? I swear I liked the idea so much it brought tears to my eyes. I like to use my laptop downstairs and I hate running the power cord across the room because I'm always afraid of the dogs tripping over it and yanking the laptop out of my hands. Now I can plug it in right behind me. And we can add a small lamp if we need to.
Update: I've posted a step-by-step tutorial here with instructions on building an outlet of your own.
Further update: We've recently upgraded to an outlet with built-in USB ports and switched out the cord to a grounded (3-prong) wire. See tutorial for additional instructions.
The two ends of the table fit together in the corner with carriage bolts screwed in underneath. I forgot to take pictures of it, but you probably get the idea. A carriage bolt, a washer, and a wingnut
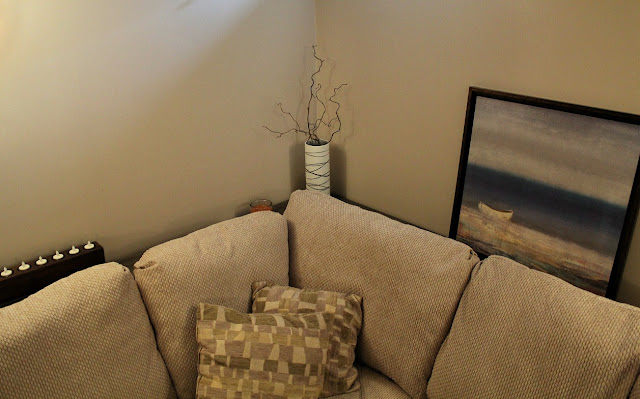
Taking pictures of this thing in place isn't easy. And pay no mind to the staging, I just added some random objects so it wouldn't look so bare. We really like how it isn't obvious - the cushions are a little higher than the back of the couch so it's hidden - yet it's the perfect location for holding your drink.
All together it cost us less than $100 for wood, outlet parts, and screws/bolts - we already had the paint & stain - and about 6 hours work. Nice!
~~~~~
I'm linking up here this week!


67 comments:
Love this and the electrical outlet on Table top brillant!
You guys did an amazing job! I love the color and design of the table! Stopping by from reasons to skip the housework link party!
Selene @ restorationbeauty.com
Really cool idea. So creative. I would love it if you would share this at my link party.
http://www.ifitsnotbaroquedesignblog.blogspot.com/2013/03/tuesday-link-party-10.html
This is an excellent project! {I had to pin it- a plan is already forming in my head} And I must say those sofas do lot comfy :-) Thank you for linking this at the ALL MY BLOGGY FRIENDS party!
Love this idea! The electrical outlet is genious! Pinning for someday when we have a finished basement...
Wow! So creative. LOVE it. Saw your post over @ Someday Crafts.
This is great! I'm always stacking stuff on the top of the couch and it slides down either the cushions or onto the floor. This is a great solution!
Linking up from Domesblissity. This is fabulous. I am impressed. It would take me more that 6 hours to make!!
This is great. What a crafty partner you have there. I am going to show this to my husband in hopes of inspiration. Thanks for sharing..linking up from Boogie Board Cottage. You site is great. I am now a follower. You can follow me at my blog: One Day at a Time. http://lovinlife1dayatatime.blogspot.com. Thanks
This is a fabulous idea. I love it! Thanks for sharing.
That's pretty awesome! Thanks for sharing at Pinworthy Projects.
Thank you!
Nice to meet you! Thanks!
Well, I did have some help. Who knows how long it would take if I had to put it together myself! Thanks for stopping by!
Thank you!
Thanks!
I've let Tom know that everyone loves his outlet idea! He's pretty proud.
Thanks, Linda!
Thank you!
Tom says thanks! :-)
Oh, wow! That is awesome! I just did a faux sofa table but just used a board and L brackets, lol! I love that you have an outlet right there.
Well that's just genius! It looks great, I never would have thought of something so skinny but I really like it!
Tania
You clever woman. For me the most ingenious part was that you thought to add the outlet. Thanks for sharing
Very nice, nice to be able to put a lamp behind on a long couch. Nice work andi
gorgeous table! Love the color you stained it :) Thanks for sharing at the weekly creative.
Shannon @ Sewing Barefoot
Hey! I've featured you today on Make Something Mondays! Come by and check it out...and thank you for linking up!
~ Sarah
http://sarahndipities.indiemade.com/blog/make-something-monday-link-party-75
That looks great and the pics of the dogs are really cute!!
Thanks for sharing!
Stacey of Embracing Change
such a great use of space! Putting the plug on the top was genius!!! I host a Tuesday link party that I would love for you to join! www.nap-timecreations.com
I love this idea!!! I never would have thought of putting a table behind the couch like this...and the built-in electrical outlet makes it even better. Thanks for sharing.
Maria from Krafty Cards etc
Gidday Barb. I love this idea. I could do with a few of these made myself. I'm featuring this at tomorrow's Thriving on Thursdays. Thanks so much for linking up. xx
Very nice! I love it! I wish I had a place for one! Thanks for linking up last week on Made in a Day!
Kim
Love this Barb! I saw a shelf that another blogger used behind her sofa and I really wanted one! I showed the image to Frank and he didn't budge, Oh well, someday.
Great idea! Thank you for sharing at Rustic Restorations Weekend!
LOVE...LOVE...LOVE. Genius idea with the outlets too! (holly at 504 Main)
This is a great idea! I love that you put the outlet in the table. You are today's Dare to Share Feature of the Day.
http://www.pamspartyandpracticaltips.com/2013/03/diy-sofa-table-feature-of-day.html
That is such a great idea, wow! I wish my husband were more handy, I'd have him building me one tomorrow!
So stinking cute and functional! Love it! Thanks for linking up the Check Me Out Saturday! I loved yours sofa table and featured it on Check ME Out Saturday Craft Link Party Highlights! http://iamonly1woman.blogspot.com/2013/03/check-me-out-saturday-craft-link.html
That is an absolutely genius idea! I love that you put an outlet on the table too. So, so smart! Thanks for linking up to our Pinteresting Link Party!
Just wondering if anyone has used this and had it last for a yr. or even
a few yr? Usually when u use latex paint over oil-based it won't stick
well enough to last very long. Hoping that's not the case with this product---that would be awesome!!
Thank you! I love that Tom thought of it - we've used it so many times already.
You could totally build it! I am lucky that Tom understands electrical so well though.
Thanks, Pam!
Thank you!
Aww, tell Frank it's easy! Is he worried about how much space it'll take up?
Thank you!
Thanks, Anne!
Thanks, Emily!
Thanks, Sarah!
Thank you!
Thanks!
Thank you!
I can't take the credit for that, but I'm definitely enjoying having it! Thanks for stopping by!
This microfiber couch is extremely comfortable. This is my first (nicer) couch so I was careful in my selection. It comes in 3-4 big boxes and assembly takes about 30-40 minutes, and is very easy. I've only used the couch by myself (150lbs), so I can't say how larger people or multiple people would feel on it. So far though it's very comfortable sectional sofa
Thanks so much, Meredith!
I absolutely Love this couch, I have a small apartment and it fit perfectly in my space. The quality was better than what I expected. The Pillows were very trendy even though I did not use them, I keep them in storage to switch them up. The ottoman is so useful. My daughter and I cuddle up every night and watch cartoons. It absolutely makes my apartment look so Chic. I couldn't have asked for a better couch for this price.! The Shipping process was a little fiasco but it was worth it. I definitely Recommend this small sofa
Absolutely love this! I'm curious how you converted the wall outlets into plugins?
My husband did that - I'll get some details from him and write back.
fantastic and looks wonderful!
Thank you!
I LOVE this. Hoping when we have a finished basement (someday!) that my hubby will make this for us. I've featured it on my blog, check it out! http://www.unoriginalmom.com/original-fridays-1/
I would love to know how you did the outlets as well!! I must do this!!
Very lovely DIY Sofa Table. I love to see your all sofa. these all are really amazing
electric couch
DIY Sofa Table is looking so beautiful. http://www.leathersofaland.com
The electrical outlet as shown is not grounded. The idea is fine, however the cord and plug should be one with a ground cable. Standard romex wire with a three-prong plug, instead of the two, would be preferred.
This is the most amazing thing ever. I cannot get over how brilliant an idea this is.
Aww, that's nice, thank you! We've loved how handy it is.
Great idea for behind sofas and even beds! Only thing I would caution on is the outlet. Being married to a Journeyman Electrician, an outlet facing upwards is in line of danger for spilled drinks and even small items falling into it. Make sure the outlet is GFI protected and covered to prevent potential hazardous issues! Optimal placement of the outlet would be on the side pieces of the table. I think I may do this project for a new headboard for our bed and add outlets outfitted with USB charging! Thank you for the idea!
Post a Comment