SEARCH THE BLOG

Nov 29, 2011

Vacation Ornaments

I've been on an ornament kick lately. 

First there was the pinecone map ornament
Then I did three more on the weekend.
I bet I could do 30 different posts on ornament ideas I have. 
Maybe next year I'll do a "30 days of" series.

Today I'm going to show you the clear glass vacation ornaments I made.

Backstory:
I collect sand from every beach vacation we take. 
I know people who collect sand from anywhere,
but I only collect it from places I've been to myself
and that have special meaning to me.
I have a window sill full of labelled jars from each vacation. 
I'm going to have to find a better place to display them
though as I've run out of space.

I bought some clear glass ornaments (with a 50% off
coupon of course) when I was at Hobby Lobby this summer.
 Going to Hobby Lobby was a huge deal for me as we don't have any in Canada.
Between that and The Christmas Tree Shoppe I felt like I was at Disneyland. 


I didn't notice that the balls were iridescent when I bought them. 
It makes it hard to show the different colours of sand.

Since Hawaii is our #1 favourite vacation spot, I started with that one.
I used sand from Lanikai Beach on Oahu. I carefully poured 
sand into the ornament and then added in some very small shells. 

I'm going to be honest here - the shells are from Prince Edward Island
I don't think I've ever seen shells in Hawaii. 
But I couldn't have an ornament with just sand in it. 

Vacation Ornaments - Turtles and Tails blog

 I did print out a label with the place and date to put inside,
but I couldn't get it to lay properly without covering up the shells. 
Something I'll have to work on. 

Vacation Ornaments - Turtles and Tails blog

I tried different ribbon combinations
but settled on using hemp twine to make a bow.

Vacation Ornaments - Turtles and Tails blog


Vacation Ornaments - Turtles and Tails blog

I also made one with sand from our trip to Cuba for my cousin's wedding. 
The sand was so soft and powdery. 
That trip was a lot of fun as there was a huge group of us
and it was Tom's & my first time in Cuba. 
Hopefully not our last.

Vacation Ornaments - Turtles and Tails blog

The fourth one is from the sands at Basin Head
(Singing Sands Beach) in Prince Edward Island. 
The squeaking noise the sand makes when you walk on it is hilarious. 
You can even do it just by running your hand across it. 
We had so much fun watching the dogs try to figure out
where the sounds were coming from.

Vacation Ornaments - Turtles and Tails blog

After finishing them I realized there wasn't enough variation
in the sand colours, so I emptied out the one from Hawaii
and used two other Hawaiian sands - from Black Sand beach (Punaluu) 
and Green Sand beach (Papakolea) - both on the Big Island.

Vacation Ornaments - Turtles and Tails blog


Vacation Ornaments - Turtles and Tails blog


Vacation Ornaments - Turtles and Tails blog


Vacation Ornaments - Turtles and Tails blog


Vacation Ornaments - Turtles and Tails blog

Ahhh, that iridescence!  You can see me in every shot.

~~~~~~~

I'm linking up to these great parties this week!

Nov 28, 2011

That's a Wrap (Wrapping Paper Centre)

After this weekend I'm one step closer to having a real craft room.

Tom & I installed my "wrapping paper centre" on one of the blank walls above the worktables. 

Wrapping Paper Centre

I looked at dozens of pictures online and sketched out different layouts, until eventually deciding I wanted something very simple and streamlined.  Just two vertical pieces of wood with dowels hung horizontally between. I didn't want something bulky and overpowering in the room. Plus I'd probably bump into it all the time.

Tom gets so frustrated with me because I have to physically lay things out to get a sense of the space, I can't just picture it in my head. I made him wait while I layed rolls of wrapping paper and ribbon on the floor to figure out the spacing. Then did it again once the wood was cut. I probably would have checked a third time if he'd let me. I arrived at 6 dowels for paper, one for ribbon, and an extra one at the bottom for tissue paper. 

The build was really simple. Two 38" lengths of 1x3 with cup hooks screwed in at even intervals. 

Wrapping Paper Centre

We added a "bump-out" for the larger ribbon rolls with another small piece of 1x3 at the top of each board. 

Wrapping Paper Centre


Wrapping Paper Centre
(I'm supposed to mention - Don't do this at home. Tom is demonstrating very unsafe power tool handling.)

A few Many coats of plain white semi-gloss paint were needed. In retrospect, I think it would have been faster to spray paint them. Of course, primer wouldn't have hurt either.

Wrapping Paper Centre

It wasn't until I had the hooks back in that I noticed the holes on the two boards didn't line up. 
Tom had attached one of the bump-outs to the wrong end of the board. Maybe he should have laid it all out first instead of visualizing it. Just sayin'.

Rather than remove the piece, sand and repaint, he redrilled the holes and I puttied and painted over the old ones. We hung it with anchors and screws (checking with the level multiple times - I'm a safety girl) and measured the dowels for cutting. Eventually I'll get around to puttying and painting
over those anchor screws, but not today.

Wrapping Paper Centre

Check out this cool flukey shot - it looks like the hammer is transparent.

Wrapping Paper Centre


Wrapping Paper Centre

Having it all up there makes me realize that I'm not very adventurous with my ribbon colour choices.  I'm going to have to remedy that. 

Wrapping Paper Centre

This wasn't my first choice for how to hang the tissue paper, but I couldn't figure out anything that didn't stick out too far from the wall. I considered a pant or tie rack with arms that would fold flat
but couldn't find one anywhere.

Wrapping Paper Centre

I'm very happy with it.  Everything is tidy and accessible. 

Wrapping Paper Centre

Wrapping Paper Centre


And I don't have to worry any more about finding a bunch of chewed up ribbon under the spare bed because Little Dog thought it was a new toy.

Exhibit A:


Oh, I see you Little Dog. I see you.

~~~~~~~

I'm linking to these great parties!

Nov 27, 2011

40-Acre Couch

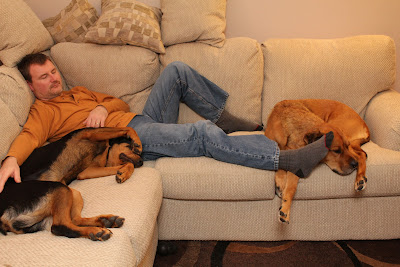
It was a big day here on Saturday. 
We bought a sectional for the basement to replace the one
that just wasn't big enough for two people and two big dogs. 

Our old couch is about seven years old.
It was the perfect fit - at the time. 
We only had one dog and she didn't always want to be on the couch anyway.
 
But these two.  Bi-i-i-i-ig snugglers. 


And they sprawl. 
Plus Chloe hates when Sasha is touching her. 
It's a whole thing with her.

We've been looking for a new couch for quite a while
but couldn't find exactly what we wanted
 - U-shaped, deep cushions, low rounded arms, not leather -
for a price we were willing to pay. 

But then, a few weeks ago we wandered into Leon's and the salesman
told us about a 20% off friends and family sale they were having the next week.
If we put a deposit down that day we could have the sale price.
So we jumped.  Without looking around.
In our defense, we did spend the following week comparing prices
at other stores but nothing came close. 
So it was all good!
  
Here is the old one.  Pretty exciting, right?

Those aren't stains on the cushions, just the way the nap is laying.
And the walls aren't pink, it's just a bad picture.

We moved out the old couch the night before
to measure the space for the new one.  
And got a little scared.  It was going to take up most of the room.
128 inches wide.  99 inches long.
Wow. 
Here's hoping we're wrong.

8:45am Saturday morning. The delivery truck is here!


Excellent delivery guys. 
They even moved the old couch out to the garage for us. 

And look! The couch fits! 


Check out the chaise. 
There are going to be fights over that spot. 


This is, "Here's what I want to do with the room"
- and, "Please don't take my picture." 


I know the walls, carpet, and couch are all
the same colour (that's an area rug in the picture above).
But that's going to change. Soon
We've been waiting to find a couch before we decided the colour
for the walls and a new area rug. I can hardly wait.

Looks like everyone is pretty happy with the new seating situation. 


And someone doesn't want to leave. 


Not even if you ask. 


Nicely. 


Noooooo! I don't wanna go!


How cute is this?


I think we have a winner. :-)


Nov 23, 2011

Tray-ding Up

We had a surprise party in August for Tom's 40th birthdayand my aunt brought a tray of cheese and crackers. It was a dollar store tray that she was more than happy to leave behind. I decided that I would break out the mod podge and fancy it up. 

First I spray painted it with Tremclad "Anodized Bronze". 

serving tray mod podge book pages

I had gone to Goodwill to find some books to take apart and glue to the tray bottom.  But they were so pretty that I just couldn't. I went through my bookshelves and found an old Alfred Hitchcock collection that no one was ever going to read and randomly cut out some pages. 

My apologies now to the person that does finally decide to read it and will never know who-done-it. 

serving tray mod podge book pages

serving tray mod podge book pages

I cut the pages in half to make them easier to work with, then tea-stained them and applied them to the tray with watered-down mod podge. An excellent tip I read online was to glue them down randomly - don't work from one side to the other - otherwise you'll end up with them all on top at one end.

serving tray mod podge book pages

I was pretty darn happy with the effect. I even added a fall leaf for some colour and texture.

serving tray mod podge book pages

serving tray mod podge book pages

But then we went to the Leonardo da Vinci Workshop exhibition at the Ontario Science Centre (a must-see if you're in the Toronto area). I fell in love with the reproductions of his writings and drawings (also the lion and the self-supporting bridge). 

I found some copies online, sepia tinted them, and printed them out. This was so much more me. Always been more the science geek than the literature geek. 

But. But. Mod podge on printer paper is not a nice look. You could see right through the paper to the printed pages below. And it was a bit smeary. Thank goodness the original mod podge provided a barrierbecause I just scraped the new pages right off without damaging the pages below. I have no pictures of this fiasco. Be glad.

I sprayed on some clear coat to protect the paper and mod podge from moisture and heat. I stared at it for a while. I just wasn't happy with the tray colour. The grey was too primer looking for my liking.

Seriously, is this ever going to end? 

I carefully taped around the edges of the tray bottom with painters tape and then taped down a leftover paint roller bag (recycle! reuse!) to protect the bottom from overspray. 

serving tray mod podge book pages

I gave the tray a few coats of ORB (oil rubbed bronze). I tried Krylon this time instead of my usual Rustoleum. I think I like the Rustoleum better because it has more shimmer. But the Krylon is cheaper, so it's a toss-up.

When it was dry I pulled off the tape and was much happier with the result. There was a better contrast between the aged pages and the dark tray. Plus the paint colour is very close to the printing colour on the paper. 

serving tray mod podge book pages

I bought some black silk cord and hot glued it around the seam between the tray and the paper bottom. It gives it a nice finished look.

serving tray mod podge book pages

The pictures don't really do it justice as the ORB doesn't seem to reflect the light very much.


Here we are all done up for the holidays with some decorations.

serving tray mod podge book pages 

serving tray mod podge book pages

serving tray mod podge book pages

serving tray mod podge book pages

serving tray mod podge book pages


Related Posts Plugin for WordPress, Blogger...