SEARCH THE BLOG

Aug 28, 2013

Anniversary Adventure Weekend (Blue Mountain Resort)


Our anniversary was a few weeks ago, but we didn't have time to celebrate until just this past weekend. We don't normally make a big to-do about our anniversary - just dinner usually - but we were bored and decided to have some fun.  So we went to Blue Mountain resort near Collingwood, Ontario to try out the summer activities. The last time we were at Blue Mountain it rained the entire weekend, so we weren't able to do anything outdoors. This weekend was beautiful though and we "played" until we were exhausted.

We stayed in the resort village at Seasons at Blue - with a room that looked out on the mountains. This was the view on Saturday morning. Perfect.

Blue Mountain Resort, Collingwood, ON

We started the day with a trip to the Collingwood Farmers Market. It's a small market, but they have a wide variety of things for sale - vegetables, fruit, smoked meats, bread, jam, cookies, and handmade furniture. We bought some salami, jam, zucchini, and...something else, but it's a gift so I can't talk about it.

Collingwood Farmers Market

Collingwood Farmers Market

Collingwood Farmers Market

We also met this German shepherd puppy. He came from a litter of eleven puppies that had been abandoned. How adorable is that face? I didn't want to leave him. Sigh. Puppies.

German Shepherd Puppy

German Shepherd Puppy

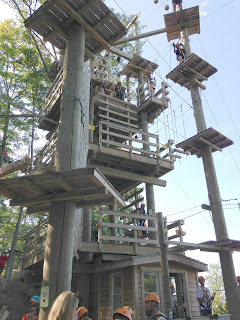
But we had to get back to the resort because we had an appointment with some trees. We'd signed up to try out the Timber Challenge High Ropes. There are seven different courses with rope bridges, cargo nets, zip lines, and wobbly wooden bridges, all 10 to 50 feet above the ground.

Timber Challenge High Ropes, Blue Mountain, Collingwood, ON

You start out with ground school to learn how to use the equipment, then you work your way up through harder and harder elements. I'm not particularly afraid of heights - if I feel secure - but when the bridge you're on is swinging around, or you're walking across a cable with just dangling ropes to hold on to - that's scary. 


Timber Challenge High Ropes, Blue Mountain, Collingwood, ON

Here I am on my first zip line. I forgot to plant my feet at the end and almost fell backwards. Bit of a moment of panic there.


There aren't a lot of pictures of me on the course as Tom got yelled at for using the camera phone up on the platforms, but I got some photos of him once I was back on the ground.


Timber Challenge High Ropes, Blue Mountain, Collingwood, ON

This one scared me the most. Tom called it the "pogo sticks". He crossed it twice, but once was enough for me. Those poles are only attached at the top. If you go back to the first picture you can barely see the bottoms of the poles in the top left of the photo. That's how high up we were.

Timber Challenge High Ropes, Blue Mountain, Collingwood, ON

Timber Challenge High Ropes, Blue Mountain, Collingwood, ON

Timber Challenge High Ropes, Blue Mountain, Collingwood, ON

And check out my new bruises! I didn't even feel them until the next day. Both of my forearms are pretty beat up too. One guy who did the hardest course came back down with scraped and bloody arms. This was tough!

Gun Show

After 3 hours were were tired and hungry so we headed back down the mountain for some food. But on the way Tom decided that he wanted to try out the climbing wall. It wasn't a difficult one but he'd never done it before so he couldn't say no.

Climbing Wall, Blue Mountain, Collingwood, ON

We stopped for dinner at Rusty's at Blue, a restaurant in the village, and I had the most amazing Cajun catfish tacos. These were seriously the best tacos I've ever eaten. Huge pieces of fish, spicy sauce, guacamole, and homemade tortillas.

Cajun Catfish Tacos, Rusty's at Blue, Blue Mountain

We spent the rest of the evening in the pool and hot tub, and then crashed for the night. The next morning we got up and headed out again, to the Ridge Runner this time. It's a mountain coaster where you control how fast you go, and you can reach speeds of 25 mph if you go full out. I couldn't take pictures while on it (holding on too tight!), so here are some from our last visit and from around the 'net.

Ridge Runner Mountain Coaster, Blue Mountain, Collingwood, ON

Ridge Runner Mountain Coaster, Blue Mountain, Collingwood, ON

Ridge Runner Mountain Coaster, Blue Mountain, Collingwood, ON

Once the adrenaline rush had worn off, we grabbed some lunch at an Irish Pub, and then rode the gondola up the mountain to take a walk around the Niagara escarpment.

Blue Mountain Resort, Collingwood, ON

Blue Mountain Resort, Collingwood, ON

Blue Mountain Resort, Collingwood, ON

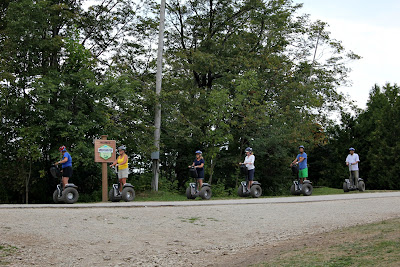
Watch out for those Segway gangs!
Blue Mountain Resort, Collingwood, ON

Blue Mountain Resort, Collingwood, ON

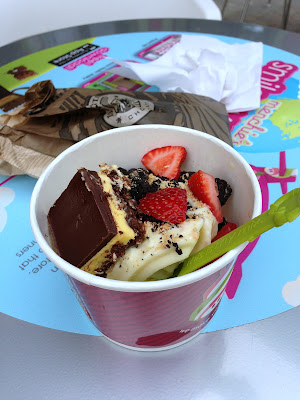
By this time it was starting to get overcast and threatening rain, so we toured through the shops, grabbed some frozen yogurt, and headed home. This is the first time we planned something for our anniversary, and it was a blast. Can't wait 'til next year!

Blue Mountain Resort, Collingwood, ON

Blue Mountain Resort, Collingwood, ON

Blue Mountain Resort, Collingwood, ON

Blue Mountain Resort, Collingwood, ON

Blue Mountain Resort, Collingwood, ON

Blue Mountain Resort, Collingwood, ON

Blue Mountain Resort, Collingwood, ON


Aug 22, 2013

Lego Table from a Coffee Table (Flashback!)


When I was putting the bookcase back together after painting the front room, I came across a photo of my very first DIY project. This thing has to be 10 years old at least. Before I even knew what a blog was.

Coffee Table to Lego Table

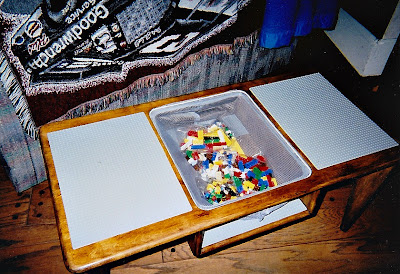
The table was a Christmas gift for Tom's nephews and I was so darn proud of it. Unfortunately I only took one picture of the finished product, and no pictures of the steps taken to get there. Please excuse the Nascar blanket thrown over the couch - it was that era too.

The table started out as a plain coffee table that my mom found for me at a resale shop. I was in college and didn't have very much furniture of my own. The center had a glass insert, and the shelf underneath was perfect for storing remotes, books, cookies...you know, the usual. Years later we upgraded our furniture and I almost got rid of this guy, but then inspiration hit.

First I removed the glass insert (I wonder what happened to it?), and stripped the honey-coloured finish off of the wood. I remember I then restained it in a dark, dark shade (think ebony) with a poly topcoat. But I didn't like it, so I stripped that off too and tried again. I think this might be Minwax's Provincial.

There is a mesh net in the center well to hold all of the loose Legos. It was the bottom of an unused laundry bag - something like this:


We glued the raw edge of the bag around the frame of the well, and then finished it with some white cord as the glue was a little rough to the touch.

We bought a huge sheet of grey Lego baseplate and cut it to fit the two flat surfaces on the top. We just glued it right to the table. This gave the kids a place to build at a comfortable height, and all of their Legos were right there close by. There was some baseplate left over, so we cut it in two and glued each piece to the edge of the center shelf, to give them a couple of extra places to build.

Nowadays, you can find hundreds of homemade Lego tables out there, but back then, we were feeling pretty original. We had seen a couple of pre-fab, factory-made tables, but I liked the sturdiness of ours. And with that solid wood, I think it's something that could get passed down from generation to generation. Do you think Legos will be around in another 60 years?

Coffee Table To Lego Table


Aug 20, 2013

Bye-Bye, Burgundy - Painting the Front Room

We dove right in and painted the front room this weekend. This is the last room that still has the previous owners' colour scheme. Except for the basement. And the master bath - but that's going to be a complete gut job.

We aren't finished with the room yet, but I'm so slow at getting projects done and writing about them that I wanted to give you an update. I don't want you to think I've just been lazing around in my backyard hammock all summer. Though if it had rained less this year I might have been.

But back to the painting. This front room is difficult to describe. It's not a bedroom because it doesn't have a closet. It's upstairs so it's not really a living room. The builder's floor plan called it "the learning centre". That sounds creepy. We call it "the computer room". Because it has a computer in it. Geniuses, I tell you.


As you can see the room was a really dark burgundy. It's a colour we loved - in fact the living room in our old house was that colour for a few years - but we've grown out of it. We're more about calm, restful shades now. And we were never into that sun and moon border at the top. Way to make the room even darker!


The redeeming factor is the huge bay window that faces south. This room gets so much light. And if I let you look closely you would see the nose art gallery on the windows, because the dogs spend all their time there - spying on the neighbours. My dogs know your secrets.


The one wall has looked like this for two (three?) months. We were having a tough time because we wanted something that wasn't too green, too grey, too washed out. We've made each of those mistakes before. I let Tom decide since he spends the most time there. He chose Benjamin Moore's Nimbus Gray. It's really a blue with grey undertones.


I don't have many pictures of the new colour on the walls as we haven't put the room back together yet. Just what I grabbed with my phone. Sasha snuck in while I was painting the door - I'm pretty sure she thinks I don't know she's there.


This one shows off the colour the best. And with the new white trim. Isn't white trim just the greatest thing? Tom recommended we keep the couch in front of the window when we're done - so that we can be comfortable while we spy. Unfortunately it also makes us a little obvious. Less like spies, more like gawkers.


I can't wait to get the bookcases put back up - the contrast between the dark wood and the light blue is going to be gorgeous. I'm going to bring in some more white and tan to tie the furniture and walls together, and then I'll need an accent colour to give it some life. I'm really favouring orange this year - what do you think?


Aug 15, 2013

Happy, Happy Birthday!


Today is Tommy-boy's birthday. The big 4-2. He should be very excited - it IS the answer to the ultimate question of life, the universe, and everything after all.

All he wanted was a coffee cake. Is that the weirdest thing? I think so. Of course, I like those McCain grocery store freezer section cakes, so maybe I'm not one to judge.

Last year I asked the bakery dept. at the grocery store if they could write "Happy Birthday" on the coffee cake for me. No, they could not. So this year I was prepared. I bought cake decorating tools at the dollar store and a can of cream cheese frosting.

I've never written on a cake before so I practiced a bit. On some fry bread. Use whatcha got. Bonus for me, I got to eat the iced bread later. I've tried to use a ziploc bag with a piping tip to make flowers before and had no luck, but this plunger style was excellent. Plus it was only $1.50. And in case you're wondering, I didn't spell happy wrong, I just wanted to make sure I could make a round letter.


The plan was to write "Happy Birthday Tom" around the circle, but with the surface being so bumpy I couldn't write on part of it. So I changed tips and added two rosettes and some nonpareils.


Ta-da! I'm sort of impressed with how it turned out. I'm not going to be entering any contests, but at least it's legible. I then rushed around and cleaned up my mess and hid the cake. This morning I added two candles.


I think he's pretty happy. Success!


Aug 12, 2013

Floating Bedside Shelves


Just a tiny, little carpentry project this week. But it was kind of a big deal because I cut the wood myself. With the sliding mitre saw. I'll admit that it took me longer to figure out how to unlock the saw arm than it did to cut two pieces of wood, but I did it!

Our bedside tables are a little crowded with books, globe lamps, water bottles, alarm clocks - the usual paraphernalia. No bedside styling or tweaking in my house, we just don't have room for it. We could have installed wall-mounted sconces, but since these lamps are less than a year old that wouldn't be very fiscally responsible, would it?

floating bedside shelf - cerusing

I had the idea to get the lamps off the tabletops and put them on floating shelves. Now ideally I would have liked streamlined, 100% floating shelves, but that isn't really possible with the depth of shelf we need. So I gave in to having a (small) support underneath. But all of the shelf supports at the big box store were either huge (like over 8" in each direction) or made of something other than wood. I wanted the support to blend with the shelf, so it had to be stainable/paintable.

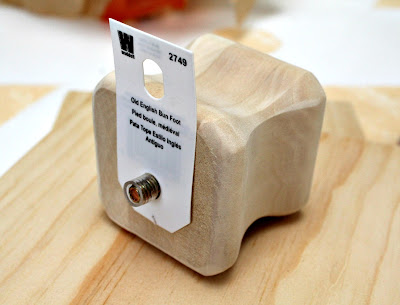
We eventually wandered into the moulding aisle and found some short, squatty table legs - or bun feet as they're called. Do you know how much fun I had saying "bun foot" over and over again? I bet you do. We tried out all the different styles and settled on the square one. The plan was to cut off the back of each foot to make it flush with the wall and attach it to the shelf above. And remove the top screw of course.

floating bedside shelf - cerusing

So here were my supplies. Two 7" x 7" pieces of scrap one inch board, (some screws), and two bun feet.

floating bedside shelf - cerusing

Tom did the scary support cutting and then attached the board and the foot to each other with wood screws, plus he drilled two offset holes in each support so that it could be mounted directly to the wall. He also cut a channel down the back of each piece so that the lamp cord could fit through and be centred, rather than hanging off the side of the shelf.

floating bedside shelf - cerusing

I puttied and sanded the top screw holes (the other ones would have to wait until after the shelf was mounted), and then stained and painted the shelves. I used the same cerusing technique that I did on the nightstands, trying to match the grey barnboard colour as closely as possible. Here are some other examples (one, two, and three) of that paint-on-stain technique if you'd like to see some instructions.

floating bedside shelf - cerusing

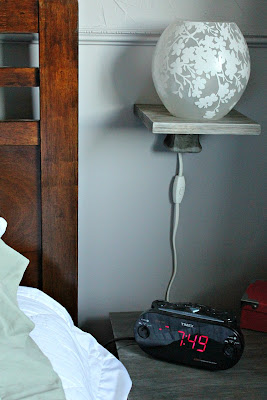
I held the lamp and cord in place while Tom mounted the shelf to the wall. Luckily he hit studs both times so we didn't have to use the anchors, and we don't have to worry about the shelves falling down. The lamps aren't that heavy anyway so I don't think there's any danger.

floating bedside shelf - cerusing

The lamp has an on/off switch on the cord that hangs at the perfect height when you're laying in bed. No more digging behind the nightstand in the dark, trying to find it and knocking everything all over the place!

floating bedside shelf - cerusing

floating bedside shelf - cerusing


~~~~~

I'm linking up here this week!

Related Posts Plugin for WordPress, Blogger...