SEARCH THE BLOG

Feb 26, 2013

Cerusing Nightstands (Hunh?)


It's time once again for another Pinterest Challenge - winter edition this time.  The Pinterest Challenge is a get-off-your-butt-and-make-that-thing-you-pinned declaration started by Sherry from Young House Love and Katie from Bower Power.  This edition is also co-hosted by Megan from The Remodeled Life and Michelle from Decor & the Dog.


I've participated a few times before - check out my photo bottles, yarn eggs, fold-up patio bar, and my favourite - the poop factory costume for the ever-patient Chloe.

This time I wanted to try something a little bigger, though since I can only do this DIY stuff on the weekends it couldn't be too big. How about a little nightstand makeover?

My go-to method of refinishing wood is to sand it down, wipe on dark stain, wipe on watered-down paint, and then wax and buff it to a shine. I love the results - every time it turns out a little different depending on the stain and paint colour I choose. If you'd like to see some of my past results go here, here, and here.

But colour me surprised when I found out there is a name for this method - it's called "cerusing". Except there is one additional step - you use a wire brush on the wood before staining and painting so that the paint gets right in the grooves. When you wipe off the excess paint, you get little spots of paint left behind. It's a great way to camouflage imperfections in the wood when you can't sand the heck out of it (like with wood veneer).

I first saw this on The Ridiculous Redhead and had to pin it. I love the results I've had so far, but paint in the grooves would add some extra depth that's been missing.

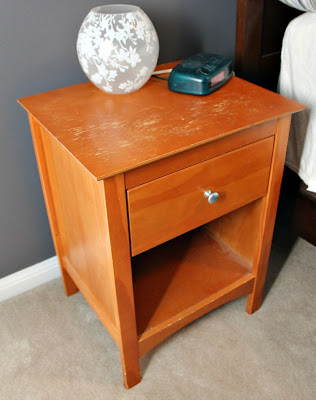
This is the nightstand that volunteered for the makeover. Plain, serviceable, nothing to write home about.

Nightstand - cerusing furniture

Someday we'll build ones that we love, but the to-do list is so long right now that it won't be any time soon. I'm not a fan of the orange stain and the top has some pretty bad water damage. But the body/frame is real wood, although with particle board/veneer on the top and thin plywood on the sides. Materials that make sanding an adventure.

Nightstand - cerusing furniture

Do you know that I sanded them in the bathroom? Well now you do. I didn't want to go out to the freezing cold garage - we have a kerosene heater there but it burns my eyes after only a few minutes - and I didn't want fine stain/lacquer dust all over the house, so I chose the bathroom. The tiny, tiny bathroom. Pretty brilliant, I think. It only took about 90 minutes to completely strip each nightstand, though every surface in the room ended up covered in dust. And I sanded them on two different nights so I ended up cleaning the bathroom from top to bottom twice in one week. It's the hard-knock life.

They look pretty good naked, don't they? Tom thought I should leave them like that. Does he not know me at all? There's experimenting to do, y'all!

Nightstand - cerusing furniture

I used a wire brush to scuff up the wood - in the direction of the grain - on every surface of the stand. The veneer looked pretty cool because the brush would take out little divots rather than make big scratches. Don't forget to lightly sand again to smooth down the edges of the grooves when you're done.

Nightstand - cerusing furniture

I used a cloth to apply a thin coat of stain - Jacobean by Minwax - and then once it was dry applied a coat of "whitewash paint" with a new cloth. The colour I used was a mistint from the Habitat for Humanity ReStore - sort of a taupe-y shade with almost a pink undertone.

Nightstand - cerusing furniture

Nightstand - cerusing furniture

This might be the point at which I admit that this was a cerusing failure. The paint didn't appear to be in any grooves, it just looked like it always does (which is fine, but not what I was going for). I thought it might be too light - kind of a barn-board colour - so I added another coat of stain, but with a foam brush this time, and I let it dry without wiping. Once that was dry, I wiped on another coat of whitewash and then scrubbed it down, trying to mimic a wood-grain effect. Much better. Still not ceruse but I liked it. Two coats of Minwax paste wax and some buffing later, you have the final product.

Nightstand - cerusing furniture

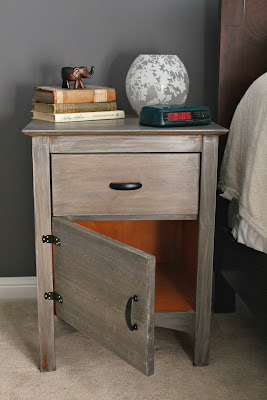
But wait! There's more. I didn't want to sand the inside of the nightstand - thin plywood, remember - but I also didn't want the old orange to show. So we built a door for the front of each that swings to the side and is attached with exposed trunk-style hinges. We swapped out the silver knobs for black handles as well. Lee Valley Tools has the most amazing selection of hinges and handles - everything from basic knobs to fancy shapes and hammered metal.

cerused nightstand

To make sure the door stays closed, Tom inserted a crosspiece below the drawer and screwed in a flathead screw flush to the wood at one end. He then countersunk a magnet in the back of the door that lined up with the screw and keeps the door closed when you want it to be. I applied a thin coat of wood putty over the magnet and the screw to make them less visible.

Nightstand - cerusing furniture

cerused nightstand

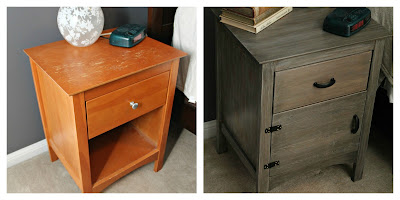
I'm thinking the door might eventually get a freezer paper stencil, but for now I'm pretty pleased with the results. The grey tone is more our style and it makes the nightstand look a little less factory-produced.

Nightstand - cerusing furniture

How about a little before-and-after?

cerused nightstand

I'm going to call this a win and keep practicing my cerusing skills.

Nightstand - cerusing furniture

Nightstand - cerusing furniture

Nightstand - cerusing furniture


Now head on over to the host sites and see what everyone else was up to this week!

~~~~~

I'm also linking up here this week!


Feb 25, 2013

Personalized Artwork


I received the most wonderful gift this weekend. The husband of a woman I used to work with is an artist, and he drew this picture of Sasha & Chloe after seeing a photo on Facebook.


This is the photo he based it on. They're showing off their super-serious faces because they think there's the chance they might get a jelly bean or two:


Didn't he do a great job? He used coloured pencils, and it took over 20 hours to do. His wife told me that it goes on in layers and takes many hours of concentration at a time.

I love the little quirks he captured - like Sasha's Hitler moustache and Chloe's gorgeous eyeliner. Since Sasha has a picture hanging over her food bowl, do you think Chloe would like this one over hers?

Have you ever had a portrait done of a family member (or pet)? We also have a painting of our previous house that was based on a photo taken from an airplane. We love looking at it and remembering all that land we used to have!


Feb 22, 2013

Pins That Make My Day

Happy Friday! For a short week it seems to have dragged on. Maybe because I'm looking forward to the weekend. This guy - and his twin brother - are getting a makeover:


There might also be an Ikea trip in the works. For some reason, the last time we were there I bought some prints and didn't buy frames to put them in. I'll probably have to buy meatballs and mashed potatoes too.

To kick off the weekend I thought I'd share some of my favourite Pinterest pins - some are things I've tried and some I really want to.

Enjoy!


Confession: I have made these cookies too many times in the last few weeks. Tom is in love with them. And it's only a few minutes from start to finish. I usually make four at a time so that there's always one ready to go. Top it with some ice cream and it's a little piece of heaven.


Isn't this a great idea? I'm really lazy about cleaning my brushes right away, especially between coats, so this would be a lifesaver for me.


Want to make your baseboards look more substantial? Home Depot suggests you add some trim above and then paint the space in between to match your woodwork. Instant upgrade!


This dog bed just makes me smile. My dogs love to "fluff" their beds, do yours? This bed is full of scrunchy material, but no stuffing to end up all over the place. I don't know where you can buy this but I bet you could make it yourself.


And one more food link. This is a new one I found today and I can hardly wait to make them. My mouth is watering just looking at the picture.


Feb 19, 2013

Family Day? Painting Day!

How was your Family Day (or Presidents' Day) long weekend? Ours was pretty great. We actually got something accomplished. I know! You're as surprised as I am. Especially if you consider that our kitchen still looks the same as it did 4 months after starting the Great Cabinet Makeover.

But we're not talking about that; we're talking about the bedroom. It has been painted. Finally. We've been here for four years and have been living with this:


So many problems. First, the plaster finish on only the upper half of the wall. It looked dirty. And outdated. And I really don't like yellow anyway. Then there was the chair rail - I guess to provide a transition from the top to the bottom. Way to cut the room in half and make it look smaller.


Note to homeowners - before you put a serious faux finish on your wall, ask yourself these questions - "Is this your forever house?" or "Are you planning on staying more than a few years?" If the answers are no then please, please, think about the people who are living there after you.

So we haven't done anything with the room until now. I didn't even try to dress it up for the before pictures. (Yes, those curtains are terrible in here - but they block the light.)

We contemplated scraping the (plaster?) off and smoothing it over, but since this is also not our forever home, it just wasn't worth the effort and expense. Instead we chose to paint everything one colour - including the chair rail - hoping that would draw the eye up and make the room look larger. We chose Benjamin Moore's Artic Seal.


A bit of a difference, isn't it? I wanted something dramatic that would still go with the neutrals throughout the rest of the house. We also gave the trim a coat of bright, white semi-gloss paint - a step up from the builders' beige already there.

That trim knocked us off schedule. As I was taping over the trim in anticipation of painting the room, I mentioned to Tom that the wood didn't feel as smooth as the trim in the hallway. I grabbed the can of paint and realized that I had used eggshell instead of semi-gloss. I sat there frozen for a minute, but I wasn't even a quarter of the way around the room with the tape so I figured it was easier to just rip it off and get a coat of the semi-gloss on now. (As an aside, Tom is taking full responsibility for bringing me the wrong paint - though I guess I should have read the can myself.) We could have just gone with the eggshell, but I like the feel of semi-gloss, and it's easier to keep clean when you have dogs throwing dirt all over the place.


So the paint is on the walls and I brought in some silvery-grey curtains from another room. But why aren't there more pictures? Because I haven't hung any art or even made the bed yet. After all this work I'm not showing you a half-finished room.


How about I leave you with the happy, almost-smiling crew at the end of Day 2. Aren't we adorable?


Feb 14, 2013

Valentine's Day for Him


I borrowed an idea from Rebecca and made Tom a little snacky gift for Valentine's Day. Nothing extravagant here, just something fun (and shouldn't Valentine's Day be all about the fun?)


I bought a package of jalapeno-flavoured peanuts at the grocery store, wrapped a ribbon around them, and attached a little note. I also added a red plastic heart-shaped ring that came on the top of my cupcake the other night. I'm pretty sure I licked all the icing off first.


I hid the package in his sock drawer so he would find it first-thing this morning. I was still snuggled in asleep with the dogs when he found it and came over to thank me. I think I scratched him behind the ear in response.


I have no idea what we're doing to celebrate this year. 
I'd be happy with Chinese food and TV-watching.  


And another cupcake of course.


Feb 12, 2013

Pallet Neglect


My newest project is really an old project. I've had this pallet "canvas" sitting in my garage since last summer. I'm sure it's been that long because I had Tom pick up an old pallet laying by the side of the road when he still had his little blue truck. And that's been gone since June. So there you go - 8 months. Way to get on things, Barb.


We're lucky enough (ha!) to have quite a bit of new home construction going on in the area so there are always old pallets nearby. And if you give them a couple of weeks, the elements will do most of the weathering for you. Not that I don't know how to weather some boards, but it's nice to have a bit of authenticity once in a while.

Tom let me know that since this was my project, I was going to have to take the pallet apart myself. A quick lesson on how to work a crowbar and off I went. I took it all apart, chose the best boards, and gave them a brief sanding. Then Tom screwed them together for me using a piece of plywood on the back. (The picture below is of the back, pre-plywood.)


This sign is going to go in the basement where I'm aiming for a beachy feel- lots of tans and soft blues. I dipped into my stock of mis-tinted paint and chose a greenish-grey colour. I watered down the paint a lot -so that as much of the real wood grain and colouring would come through as possible. This guy is rough looking right now, but I'm going to wax it when I'm all done.


So it was stripped, sanded, and painted. And that's when it sat. For months. Not because I forgot about it, but because I was dreading cutting out the stencil. This was going to be a BIG stencil. The biggest stencil I've ever made. And then a miracle happened. I got a Silhouette Cameo for Christmas. Yay!!! Oh. Now I have to get the sign done, don't I?


I've spent the last couple of evenings playing with fonts and spacing in Photoshop until I had what I wanted. And last night I got to cutting. While it would be nice to use the stencil plastic that came with the machine, I don't have nearly enough. I learned the hard way that you can't put construction paper through the Cameo without the cutting mat. It folds up like an accordion and the machine makes very unhappy noises. But if you use the mat, the paper then sticks and won't come off without ripping. Next idea? I moved on to my old standby - freezer paper. So much easier, if a bit thinner.

These first ones I cut are just a test run. I like the size but I think I'm going to cut some of the letters out individually (like the Y's) so that I can move them closer together.

It's all moving along well (a little too well), and I can't wait to get to the painting part of the program.


Have you made a pallet sign? 
Did it take forever? 
Was picking out what to say the hardest part?

Feb 11, 2013

Snow Falls on Sasha

This is my wordless Monday. Yeah I know, that's not great alliteration. But this picture makes me smile so much I just had to share.


I'll be back tomorrow with an update on my latest project. And we're painting the bedroom next weekend! Yay!

Feb 7, 2013

Chili Lime Chicken Wings

It's turning into a food-focused week, isn't it? Lord knows, I love to eat. And while I wouldn't say I love to cook, I do like trying new things. Something new I tried this past weekend was Chili Lime Chicken Wings. It's a recipe I found on Nom Nom Paleo, my go-to source for easy and interesting paleo-centric cooking.


I made two pounds of these and Tom & I ate them all in one sitting. Honestly, it was ugly. We might as well have been oinking at each other.

I didn't realize how good they were going to turn out or I would have taken pictures right from the start. Maybe I'll have to make them again and update with better pictures. Oh, the hardship. The steps are pretty basic though - you'll have to use your imagination and I'll explain as best I can.

You'll need:

2-6 lbs uncooked chicken wings
1/2 a medium onion, chopped
2 jalapeno peppers, seeds & ribs removed
2 tablespoons of minced garlic
1/2 cup cilantro (I used cilantro paste because the store didn't have fresh)
2 limes (zest and juice is needed)
black pepper
2 tablespoons fish sauce
2 tablespoons coconut aminos (you can substitute soya sauce if you aren't Paleo)
limes wedges for garnish


Get out your blender and toss in the onion, garlic, peppers, cilantro, pepper, fish sauce, and coconut aminos. Add the zest from the two limes plus a 1/4 cup of lime juice. Blend the whole thing together until you get a puree that looks like one of those "healthy" juicer drinks (Eat your veggies, people, don't drink them!)

Put your chicken wings in a bowl or a  sealable container and pour the mixture over the wings, making sure they're well coated. Yeah, they look kind of creepy and weird, but it'll all work out. Trust me. Cover the bowl or container and let the wings marinate for 1 to 12 hours in the fridge.


You can cook these in the oven or on a grill. They'll be sticky though so make sure you oil the grill first. Lay them out on a cookie sheet - or a rack if you're lucky enough to have one (I'm not) - so that they aren't overlapping.


I cooked them in the oven and even though I oiled the sheet they still stuck a little bit. Bake them for 30-40 minutes - flipping them halfway - or until they're crispy and brown.


Once they're cooked, plate them up and add lime wedges to garnish. Which I didn't do, but you're a better food stylist than I am, right?

You won't believe how good these are. You definitely have to have the time to marinate them, but it's so worth it!

Extreme wing close-up:

What's your favourite chicken wing recipe? 

Share in the comments, I'm always looking for something new.


~~~~~

I'm linking up here this week!


Feb 5, 2013

Chocolate-Covered Pretzels: Redux


***Note: this is a reposting of an entry from last year. Those of you new to these parts may not have seen it before, and those who have might still like seeing it again! I'm planning on making some new ones this weekend but I didn't want any of you to miss out on the chance to try them yourself before Valentine's Day, just in case I completely flub the deadline! Enjoy!***

~~~~~


I've got to admit that I've never been a big celebrator of Valentine's Day. I'm all for chocolate, but not the cards and flowers and hearts and pink and whatnot.  I'm just not that girlie I guess. Case in point: What I want for Valentine's Day? Private obedience training for the little dog. That's how you win my heart.

However, it's a co-worker's birthday this week (Happy Birthday Sue!) and I thought I'd make her a treat that ties in with Valentine's Day.


You only need three ingredients for this - pretzel rods, candy melts, and nonpareils (or any other topping that suits you).  I bought the melts and nonpareils at the bulk store for just a couple of dollars, and the pretzels were about 3 dollars for an entire bag.


You'll start be melting the "chocolate" in a double-boiler to keep it from burning. It stays soft for quite a while so you have lots of time to work with it. I had read about melting it in the microwave but all I ended up with was half blackened, half melted pink discs and a house that smelled like burnt marshmallows. 


Dip a rod into the melted chocolate - about halfway up - and spin it around to get an even coating. You then should wait a minute or two to let it cool a bit before adding the nonpareils. You can roll it directly into the nonpareils if you want a heavy coating, but I just held the rod over the bowl and sprinkled them by hand until I got the coverage I was looking for.


Here is my tester.  Looking good!


You will then need to set them down somewhere to cool. Our solution (thank you Tom) was to hang them over the edge of a dinner plate with a coffee mug sitting on the undipped end to weigh it down.

I ran out of nonpareils with two rods left so I improvised with crushed honey-roasted peanuts. Not as pretty but they still taste good. I also tried rice krispies (they looked like mini clubs) and chocolate chips (too heavy, wouldn't stick). 


Here are my finished pretzels. Pretty, hunh? And the mix of sweet and salty is always a winner.


I bought some long cellophane gift bags and put two pretzels in each, tied up with some pink and white ribbon. 


I'm loving these so much! Considering how easy they are to make I think I might whip some up the next time I need to bring a snack or a dessert to a get-together.


Did you try out any new Valentine's recipes this weekend? Try to burn the microwave up melting chocolate?  Was that just me?


~~~~~~~~~

Linking up here this week!
Related Posts Plugin for WordPress, Blogger...