SEARCH THE BLOG

May 27, 2013

Houston or Bust!

Hey, everyone! (or should I practice my y'alls?)

We're heading down to Houston, Texas next week for some fun in the sun. Apparently spring/summer got lost on its way to Canada so we're going looking for it.


We're going to be staying in Kemah, but travelling around to Galveston, Port Aransas, and San Antonio hopefully. We always overschedule ourselves (I'll take the blame for that) and misjudge how long it takes to get anywhere.


So who has recommendations for us? Things to do, places to eat, must-see sights? We love to be outdoors - I swear the last time we went to Hawaii we spent the whole week hiking - but we're also going to hit up the outlet malls.


The above picture kills me. There's not a chance my husband would look that happy while shopping. Not even at a sporting goods store. Maybe an ice cream shop - he definitely looks this happy when he's eating ice cream.


May 22, 2013

Nautical Kitchen Cabinet Hardware


We really are in the homestretch now with this kitchen update. I am currently painting the last three cupboard doors every morning and evening (backs in the morning, fronts in the evening), and hopefully they can be hung by the middle of next week. I think we're going to leave the backsplash as is. With the wall colour, the white cabinets, and the dark countertop, the yellow isn't all that bad. It just needs a really good scrubbing. It has a plaster texture and grime collects in the grooves if you don't keep on top of it (and we don't).

We have most of the hardware on now. So much nicer than using a piece of painters tape as a pull! After thinking we would have to head to Lee Valley to find something nice, we stumbled on handles and cup pulls at Target of all places.

The cup pulls are for the drawers and the handles are for the cabinet doors. They both have a brushed nickel finish with just a slight sheen. Nothing ostentatious, just hardworking dudes. I know the spacing between drawers is uneven; adjustments will happen eventually.

nickel plated cup pulls on white drawer

Tom used a hole guide from Lowe's to make sure the holes were evenly spaced and level every time. No way was I going to go through puttying and painting again.

nickel plated cup pulls on white drawer


The smaller drawers have one pull each, with the larger, longer drawers having two. We keep our pots and pans in these drawers so it's nice to be able to pull the drawer out evenly when it's so heavy.

nickel plated cup pulls on white drawer

The cabinet handles are called "nautical" on the packaging. I guess they are reminiscent of a boat cleat.

nickel plated nautical cabinet handle on white door

I like the raised detail at each end, and there is just a slight bend in the middle.

nickel plated nautical cabinet handle on white door

At first I thought I was going to want dark hardware - oil-rubbed bronze or something like that - but with the stainless steel appliances, these ones tie in much better. We're trying hard to make this windowless kitchen as light and bright as possible and the nickel just kicks it up one more notch.

I really can't wait to show off the whole thing. I thought this was only going to take a couple of months, but with changing our minds halfway through (and taking November & December off) it's been 8 long months.

May 15, 2013

Rebuilding a Deck

I'm still chipping away at the kitchen - the cupboard doors are back on! All that's left is to:

-sand and paint 3 lower doors
-paint the microwave shelf
-attach the handles and pulls

Then we have to do something about the backsplash and we're done. You can't believe how happy I'll be when it's all finished. I'm loving how it looks already.

One project I haven't shared with you is the deck we rebuilt last summer. This wasn't a complete start-from-scratch build, but more an overhaul of a bad original design.

The houses in our neighbourhood all come with a small 4'x6' deck with a set of steep stairs down one side. The previous owners extended the deck by putting on a 10'x10' addition, but with a 4-6" drop from the first to the second level. This drop made it feel as though there were two decks, with neither one really large enough to place furniture comfortably. This is the only photo I have of it before. There is no room to move; you can barely pull your chair back from the table without hitting a rail or the step up to the other section.


We decided a redesign - and slight expansion - was in order. This wasn't a "build your dream backyard space" project, more a "get the most bang for your buck" project. I think we spent over 6 months drawing and re-drawing our plans until we had something we were both happy with. I'll admit, I kept going for grand sweeping staircases, while Tom was picturing utilitarian steps and high railings.

We tore down all of the railings, took out the oddly placed flower box, and the stairs. You can see how dark and damp that corner by the stairs ended up most of the time. And we never used it for anything other than storing the garden hose and some tools.

deck renovation

deck renovation

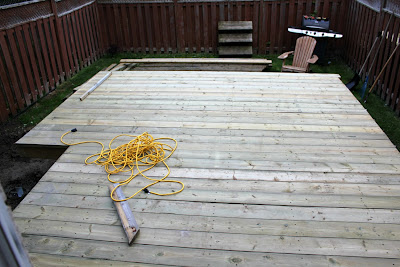
We then removed all of the deck boards and raised the lower deck up to be level with the top one. The previous support posts were attached to the concrete pilings with brackets so it was just a matter of jacking up the deck one corner at a time, removing the shorter posts, and attaching new, longer ones.

deck renovation

We couldn't really extend the length of the deck because our backyard is so small to begin with. While our neighbour decided to build a deck over his entire backyard (!!), we thought the dogs might appreciate having some grass to run around and do their business on.

Instead we extended the width of the deck. The previous "upper part" went from 6 feet to 10 feet wide and the "lower part" from 10 feet to 12 feet wide. Tom did this by building two box frames of 2x10's and attaching them to the existing joists and beams. Sounds kind of crazy but it is very secure.

Beside our deck, near where the stairs used to be is one of only two basement windows. I was insistent that we have a place to hang the hammock, but we didn't want to cover up a precious light source for the basement. We decided to build a lower deck that sat nearly on the ground, just under the window ledge. It runs from the upper deck to the fence and outwards about 10 feet.

First we had to tear out the bricks that were already laid. Then Tom dug 4 post holes for the concrete footings and support posts of the new deck. He filled the holes with concrete and inserted brackets for the posts (this is the building code in our area). He then installed the joists and beams, attaching them to the house with  a ledger board and metal connectors.

deck renovation

deck renovation

The one thing we wanted to make sure of was to reuse as many of the old deck boards as we could. A lot of them were in really good shape so it would have been a shame to just throw them away. We were able to use the old 10 foot boards on the lower section (it's about 6 feet wide) and a few on the section closest to the house. We only had to buy boards for the 12 foot section and to finish up the 10 foot section.

deck renovation

deck renovation

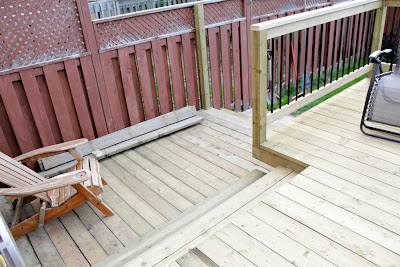
The two decks are joined to each other with wide steps (only two so we don't need a handrail!), and then there is another step down from the end of the lower deck to the ground. We wanted the descent to be gradual instead of a steep set of stairs. And making them wide opens up the space even more. (Ignore the unfinished edges - this is a "during" shot.)

deck renovation

We used some of the bricks that were removed from under the lower deck area to make a break when you step down from the lower deck to the ground. This area gets very little sun and the dogs are always stomping on it so no grass would ever grow there. We figured out our pattern, laid the bricks, and then finished with a layer of polymeric sand to lock the bricks in place.

deck renovation

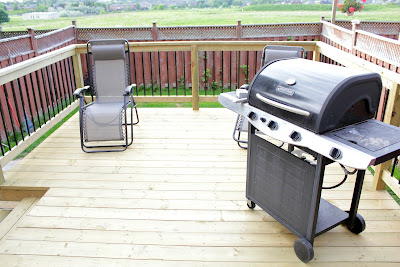
As for the deck railing, we used 2x4's for the upper and lower railing, with black metal balusters between. There are so many different designs for deck railings but we decided to keep it as simple as possible. Just a bottom rail, a cap rail directly on the top rail, and 4x4 rail posts. It was a serious test of my math skills calculating the number of balusters per section so that it looked good and followed the bylaws.

deck renovation

These balusters are so easy to install. You just install your top rail, then screw in the baluster connectors to your rail boards, pop the balusters onto the top rail connectors, and then install the bottom rail, squeezing the balusters in between.

installing balusters

installing balusters

installing balusters

These pictures always make me laugh. You can see the smile on Tom's face in the middle shot and - spoiler alert! - the metal level sitting on the rail above him. It was pretty late by the time we got to this part and getting dark fast. Just after the bottom picture was taken, the level fell on Tom's head. He swore REALLY loudly. I told him to shush because it was so late and I didn't want the neighbours to hear. I'm horrible and didn't even ask if he was okay. Our neighbours told us later that all they heard was, "#$&*%@!!!!!",  and then, "Shhhhh! We have neighbours!", and then, "The level fell on my head!" They thought it was hilarious and weren't offended at all.

The black metal gives the deck a much more upscale look than the old wooden pickets ever did. And even though we only added a few square feet to the upper deck, it feels like it's doubled in size.

deck renovation "after"

deck renovation "after"

We sold the old patio table and chairs and replaced them with a seating area that is more our style - a loveseat, two chairs, and a low table. We added a large umbrella behind the loveseat, and I accessorized with my terrycloth pillows. On the lower deck we have an Adirondack chair with a little side table (not the one shown) for anyone who would like to stay in the shade. There is even room for the barbecue just outside the sliding door.


deck renovation "after"

As for the hammock? Tom attached a boat cleat to the wall of the house and a hook to a 4x4 post installed at the bottom corner of the lower deck. The hammock hangs at a diagonal across the deck giving us the greatest length possible. When it's open you can still walk past it to the backyard, and yet it swings freely without bumping into the deck railing, the chair, or the fence.

deck renovation "after"

This was one of our first big projects at this house and I'm so happy we did it. Before, we hardly spent any time out here, but now it's one of our favourite places to be. We worked so hard on this deck, doing everything ourselves, but I think that makes us appreciate it even more.

deck renovation "after"

deck renovation "after"

And the dogs love it too. You have to fight Chloe for a seat (usually the loveseat), and don't even think about lying in the hammock by yourself if Sasha's in the area.

Chloe on the deck

Sasha in the hammock

And don't forget our DIY fold-up bar. Duffy's Bar & Grill is now open!

deck renovation "after"


~~~~~

I'm linking up here this week! You should too!

May 8, 2013

Strawberry Cheesecake Streusel Muffins


I haven't been doing a lot of baking or cooking lately. Just the bare minimum to keep us from falling over in hunger. And with our cupboard doors & drawer fronts covering every available surface, there isn't much room to get creative anyway.

But these muffins made me change my mind. I first saw them on The Recipe Critic, and I couldn't help but be drawn to words like "pockets of jam" and "cheesecake". Plus I had all of the ingredients in the house. At the same time. That's a miracle in itself.

Strawberry Cheesecake Streusel Muffins

I'm trying out this recipe as part of the spring Pinterest Challenge, created by Katie Bower (Bower Power) and Sherry Petersik (Young House Love), with help this time from Emily West (Sparkle Meets Pop) and Renee Starzl (RedBirdBlue).


The Pinterest Challenge is a get-off-your-butt-and-make-that-thing-you-pinned motivational party that's been going on for a couple of years now. For past challenges I've made a fold-up patio bar, photo bottles, yarn-wrapped eggs, a poop factory dog costume, and most recently I tried my hand at cerusing a nightstand.

This recipe truly is easy, though you will need several bowls to mix up the different parts. And it takes twice as long if you're constantly taking pictures - most of which you don't end up using. You do that too, right?

Strawberry Cheesecake Streusel Muffins


What you'll need:

For the muffin batter:

2 cups all purpose flour
1/2 cup sugar
2 tsp baking powder
1/2 tsp salt
1 egg
1/4 cup oil (I used sesame)
1 cup milk
1 tsp vanilla extract
2 cups strawberries cut into small pieces

For the cream cheese filling:

4 ounces cream cheese
1/3 cup sugar
1/2 egg, beaten
1 tsp vanilla extract

For the cinnamon streusel:

1/4 cup all purpose flour
1/4 cup sugar
1 tsp cinnamon
3 tbsp butter


Preheat your oven to 350 degrees and line a muffin pan with cupcake liners or just grease the pan really well.

In a mixing bowl, sift together the flour, baking powder, and salt. Set aside. In another bowl, beat the milk, oil, vanilla extract, egg, and sugar. Add the dry ingredients to the liquid mixture slowly. Do not stir too much.

In a third bowl, beat the cream cheese, egg, sugar, and vanilla together until smooth. Set aside.

Fourth bowl. Yes, fourth. To make the streusal topping, mix together the flour, sugar, and cinnamon. Using a fork, blend in the butter until it looks like coarse sand. Mine turned out a little creamier than I think it was supposed to be, possibly because I used margarine instead of butter so it softened quickly. No matter though, it will still taste good.

Now you're going to "build" the muffins. Scoop a tablespoon of the muffin batter into the bottom of each cupcake liner. Sprinkle a few pieces of strawberries, then add about 1/2 tablespoon of the cheesecake mixture. Sprinkle some of the cinnamon streusel topping on the cheesecake filling, followed by another layer of the muffin batter. Add a few pieces of strawberries on the top and finish with another sprinkle of the cinnamon mixture. You can be pretty heavy-handed with the berries if you want - I was and had plenty to make 18 muffins.

Strawberry Cheesecake Streusel Muffins

Bake for 20-25 minutes or until a toothpick inserted into the center of the muffin comes out clean.  Let cool in the pan or on a rack.

Strawberry Cheesecake Streusel Muffins

Look at all that berry goodness. These muffins are very moist in the middle and they have the perfect amount of sweetness. I made a few of them with a mix of strawberries and blackberries too. I think they're even better.

Strawberry Cheesecake Streusel Muffins

There are so many flavours going on - berries, cheese, vanilla cake, cinnamon. It's like the old Bits & Bites commercial - every handful bite is different. I'm afraid these didn't last very long in our house. Luckily (or not so luckily), I don't have any more cream cheese so I can't make another batch right away.


Strawberry Cheesecake Streusel Muffins


Strawberry Cheesecake Streusel Muffins

Now, head on over to each of the hosts' pages (go to the links at the top) and see what everyone else challenged themselves with this week. Or link up your own Pinterest Challenge project - we all need a challenge once in a while.


~~~~~

I'm also linking up here this week!


Related Posts Plugin for WordPress, Blogger...