SEARCH THE BLOG

Showing posts with label Pinterest Challenge. Show all posts

May 8, 2013

Strawberry Cheesecake Streusel Muffins


I haven't been doing a lot of baking or cooking lately. Just the bare minimum to keep us from falling over in hunger. And with our cupboard doors & drawer fronts covering every available surface, there isn't much room to get creative anyway.

But these muffins made me change my mind. I first saw them on The Recipe Critic, and I couldn't help but be drawn to words like "pockets of jam" and "cheesecake". Plus I had all of the ingredients in the house. At the same time. That's a miracle in itself.

Strawberry Cheesecake Streusel Muffins

I'm trying out this recipe as part of the spring Pinterest Challenge, created by Katie Bower (Bower Power) and Sherry Petersik (Young House Love), with help this time from Emily West (Sparkle Meets Pop) and Renee Starzl (RedBirdBlue).


The Pinterest Challenge is a get-off-your-butt-and-make-that-thing-you-pinned motivational party that's been going on for a couple of years now. For past challenges I've made a fold-up patio bar, photo bottles, yarn-wrapped eggs, a poop factory dog costume, and most recently I tried my hand at cerusing a nightstand.

This recipe truly is easy, though you will need several bowls to mix up the different parts. And it takes twice as long if you're constantly taking pictures - most of which you don't end up using. You do that too, right?

Strawberry Cheesecake Streusel Muffins


What you'll need:

For the muffin batter:

2 cups all purpose flour
1/2 cup sugar
2 tsp baking powder
1/2 tsp salt
1 egg
1/4 cup oil (I used sesame)
1 cup milk
1 tsp vanilla extract
2 cups strawberries cut into small pieces

For the cream cheese filling:

4 ounces cream cheese
1/3 cup sugar
1/2 egg, beaten
1 tsp vanilla extract

For the cinnamon streusel:

1/4 cup all purpose flour
1/4 cup sugar
1 tsp cinnamon
3 tbsp butter


Preheat your oven to 350 degrees and line a muffin pan with cupcake liners or just grease the pan really well.

In a mixing bowl, sift together the flour, baking powder, and salt. Set aside. In another bowl, beat the milk, oil, vanilla extract, egg, and sugar. Add the dry ingredients to the liquid mixture slowly. Do not stir too much.

In a third bowl, beat the cream cheese, egg, sugar, and vanilla together until smooth. Set aside.

Fourth bowl. Yes, fourth. To make the streusal topping, mix together the flour, sugar, and cinnamon. Using a fork, blend in the butter until it looks like coarse sand. Mine turned out a little creamier than I think it was supposed to be, possibly because I used margarine instead of butter so it softened quickly. No matter though, it will still taste good.

Now you're going to "build" the muffins. Scoop a tablespoon of the muffin batter into the bottom of each cupcake liner. Sprinkle a few pieces of strawberries, then add about 1/2 tablespoon of the cheesecake mixture. Sprinkle some of the cinnamon streusel topping on the cheesecake filling, followed by another layer of the muffin batter. Add a few pieces of strawberries on the top and finish with another sprinkle of the cinnamon mixture. You can be pretty heavy-handed with the berries if you want - I was and had plenty to make 18 muffins.

Strawberry Cheesecake Streusel Muffins

Bake for 20-25 minutes or until a toothpick inserted into the center of the muffin comes out clean.  Let cool in the pan or on a rack.

Strawberry Cheesecake Streusel Muffins

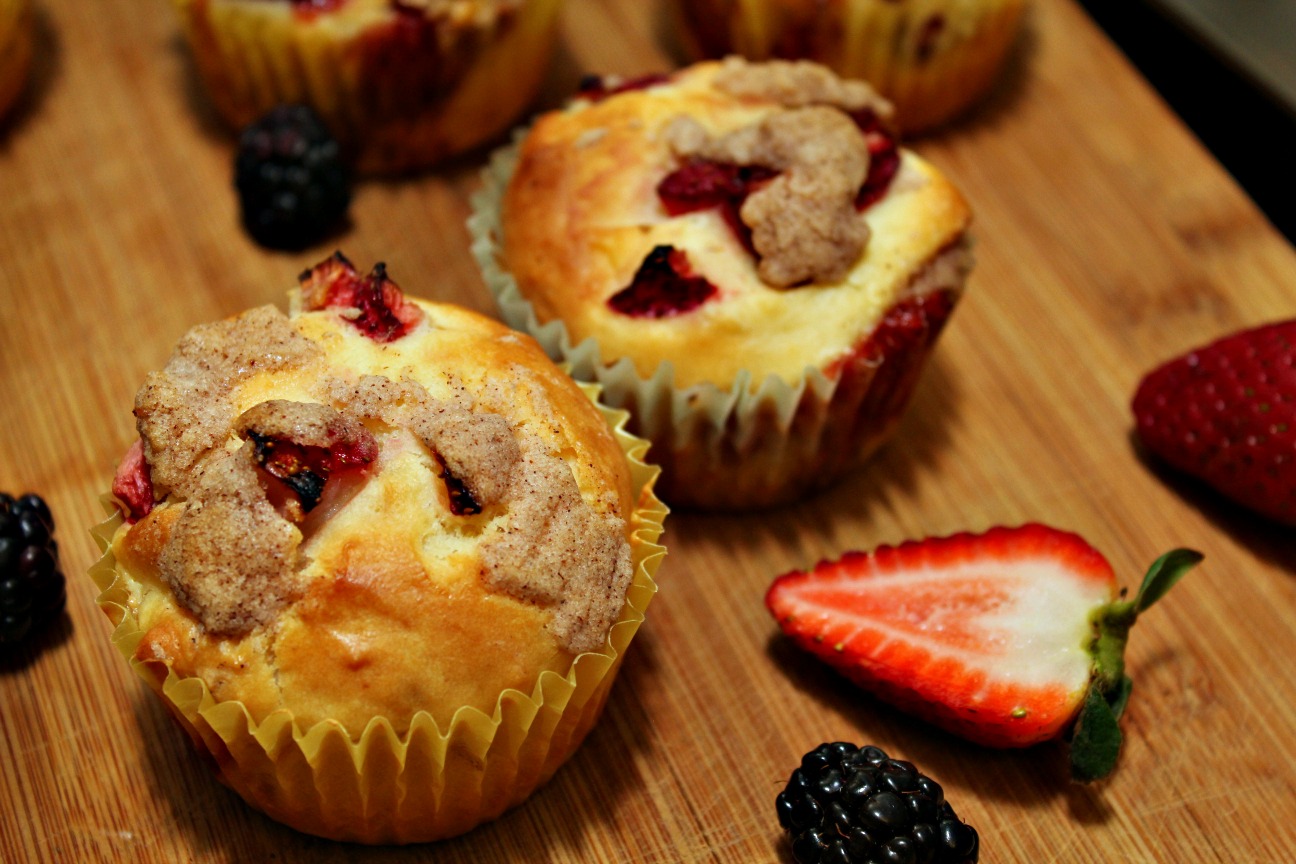
Look at all that berry goodness. These muffins are very moist in the middle and they have the perfect amount of sweetness. I made a few of them with a mix of strawberries and blackberries too. I think they're even better.
Strawberry Cheesecake Streusel Muffins

There are so many flavours going on - berries, cheese, vanilla cake, cinnamon. It's like the old Bits & Bites commercial - every handful bite is different. I'm afraid these didn't last very long in our house. Luckily (or not so luckily), I don't have any more cream cheese so I can't make another batch right away.


Strawberry Cheesecake Streusel Muffins


Strawberry Cheesecake Streusel Muffins

Now, head on over to each of the hosts' pages (go to the links at the top) and see what everyone else challenged themselves with this week. Or link up your own Pinterest Challenge project - we all need a challenge once in a while.


~~~~~

I'm also linking up here this week!


Feb 26, 2013

Cerusing Nightstands (Hunh?)


It's time once again for another Pinterest Challenge - winter edition this time.  The Pinterest Challenge is a get-off-your-butt-and-make-that-thing-you-pinned declaration started by Sherry from Young House Love and Katie from Bower Power.  This edition is also co-hosted by Megan from The Remodeled Life and Michelle from Decor & the Dog.


I've participated a few times before - check out my photo bottles, yarn eggs, fold-up patio bar, and my favourite - the poop factory costume for the ever-patient Chloe.

This time I wanted to try something a little bigger, though since I can only do this DIY stuff on the weekends it couldn't be too big. How about a little nightstand makeover?

My go-to method of refinishing wood is to sand it down, wipe on dark stain, wipe on watered-down paint, and then wax and buff it to a shine. I love the results - every time it turns out a little different depending on the stain and paint colour I choose. If you'd like to see some of my past results go here, here, and here.

But colour me surprised when I found out there is a name for this method - it's called "cerusing". Except there is one additional step - you use a wire brush on the wood before staining and painting so that the paint gets right in the grooves. When you wipe off the excess paint, you get little spots of paint left behind. It's a great way to camouflage imperfections in the wood when you can't sand the heck out of it (like with wood veneer).

I first saw this on The Ridiculous Redhead and had to pin it. I love the results I've had so far, but paint in the grooves would add some extra depth that's been missing.

This is the nightstand that volunteered for the makeover. Plain, serviceable, nothing to write home about.

Nightstand - cerusing furniture

Someday we'll build ones that we love, but the to-do list is so long right now that it won't be any time soon. I'm not a fan of the orange stain and the top has some pretty bad water damage. But the body/frame is real wood, although with particle board/veneer on the top and thin plywood on the sides. Materials that make sanding an adventure.

Nightstand - cerusing furniture

Do you know that I sanded them in the bathroom? Well now you do. I didn't want to go out to the freezing cold garage - we have a kerosene heater there but it burns my eyes after only a few minutes - and I didn't want fine stain/lacquer dust all over the house, so I chose the bathroom. The tiny, tiny bathroom. Pretty brilliant, I think. It only took about 90 minutes to completely strip each nightstand, though every surface in the room ended up covered in dust. And I sanded them on two different nights so I ended up cleaning the bathroom from top to bottom twice in one week. It's the hard-knock life.

They look pretty good naked, don't they? Tom thought I should leave them like that. Does he not know me at all? There's experimenting to do, y'all!

Nightstand - cerusing furniture

I used a wire brush to scuff up the wood - in the direction of the grain - on every surface of the stand. The veneer looked pretty cool because the brush would take out little divots rather than make big scratches. Don't forget to lightly sand again to smooth down the edges of the grooves when you're done.

Nightstand - cerusing furniture

I used a cloth to apply a thin coat of stain - Jacobean by Minwax - and then once it was dry applied a coat of "whitewash paint" with a new cloth. The colour I used was a mistint from the Habitat for Humanity ReStore - sort of a taupe-y shade with almost a pink undertone.

Nightstand - cerusing furniture

Nightstand - cerusing furniture

This might be the point at which I admit that this was a cerusing failure. The paint didn't appear to be in any grooves, it just looked like it always does (which is fine, but not what I was going for). I thought it might be too light - kind of a barn-board colour - so I added another coat of stain, but with a foam brush this time, and I let it dry without wiping. Once that was dry, I wiped on another coat of whitewash and then scrubbed it down, trying to mimic a wood-grain effect. Much better. Still not ceruse but I liked it. Two coats of Minwax paste wax and some buffing later, you have the final product.

Nightstand - cerusing furniture

But wait! There's more. I didn't want to sand the inside of the nightstand - thin plywood, remember - but I also didn't want the old orange to show. So we built a door for the front of each that swings to the side and is attached with exposed trunk-style hinges. We swapped out the silver knobs for black handles as well. Lee Valley Tools has the most amazing selection of hinges and handles - everything from basic knobs to fancy shapes and hammered metal.

cerused nightstand

To make sure the door stays closed, Tom inserted a crosspiece below the drawer and screwed in a flathead screw flush to the wood at one end. He then countersunk a magnet in the back of the door that lined up with the screw and keeps the door closed when you want it to be. I applied a thin coat of wood putty over the magnet and the screw to make them less visible.

Nightstand - cerusing furniture

cerused nightstand

I'm thinking the door might eventually get a freezer paper stencil, but for now I'm pretty pleased with the results. The grey tone is more our style and it makes the nightstand look a little less factory-produced.

Nightstand - cerusing furniture

How about a little before-and-after?

cerused nightstand

I'm going to call this a win and keep practicing my cerusing skills.

Nightstand - cerusing furniture

Nightstand - cerusing furniture

Nightstand - cerusing furniture


Now head on over to the host sites and see what everyone else was up to this week!

~~~~~

I'm also linking up here this week!


Oct 29, 2012

Poop Factory (That's Right, I Said It)

How far are you willing to go to embarrass your dog? 
I'm willing to go pretty far as it turns out. 

This is Miss Chloe showing off her primary function in life.

Poop Factory Dog Costume

We've been dressing our dogs up for Halloween for years. I'm pretty sure they enjoy it as much as we do. They would say something, wouldn't they? Of course they would.

This particular costume idea has been floating around the internet for a couple of months and I kept it in the back of my mind (and pinned on Pinterest) for when I finally got my butt in gear to make something.

Thank goodness the fall edition of the Pinterest Challenge showed up to force me into action. (Not like October 31st was a deadline or anything.) 


The Pinterest Challenge is a fun project thought up by Sherry from Young House Love and Katie from Bower Power (with co-hosting assistance from Carmel from Our Fifth House and Sarah from Ugly Duckling House). So often we just pin and pin and pin - this challenge makes us stop pinning and start doing.

I love Pinterest, and I love showing what I've made after being inspired, so you know that if someone flat-out ASKS if I want to show off I'm not going to say no. For past challenges I've made yarn-covered easter eggs, vacation photo bottles, a fold-up patio bar, and the ever-popular pinecone map ornament.

easter eggs photo bottles pinecone map ornament - turtlesandtails.blogspot.com

Now to be completely honest, I missed the deadline for the map ornament, and it was really inspired by something Sherry was inspired by on Pinterest. But I think that counts, doesn't it?

This time, my inspiration comes from this picture I pinned from an internet photo site. I've looked around and found other versions - here and here - but none of them link to an original source. If you own one of the adorable dogs in the pictures - thank you.

The poop factory costume itself is pretty straightforward - a cut up cardboard box decorated to look like a building. I decided on red brick (red construction paper) to provide a contrast to Chloe's colouring. This turned out to be Chloe's costume because Sasha ran away every time the box came near her. So much for being our brave little toaster.

I used 3 sides of a squarish box, with the sides that hang down shortened to a length that didn't bump the dog's legs when she walked. The perpendicular flap edges were taped to each other with packing tape, and then I covered the sides in red and the top in black paper using craft glue.

Poop Factory Dog Costume

While I made windows and doors out of more construction paper, Tom drew in the bricks for me. I added a bit of scalloping along the roof edge with black poster paint, to blend the seam between the top and the side.

Poop Factory Dog Costume

Poop Factory Dog Costume

Each of those twelve window frames is made from one piece of black paper - I cut out each of the window panes using an x-acto knife and then put white paper behind them. By the third one I was so over it. Until I realized I could cut multiple windows at the same time just by stacking them. Duh.

The font I used for the factory name is called Quentin Caps - found on PicMonkey. It's fun - sort of carnival-like - even though the outlined letters tend to look out of focus from far away. That's what I'm blaming it on anyway.

Poop Factory Dog Costume

The smoke stacks are toilet paper tubes covered in more black paper. I fanned out the bottom of each tube and glued it to the roof, and then cut a ring out of black paper and slid it down over the tube to cover the fanned out part. The "smoke" is some polyester stuffing I usually use for pillows.

Poop Factory Dog Costume

Poop Factory Dog Costume

I was going to use some stuffing from one of the dog toys, but I looked around the house and all I could find were toy carcasses - no innards anywhere. It all kind of circles back you know, because Sasha likes to eat the stuffing and then it gets pooped out. And the factory is a poop factory with stuffing coming out of the smoke stacks. Get it? Get it? Ahaaaaaa-haaaaaa!

I used black grosgrain ribbon for straps. There is one strap that loops across Chloe's chest to keep the box from sliding backwards and then two straps that tie underneath her stomach in a bow to keep the box upright. I used hot glue to attach them to the box (not to the dog) as I didn't think craft glue would hold for long and I didn't want staples to show through.

Poop Factory Dog Costume

She looks pretty awesome, right?

And it's a fully functioning factory. 
Unfortunately you never know when they're going to make a delivery.

Poop Factory Dog Costume

(She didn't really poop, she was just sitting down.)

And sometimes your employees go on strike and refuse to work any longer.

Poop Factory Dog Costume

So you convince replacement workers to step in.

Poop Factory Dog Costume

But not for long (one picture only) because they run all over the building and tear their safety harnesses right off the factory wall. Yes, thanks to our moose-ance the straps have to be glued back on.

(She looks like a stubby little corgi from this angle. Please don't think I overfeed ma dawg. She's a skinny little butterpants under there.)

Do you dress up your dog for Halloween? Or for any other occasions? We also have headbands for Easter, Canada Day, and Christmas. 

Poop Factory Dog Costume

Poop Factory Dog Costume

Poop Factory Dog Costume

Poop Factory Dog Costume

Poop Factory Dog Costume

Poop Factory Dog Costume

This is one happy dog. 
I've come to the conclusion that she can't read.

Come back Wednesday for a round up of all our dog costumes over the years.

~~~~~

Thanks to Sherry, Katie, Carmel, and Sarah for hosting this edition of the Pinterest Challenge. Head on over to each of their sites (links are up above) to see what everyone else has been up to and post your own Pin-spiration.

And don't forget that my Ramsign House Number Sign Giveaway is still going on. You have until Friday at 8pm to enter. But don't wait until the last minute! I really want you to win!

Ramsign - house number sign


~~~~~~

I'm linking up here this week!


Jul 10, 2012

Photo Bottles

I think you're all familiar with my love of glueing twine to things - exhibit A, exhibit B, and exhibit C. I also love taking photos while on vacation. So when I came across a project by Kirstin at Craftiments.com that combined these two things, I knew I had to copy it.

And it came just in time for the summer edition of the Pinterest Challenge, hosted by Sherry at Young House Love and Katie at Bower Power. The Pinterest Challenge is a get-off-your-butt-and-make-that-thing-you-saw-on-Pinterest call to arms. This edition is also being co-hosted by Kate at Centsational Girl and Michelle at Ten June.

Pinterest Challenge - summer edition


Head on over to their sites to see what everyone's been up to, and to add your own project if you'd like. I can't wait to see the other projects - this challenge always results in a dozen more inspirational pins.

So let's get to it shall we?

This is the project I decided to tackle. And here is my inspiration. Isn't that photo bottle gorgeous? I love the old-time feel of the black and white photo, and the added texture the twine gives it.

Photo bottles

I had so many different bottles stored away that I couldn't limit myself to just one. Not to mention the thousands of pictures I had to choose from - every one is a winner, right?

I started with a plain clear wine bottle, washed and with the label removed.

Photo bottles

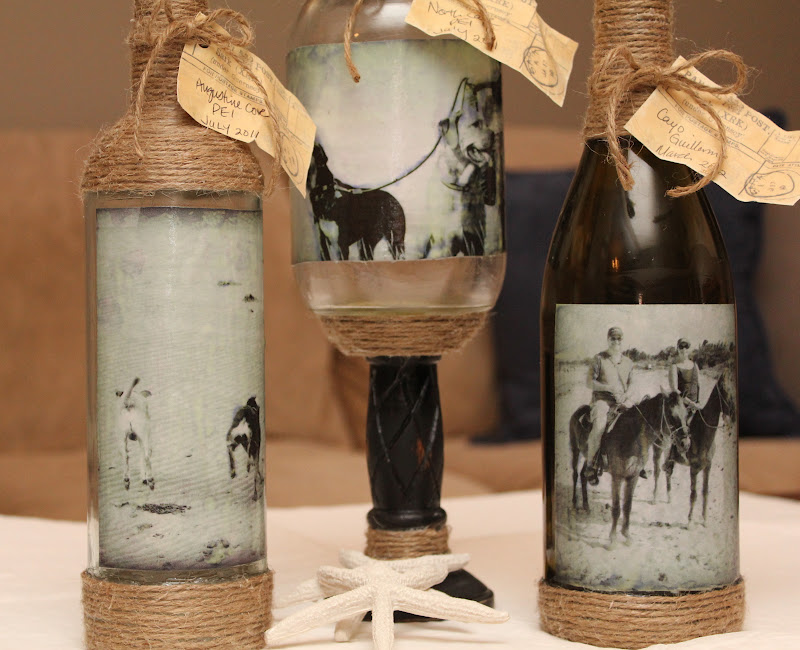
I printed out some of my favourite pictures, editing them as black and white with a vignette border. The two pictures of the dogs are from our trip to PEI last summer, and the photo of Tom & me is from our recent trip to Cuba. How cute is that shot of the dogs bouncing across the sand? They were in heaven.

Photo bottles

I began by hot-glueing the twine to the bottle starting from the bottom - about 12-15 rows. I then repeated it starting at the top and wrapping downwards.

Photo bottles

I added sand to one of them to give it some weight. It's also cool because the sand in the bottle is from the same beach as the dogs are running across in the picture.

Photo bottles

I will admit that the picture is mod podged onto the bottle rather than it being inside. The photo was being stubborn and wouldn't uncurl. I got frustrated and slapped some glue on it, and then sprayed it with a high gloss finisher. I'd like to do some more and actually put the photos inside next time.

Photo bottles

The tall bottle is a mason jar glued to a candlestick, with a finial attached to the top of the lid. It started out as an apothocary jar project but I never got around to refinishing the wood. I had painted it, then started to sand it off because I didn't like it, but then never went back to it. The worn, half-sanded finish fits in perfectly with this beachy, rustic look.

Photo bottles

I found the pattern for the tags with google and printed them on coloured cardstock. I then wrinkled them up and sanded the edges to give them a more aged look. The tags state the name of the beach and the date the photo was taken.

Photo bottles

This project was a lot of fun and one I would like to repeat as we take more vacations. The one benefit of having the photo on the inside is that it can be swapped out when you stumble across a new favourite.

Photo bottles

Photo bottles

Photo bottles

Photo bottles

Photo bottles


(the "beach" frame in some of the pictures is from this project)


~~~~~

I'm linking up here this week!


Related Posts Plugin for WordPress, Blogger...